Access eLab Order
 Tip: Before processing an eLab, verify the patient's demographics, insurance information, and guarantor is up to date. Tip: Before processing an eLab, verify the patient's demographics, insurance information, and guarantor is up to date.
- Hover over the Clinical icon and click on Labs/Studies. The Labs/Studies page opens.
- Click Pending. Pending lab orders displays.
- Click Create eLab. The Create Order pop-up window opens.
|
 |
Process eLab Order
- Review and edit the lab type, as necessary.
- Order Type: By default, Order is selected.
Note: To indicate that the specimen will be drawn later at the lab, set the Collection Date to a future date.
- Bill Type: The lab order is billed to the responsible party listed on the patient’s chart (e.g., insurance). If applicable, click to change the responsible party. Available options:
- Client: The lab bills the practice.
- Patient: The lab bills the patient.
- Third Party: The lab bills the patient's insurance.
- Cancel Order: If necessary, click to cancel the lab order. Enter the reason for cancellation in the pop-up window and click Cancel Order. Then, click X to close the window.
- Review and edit the order information, as necessary.
- Ordering Provider: By default, the ordering provider from the create lab window populates. If applicable, click to select a different provider.
- Lab: If the provider is enrolled with multiple labs, click to select which lab the order will be sent to.
- Review and edit the patient details, as necessary.
 Important Note: Changes saved in the lab order window will not update the patient's chart. Important Note: Changes saved in the lab order window will not update the patient's chart.
- To edit the Patient Demographics, Guarantor, or Insurance, click Edit next to the section. Make the changes and click Save when finished.
- Click Next when finished. The Tests tab displays.
|
 |
- Add lab test(s) by searching, selecting from the recent lab list, or select a test group.
- To search for a test, enter the test name or order code in the Search Tests field and select from the list of results.
- To select from the patient's recently ordered test(s) with the lab, click to select from the top section of the list.
Note: The top section is only available if lab tests were previously ordered for the patient from the selected lab.
- To select a test group, click to select the test group name.
- To preview which tests are included in the group, click the plus icon.
- To create a new test group for the selected lab, click Manage Test Groups.
- To select recently ordered test(s) with the lab, click to select from the list.
Note: The list automatically displays tests frequently or recently ordered by the practice and cannot be edited.
- Click Next when finished. The Diagnosis tab displays.
- If the selected test is an Ask at Order Entry (AOE) test, the Clinical tab displays. Select applicable answers, then click Next to proceed.
|
 |
- The patient's diagnosis is auto-populated from the create lab window. If applicable, remove or add additional diagnoses.
- To remove the diagnosis, click to clear the selected diagnosis.
- To search for a diagnosis, enter the code name or number Search Diagnosis field and select from the list of results.
- To select from the patient's recent diagnosis with the lab, click to select from the top section of the list.
Note: The top section is only available if a lab was previously ordered with the diagnosis for the patient from the selected lab.
- To select from the recent diagnosis list, click to select the diagnosis.
Note: The list automatically displays diagnoses frequently or recently ordered by the practice and cannot be edited.
- Click Next when finished. The Review tab displays.
- If an Advance Beneficiary Notice of Non-coverage (ABN) is required, the Coverage tab displays. Review the Medical Necessity Checks and resolve as applicable. Then, click Next to proceed.
|
 |
- Review and edit the lab details, as necessary.
- Order Date: The current date and time displays. If applicable, enter a different order date and/or time.
- Coll. Date: The current collection date and time displays. If applicable, enter a different collection date and/or time.
- Coll. by: The current user logged in displays. If applicable, enter a different collector.
- Priority: By default, Routine is selected. If necessary, click to select Stat or Timed.
- Copy to: To send a copy of the lab order results via email, fax, paper, or call to another provider, click Add. The Ordering Provider pop-window opens.
- Result CopyTo Option: By default, Paper is selected. To change the send option, click to select Email, Fax, or Call.
- Common List: If applicable, click to select a previously copied provider. The previously entered information displays.
- Provider Details: Enter the provider's First and Last Name, NPI, Code, Country, Address, Phone, Fax, and Email as applicable.
Note: The required fields may vary based on the selected copy to option.
- Click Save to Order when finished.
- Referring: To document the referring provider in the lab order, click Add. Enter the provider's First and Last Name in the pop-up window. Then, click Add.
Note: Referring provider(s) added to the lab order will not be added to the practice's referring provider list.
- Diagnosis: Displays the selected diagnosis. If edits are necessary, go back to the Diagnosis section to update.
- To go back to the Diagnosis section, click Back until the Diagnosis section displays or click Diagnosis in the navigation bar.
- Test Specific Information: Displays the selected test(s). If edits are necessary, go back to the Tests section to update.
- To go back to the Tests section, click Back until the Tests section displays or click Tests in the navigation bar.
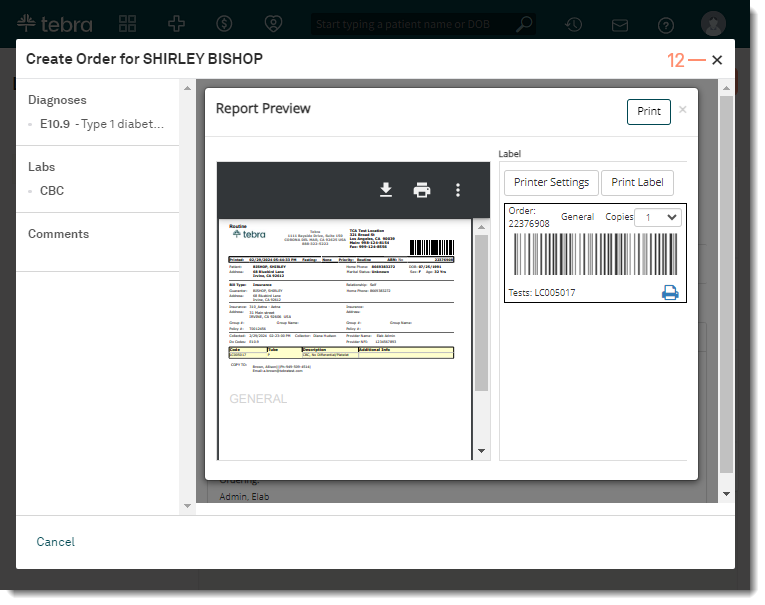
- Click Completed when finished. The Report Preview pop-up window opens.
|
 |
- If applicable, print a copy of the lab order or a label.
- To generate a PDF of the electronic lab order, click Print.
- To generate a label, click Print Label.
Note: The user's device must be connected to a label printer (e.g., Dymo) to generate a label. Labels are saved as an attachment in the pending lab order for clinical staff members to view and print again as necessary.
- Click the X to close the lab order window. The lab status is now Pending under Labs/Studies and in the patient's chart. Once results are received, the provider can review and sign the lab.
Tip: Refresh the Labs/Studies page to show the updated lab status.
|
 |