Updated: 04/17/2025 | Views: 25231
Custom Forms reduces the amount of time required for a patient to receive clinical care, eliminate the need for paper printing and storage, eliminate paper mistakes and mishandling, and reduce office staff's time administering paperwork so they can focus on keeping the practice profitable and full of patients. System administrators can create custom forms to send to patients through the Patient Intake workflow. The front office staff can choose which forms to send to the patient when scheduling an appointment.
Forms are customizable for your practice's needs. Enter your own formatted content, ask questions, and allow the patient to sign electronically. The forms will be stored in the patient's documents eliminating the need to print, scan, and upload paper forms.
Note: You are responsible for ensuring that all forms created meet your requirements and applicable laws. Tebra is not liable for your use of the Online Intake - Custom Forms feature, including form content, legal compliance, patient information, or decisions based on form data.
Available for Engage subscribers and accounts with access to Patient Intake.
Access Create Form
- Hover over the User icon, and click on Practice Settings. The Practice Settings page opens.
- Click Patient Intake. The Patient Intake settings page opens.
- Click + Create Form. The Form Name pop-up window opens.
- Enter a Form Name. This is a unique name for the staff to quickly select which form they would like to view or send to the patient.
- Click Save Form. The Edit form page opens.
|
 |
Create Custom Form
- Click Form Title to open the Edit panel.
- Enter a form title that displays on the patient's form. Then, click the X icon to close the panel.
|
 |
- By default, a Paragraph field displays. Click the Paragraph to open the Edit panel.
- Enter content and format as applicable. Then, click the X icon to close the panel.
- Available formatting options:
- Normal, Header 1, Header 2, or Header 3
- Bold, italicize, or underline
- Hyperlink
- Numeric or bullet list
- Clear text formatting
- To remove the paragraph field, click Delete.
- Continue to customize the form by adding additional fields and/or reordering the fields.
- Click Save Form when finished. The front office can now send the form to the patient through the Patient Intake workflow.
Note: Custom forms cannot be deleted once saved. If the content is incorrect, edit or archive the form.
|
 |
Customize Form
Further customize the layout of the form by adding or reordering fields. The following steps are optional.
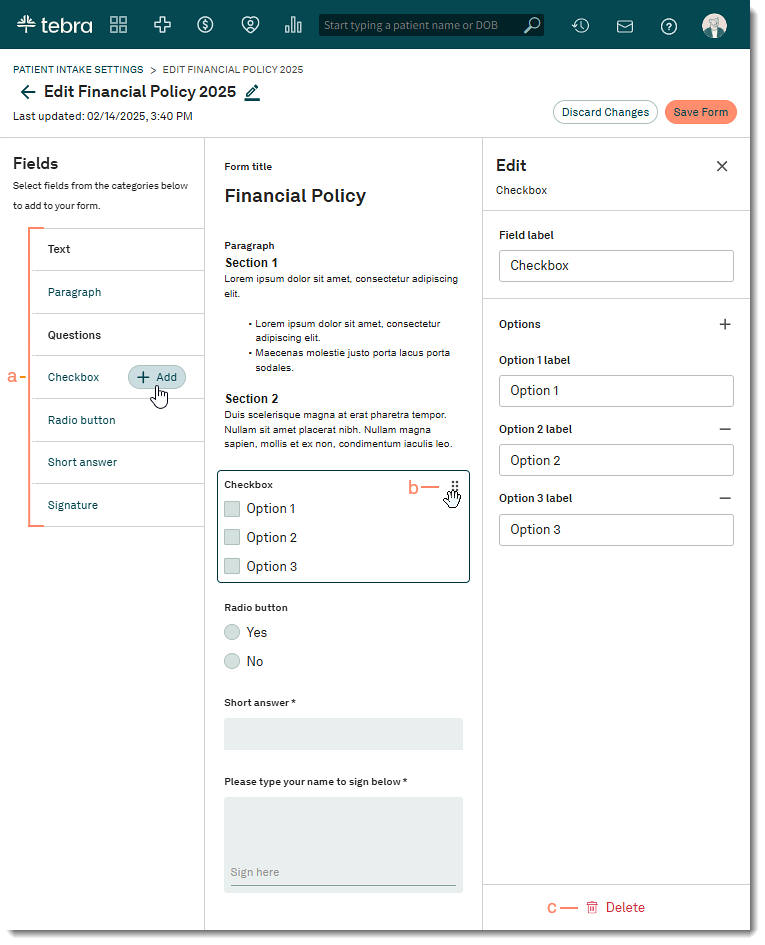
- Add Field: Hover over the field name and click + Add. The field displays and the Edit panel opens. Customize the field and click the X icon to close the panel. Add as many fields as applicable. Available field options:
- Paragraph: Add a paragraph block to enter formatted content. Available formatting options:
- Normal, Header 1, Header 2, or Header 3
- Bold, italicize, or underline
- Hyperlink
- Numeric or bullet list
- Clear text formatting
- Checkbox: Create a multiple choice question or questionnaire. Add up to 100 options per question for patients to select when completing the form.
Note: Patients are not required to complete sections with checkboxes.
- Field label: Enter a label that displays on the patient's form.
- Options: Edit the Option label names to display for the patient. To add additional options click the + icon or click the - minus icon to remove the option.
- Radio Button: Create a question with a pre-defined list of answers. Add up to 100 options per question for patients to select when completing the form.
Note: Patients are not required to complete sections with radio buttons.
- Field label: Enter a label that displays on the patient's form.
- Options: Edit the Option label names to display for the patient. To add additional options click the + icon or click the - minus icon to remove the option.
- Short Answer: Add a question and allow patients to enter a short answer when completing the form. Enter the question in the Field Label to displays on the patient's form.
- Required: By default, this field is optional for the patient. To mark the answer as required, click Required.
- Signature: Add a signature field for patients to sign.
- Reorder Field: Hover over the field and click the bar icon and drag to the desired place.
- Delete Field: Click the field to open the Edit Panel. Then, click Delete to remove.
|
 |