Updated: 08/23/2023 | Views: 2033
On August 24, 2023, your Kareo account will be upgraded to the latest version.
Billing
Billing Reports: Appointments
Billing reports empower you to identify and analyze areas for operational improvement in the practice. Access the All Appointments report to increase practice productivity and reduce no-shows by analyzing each provider’s appointment volume and cancellation, reschedule, and no-show rate. Review the Missed Charges report to eliminate lost revenue by identifying, prioritizing, and creating charges from any past appointment with missing charges.
Feature will be deployed to customers in phases and completed by end of September 2023.
Navigate All Appointments Report
- Hover over the Analytics icon and click on Appointments. The All Appointments page opens by default.
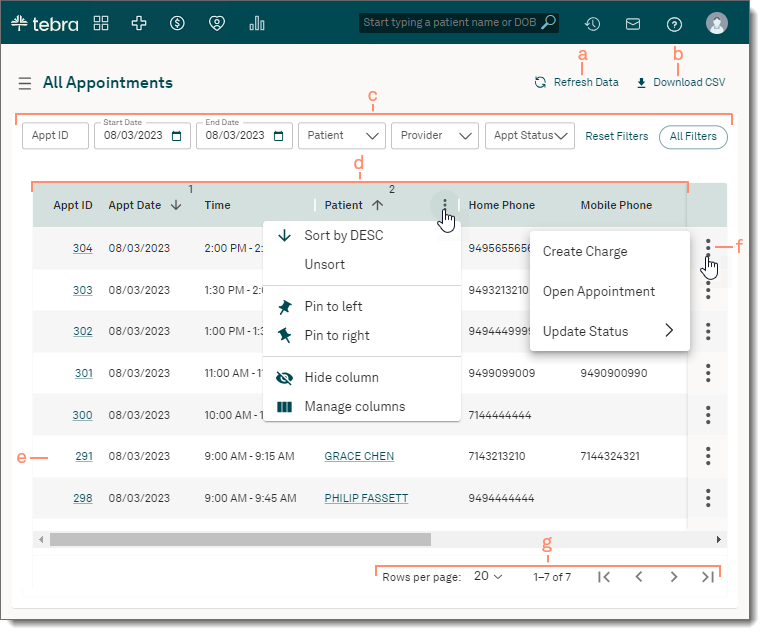
- Refresh Data: Click to refresh the appointments report data.
- Download CSV: Click to download the All Appointments report as a CSV file.
- Filters: By default, all appointments for the current day display.
- To filter by specific criteria:
- Appt ID: Enter the appointment ID number.
- Start Date and End Date: Enter or select a specific date range.
Note: The date range cannot be greater than 60 days.
- Patient: Click the drop-down to start typing the patient name to select.
- Provider: Click the drop-down to select one or more providers.
- Appt Status: Click the drop-down to select one or more appointment statuses.
- To reset the filters back to the default settings, click Reset Filters.
- To view all available filters for additional customization, click All Filters.
- Columns:
- To sort by ascending or descending, hover over the column header and click the arrow.
- To unsort, pin, hide or manage columns, hover over the column header and click the more options icon.
- Appointment Details: Displays the Appt ID, Appt Date, Time, Patient, Home Phone, Mobile Phone, Provider, Service Location, Appt Reason, and Appt Status.
- To open, view/edit the appointment details, click the Appt ID number.
- To open and view the Patient Facesheet, click the Patient name.
- Right side more options icon: To create a charge for the appointment, open to view/edit appointment details, or update the appointment status, hover over and click the more options icon.
- Pagination: By default, each page displays up to 20 appointments.
- To change how many appointments are displayed per page, click the Rows per page drop-down and select 10, 20, 50, or 100.
- To navigate forward or back, click the arrows.
|
 |
|
Navigate Missed Charges Report
- Hover over the Analytics icon and click on Appointments. Then, click on Missed Charges. The Missed Charges report displays.
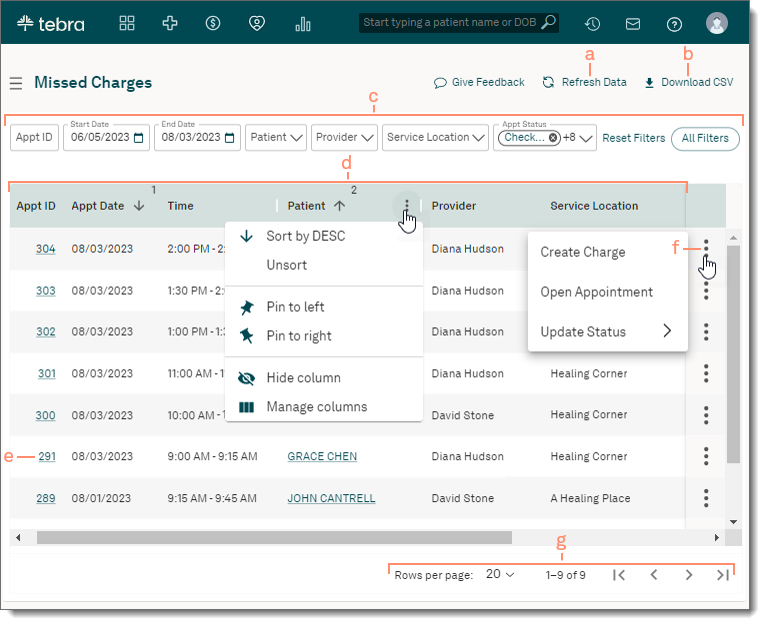
- Refresh Data: Click to refresh the appointments with missing charges report data.
- Download CSV: Click to download the Missed Charges report as a CSV file.
- Filters: By default, all appointments with missing charges within the past 60 days display.
- To filter by specific criteria:
- Appt ID: Enter the appointment ID number.
- Start Date and End Date: Enter or select a specific date range.
Note: The date range cannot be greater than 60 days
- Patient: Click the drop-down to start typing the patient name to select.
- Provider: Click the drop-down to select one or more providers.
- Appt Status: By default, Scheduled, Reminder Sent, Confirmed, Checked In, Roomed, Checked Out, Needs Reschedule, Ready To Be Seen, and Tentative are selected. Click the drop-down to select or clear one or more appointment statuses.
- To reset the filters back to the default settings, click Reset Filters.
- To view all available filters for additional customization, click All Filters.
- Columns:
- To sort by ascending or descending, hover over the column header and click the arrow.
- To unsort, pin, hide or manage columns, hover over the column header and click the more options icon.
- Appointment Details: Displays the Appt ID, Appt Date, Time, Patient, Provider, Service Location, Appt Reason, and Appt Status.
- To open, view/edit the appointment details, click the Appt ID number.
- To open and view the Patient Facesheet, click the Patient name.
- Right side more options icon: To create a charge for the appointment, open to view/edit appointment details, or update the appointment status, hover over and click the more options icon.
- Pagination: By default, each page displays up to 20 appointments.
- To change how many appointments are displayed per page, click the Rows per page drop-down and select 10, 20, 50, or 100.
- To navigate forward or back, click the arrows.
|
 |
Billing General Improvements
- For our customers using the Tebra Web Service API, Tebra is continuously enhancing safeguards to ensure a positive experience for all users. Earlier this year, we implemented API rate limiting policies for our frequently used endpoints. After careful review, we have expanded these guidelines to all API endpoints. As of August 18, 2023, rate limiting guidelines have been applied to all remaining API endpoints at every half second, with the following exceptions listed below:
- SearchPatient: Can be called once every 1/4 seconds
- GetAppointments: Can be called once a second
- GetCharges: Can be called once a second
- GetPayments: Can be called once a second
We appreciate your continued partnership as we work to provide an optimal experience for all customers. For more details about our API requirements, refer to our API documentation or Terms of Use.
Billing Resolved Issues
- Fixed an issue where users received an error message when running reports in the Desktop Application (PM)
- Fixed an issue where the Official Name for multiple CPT codes were missing or incorrect
- Fixed an issue where Billing Analytics data did not match any Desktop Application (PM) reports
- Fixed an issue where users received an error message when generating proof of timely filing
- Fixed an issue where users were unable to send patient statements
- Fixed an issue for Tebra Payments customers where transaction amount formatting caused card on file transactions to fail
- Fixed an issue where the incorrect balance displayed in the Patient Portal under the Bill Details
- Fixed an issue where patients could not pay other amounts via the Patient Portal
- Fixed an issue for Tebra Payments customers where some patient payments were not recorded in the Desktop Application (PM)
- Fixed an issue where the practice's user accounts did not display
Back to top
Clinical
Clinical Resolved Issues
- Fixed an issue where users received an error message when navigating through the patient's chart
- Fixed an issue where eRx change requests sent from CVS pharmacies were not delivered to providers
Platform
Platform Resolved Issues
- Fixed an issue where the incorrect balance displayed in the Patient Portal under the Bill Details
- Fixed an issue where patients could not pay other amounts via the Patient Portal
- Fixed an issue where the practice's user accounts did not display

