Edit or Delete Patient Appointment
- Last updated
-
-
Save as PDF
Updated: 12/02/2025 | Views: 6305
Patient appointments can be easily edited to help manage and organize the practice’s daily agenda.
Access Appointment
- Click on the appointment to view the Appointment Card.
- Click More Options and select Edit Appointment. The Edit Appointment page.
|
 |
Edit Appointment
Make the applicable changes to the appointment.
- Status: To change the status of the appointment, click the drop-down arrow and select a different status.
- Appointment details:
- Patient: To remove the patient, click X. Then, begin entering the patient's name and click on the patient's name when it appears. If the patient record is not found, select Click to create new patient record to add a patient record.
- Patient Name: Click to view the patient chart. Or hover over the patient name to view the patient's primary phone number, email, address, last and next appointment, and alert.
- Visit Reason: To select a different Visit Reason, click the drop-down arrow and select a new visit reason.
- Appointment Mode: Click to change the mode for the appointment. Telehealth appointments are only available for Telehealth subscribers.
- Location: To select a different Service Location, click the drop-down arrow and select a new location.
- Date and Time: Update the date and/or time as applicable.
Note: The time zone displayed is based on the configuration in Calendar Settings.
- Duration: Update the duration as applicable.
- Recurrence: Select a pre-set or custom recurring appointment option if necessary.
- Notes: Add an optional note about the appointment. Appointment notes will populate the chief complaint of the patient’s clinical note (Clinical subscribers only).
Note: The note will not populate in the chief complaint of an AI note.
- Patient Intake:
- If the patient intake was not previously sent, click to select which patient intake forms to send to the patient (Engage subscribers and accounts with access to Patient Intake only).
- By default, the option to email the patient intake form is selected. If necessary, click to clear.
- To send the patient intake form via text message, click to select "Mobile Phone as SMS".
- If applicable, click Edit to edit the patient's email and/or mobile phone number.
- If the intake forms were previously sent, click the Patient Intake more options icon to Print Forms, Start Intake on Kiosk, or Resend (Engage subscribers and accounts with access to Patient Intake only).
- Appointment resources:
- Provider: To remove the provider, click X. Then, search for and select a provider from the drop-down.
- The provider's availability displays by their name: Available, Conflicts with another appointment, or Outside office hours.
- Staff: To remove a staff, click X. Then, search for and select a staff member, if necessary. Multiple staff members may be selected.
- The staff's availability displays by their name: Available, Conflicts with another appointment, or Outside office hours.
- Room & Equipment: To remove a room or equipment, click X. Then, search for and select a room/equipment, if necessary. Multiple rooms and equipment may be selected.
- The room and equipment availability displays under their name: Available or Conflicts with another appointment.
- Billing and Insurance:
- Insurance Case: If applicable, select a different case and review the insurance information with the patient.
- Click the Eligibility more options icon to select the option to View Report or Check Eligibility.
- Click Save Appointment when finished.
- For Self-Pay Only enabled practices that collect payments at the time of scheduling, click Save and Collect Payment to save the appointment and open the Collect Payment page.
|
 |
Delete Appointment
- Click on the appointment to view the Appointment Card.
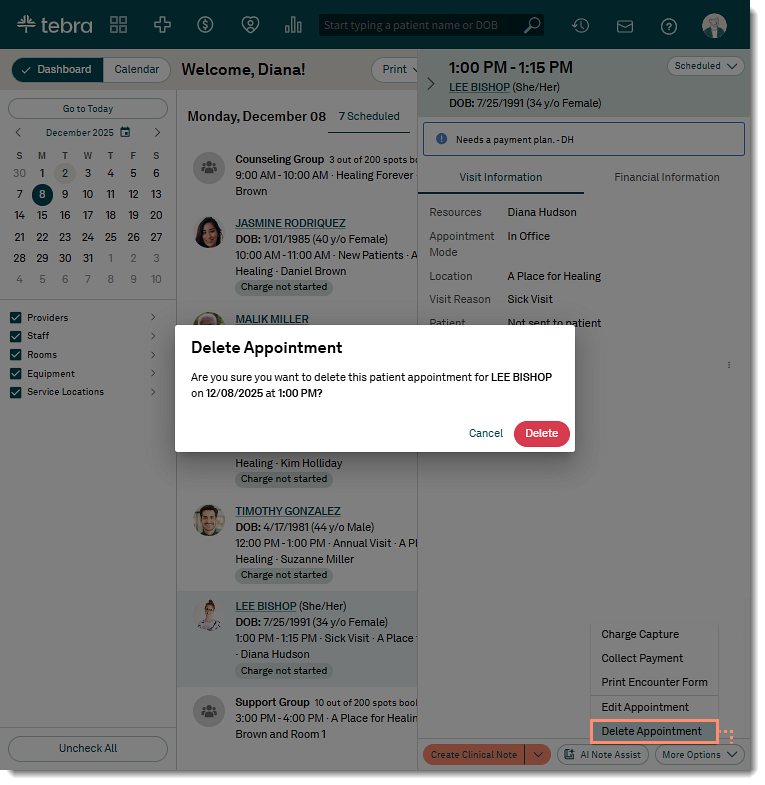
- Click More Options and select Delete Appointment. The Delete Appointment pop-up window opens.
- Click Delete to confirm. The appointment is removed from the Dashboard and Calendar.
|
 |


