Electronic Claim Attachments: Clinical Notes
- Last updated
-
-
Save as PDF
Updated: 06/10/2025 | Views: 1237
Tebra’s integrated electronic claim attachment functionality streamlines the submission of supporting documentation directly within our platform, eliminating the need for manual methods like faxing or mailing. This reduces claim processing times, lowers costs, and minimizes errors that lead to denials. Practices and billers benefit from faster reimbursements, improved workflows and secure handling of sensitive patient information.
System Administrators and Billers with the Clinical Assistant web user role can attach clinical notes (up to 10 attachments per claim) for electronic claim submission to certain workers' compensation, auto insurance, and commercial payers for an additional charge. Refer to our Pricing Policy page for more information.
Feature is available for Clinical subscribers.
Note: Certain commercial payers (e.g., Cigna) do not support including documents with claims. For a list of supported commercial payers, view the Electronic Claim Attachments Payer List.
Attach Clinical Notes
- Create or edit an encounter that requires the supporting documentation. Then, select the Documents tab. The documents list displays.
- Click Clinical Notes. The Clinical Notes window opens.
|
 |
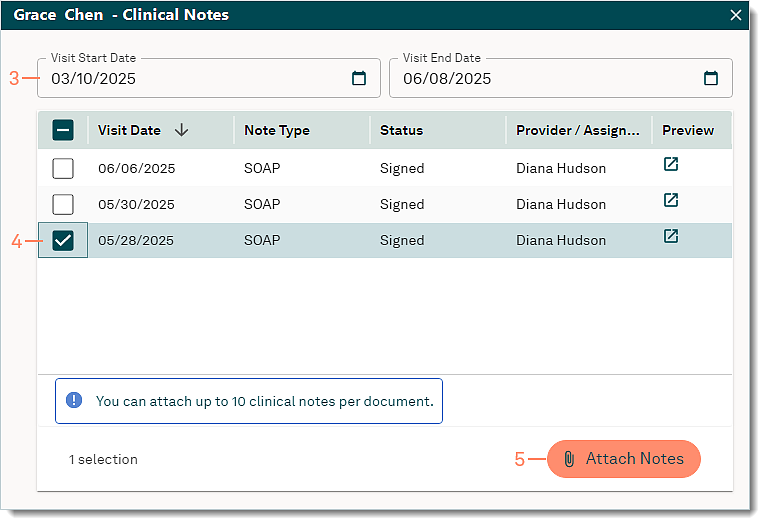
- By default, the date range is set for the previous three months. If necessary, select a custom date range.
Note: The date range cannot be greater than 90 days.
- Click to select the clinical note(s) to attach.
- To view a clinical note, click the preview icon.
- Click Attach Notes. The clinical note(s) selected is listed under the Documents tab of the Encounter record.
- To remove a clinical note document, click once to select it then click Delete.
|
 |
- Click once to select the clinical note document.
- Click Info. The Edit Uploaded Document window opens.
|
 |
- Review the document details and make any necessary changes.
- Document Label and Status: Click the drop-down arrow to update as necessary.
- Claim Processing section:
- "Include with claim": Selected by default. If not selected, click to select the checkbox.
- Document Type: Defaults to OZ - Support Data for Claim. If not selected, click the drop-down arrow to select OZ - Support Data for Claim.
- Notes: If applicable, enter notes related to the document.
- Click Save. The clinical note document will be included with the electronic claim once submitted.
Note: Certain commercial payers (e.g., Cigna) do not support including documents with claims. For a list of supported commercial payers, view the Electronic Claim Attachments Payer List.
|
 |