Updated: 05/14/2026 | Views: 1222
The Reputation settings page allows practices to manage post-visit survey review allocation and personalize survey delivery settings. Sending automated patient surveys after each patient visit helps establish a provider's online reputation. The post-visit survey is emailed to a patient when their appointment status is changed to Checked Out. Once a patient completes the survey, results will be available for the provider to review internally or is published to their provider profile.
This feature is only available for Practice Operation subscribers with Patient Experience.
Access Reputation Settings
- Hover over the User icon and click on Practice Settings. The Practice Settings page opens.
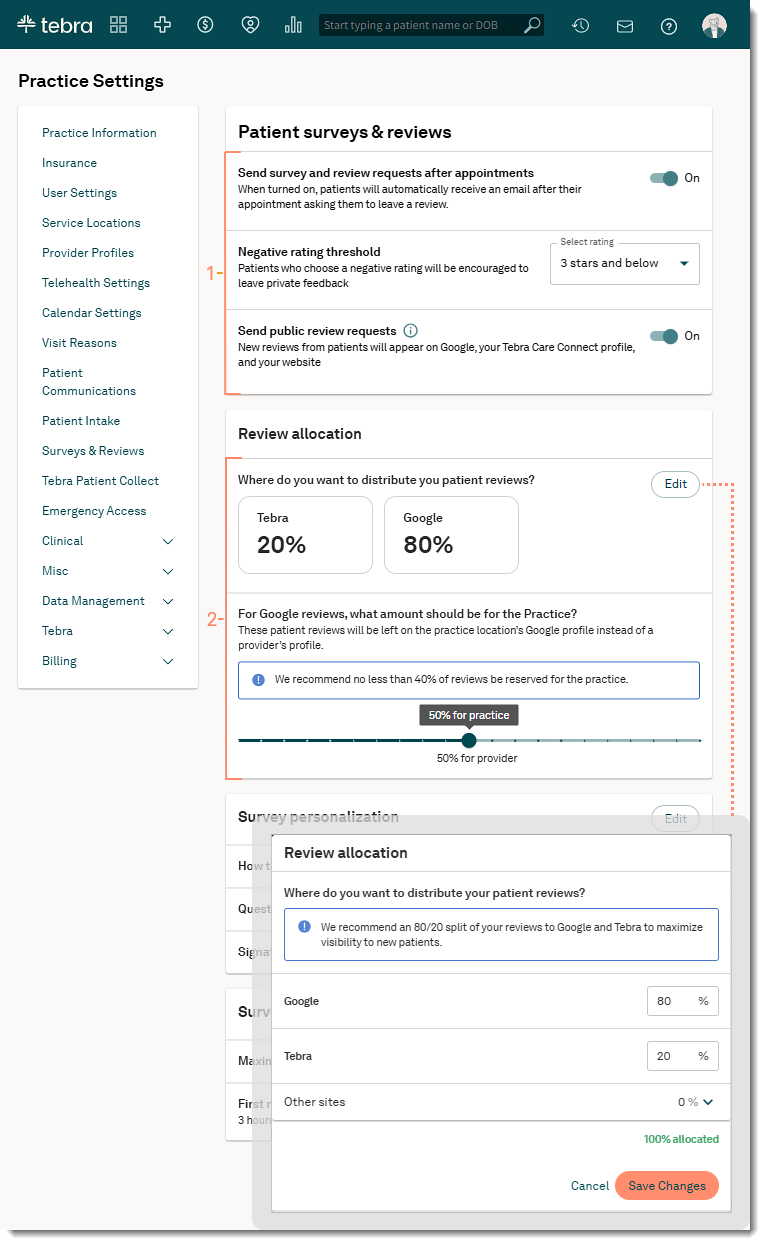
- Click Surveys & Reviews. The Surveys & Reviews settings page opens.
- If applicable, click the Send survey and review requests after appointments toggle on to configure the settings.
|
 |
Configure Reputation Settings
Changes only apply to new surveys sent after the settings are saved. Surveys already sent to patients continue to use the settings at the time the survey was sent.
- Patient Survey and Reviews: Configure the option to send a review to the patient after their appointment and the negative rating threshold.
- Send Survey: Enable or disable the option to send a review to the patient after their appointment.
- To disable surveys, click the Send survey and review requests after appointments toggle off.
- Negative Rating Threshold: Click the drop-down to select the star rating threshold that will encourage patients to leave a private feedback instead of a public review. Available options: 3 stars and below, 2 stars and below, and 1 star.
- Send public review request: By default, this option is enabled to allow new reviews from patients to appear on the practice's review websites.
- To collect private patient feedback only, click the Send public review request toggle off.
 Tip: For practices that require discretion (e.g., Mental Health), disable this option for reviews to be submitted privately. Tip: For practices that require discretion (e.g., Mental Health), disable this option for reviews to be submitted privately.
- Review Allocation: Select how patient reviews are distributed.
- Allocation: Select how patient reviews are distributed. To change the percentage or which site(s) to include, click Edit.
- To add an allocation site, click the Other Sites drop-down arrow to display additional options: Facebook, Healthgrades, MD.com, Vitals, and WebMD.
- To change the allocations, enter the percentage for each site to equal 100% allocation.
- Click Save Changes when finished.
- Practice Allocation: Select what percentage of patient reviews will be left on the practice location’s Google profile instead of a provider’s profile. Move the slider to left to lower the percentage or move the slider to the right to raise the percentage.
|
 |
- Survey Personalization: Configure how to address patients, which question to include, and the signature line.
- Click Edit to expand the options.
- Address Patients: Click the drop-down to select Use first name only or Don't include patient's name.
- Questions to Ask: Click the drop-down to select from the available options:
- Were you satisfied with your visit?
- Would you recommend our practice?
- Did we meet or exceed your expectations?
- Did we provide a great experience for you?
- Did you have a positive experience with us?
- Did you have a great experience with us?
- Were you satisfied with your care?
- Would you recommend our practice to others?
- Signature Link: Click the drop-down to select from the available options:
- Sincerely, {Provider's name}
- Best regards, {Provider's name}
- Much appreciated, {Provider's name}
- See you soon, {Provider's name}
- Thank you, {Provider's name}
- Sincerely, {Practice's name}
- Best regards, {Practice's name}
- Much appreciated, {Practice's name}
- See you soon, {Practice's name}
- Thank you, {Practice's name}
- Click Save Changes when finished.
- Survey Delivery: Configure the maximum number of message sent to the patient and if the first message should be delivered by SMS or email.
- Maximum number of Messages: Click the drop-down to select the max number of messages the patient will receive about the survey. Available options: 3 messages, 2 messages, and 1 message.
- First Message: Click to select "SMS" or "Email" to send the first message via text message or email 3 hours after the appointment.
- Second Message: If applicable, click to select "SMS" or "Email" to send the second message via text message or email the day after the appointment.
- Third Message: If applicable, click to select "SMS" or "Email" to send the third message via text message or email 5 days after the second message.
- Click Save Changes when finished.
|
 |