Updated: 01/08/2026 | Views: 13465
After submitting e-claims, claim processing reports are routed to the practice(s) within your Tebra account and can be found in the Clearinghouse Reports under the Claim Processing tab. You can access these reports and review report details to identify rejections and determine next steps. The Claim Processing reports list includes Tebra internal validation reports, clearinghouse acknowledgement/rejection reports, and payer acknowledgement/rejection reports. Tebra internal validation reports are generated within a few hours after submitting e-claims. Clearinghouse and/or payer acknowledgement/rejection reports are generated daily. Receipt of these reports depend on when the e-claims were submitted, and the clearinghouse's and payer's claim processing times.
Navigate Claim Processing Reports
- Click Encounters > Clearinghouse Reports. The Find Clearinghouse Report window opens.
 Tip: For quick access to view and find help articles for common claim rejections and resolutions, click Tebra Rejection Troubleshooting Guide. Tip: For quick access to view and find help articles for common claim rejections and resolutions, click Tebra Rejection Troubleshooting Guide.
- Select the Claim Processing tab. The Claim Processing reports list displays.
- The following report information varies depending on the source, clearinghouse, and/or payer.
- ID: Clearinghouse report ID assigned by Tebra.
- Type of report generated: Internal or Clearinghouse.
- Source or payer the report is associated with: e.g., Tebra, MedAvant (Change Healthcare), Aetna, Medicare.
- Claims: Total number of claims the report includes.
- Rejected: Total number of rejected claims the report includes.
- Received: Date the file was received in Tebra.
- Reviewed: No or Yes indicates whether the report was marked as reviewed.
Note: "Show unreviewed only" is selected by default and displays all reports that are not marked as reviewed. To also include reviewed reports, click to deselect "Show unreviewed only".
- Notes: A brief description of the report.
- Comments: Internal comments entered on the report.
- Click to select and highlight a report or double click to open and view a report.
- View: Click to open and view a highlighted report.
- Mark as Reviewed: After reviewing a report and determining no further action is needed, click to mark the report as reviewed.
- Pagination: Click the arrows to navigate forward or back, or enter a specific page number. Each page displays up to 20 reports
|
 |
Tebra Internal Validation Reports
Tebra checks for general missing or invalid information prior to forwarding claims to the clearinghouse. If an issue with the claim is detected, it rejects within a few hours after submission so the correction(s) can be made in a timely manner.
- Example Tebra internal validation report with invalid insurance plan zip code rejection.
- Rejection message and details. If available, follow the provided solution steps or click on the link to view the related rejection help article.
Note: To find a help article related to a specific Tebra rejection, search the Tebra Validation section of Claim Rejections.
- Click to access the Encounter record.
Note: The numerics before the Z is the encounter ID and the numerics after is the Tebra account ID.
- Click to access the specific claim associated with the Encounter record.
Note: The numerics after the S is the claim ID.
- Comments: Enter internal comments to add reminders or collaborate with other staff members.
- Save: Click to close the window and save any comments entered.
- Print: Click to print the report (excludes comments).
- Mark As Reviewed: After reviewing the report and determining no further action is needed, click to mark the report as reviewed.
|
 |
Clearinghouse Acknowledgement/Rejection Reports
Once the clearinghouse (e.g., Trizetto, Change Healthcare) receives the claims, they are validated against 5010 ANSI standards and known payer specific requirements.
- Example Trizetto clearinghouse acknowledgement/rejection report.
Note: Clearinghouse acknowledgement/rejection report details vary depending on the clearinghouse.
- Status: Indicates the claim is acknowledged (ACK) or rejected (REJ).
- Tebra Claim ID: Click to access the Encounter record.
Note: The numerics before the Z is the encounter ID and the numerics after is the Tebra account ID.
- Acknowledgement or rejection message details. If the claim is rejected, click on the link (if available) to view the related help article.
Note: To find a help article related to a specific rejection, search Claim Rejections.
- Comments: Enter internal comments to add reminders or collaborate with other staff members.
- Save: Click to close the window and save any comments entered.
- Print: Click to print the report (excludes comments).
- Mark As Reviewed: After reviewing the report and determining no further action is needed, click to mark the report as reviewed.
|
 |
Payer Acknowledgement/Rejection Reports
Once the payer receives the claims, they are validated for missing or invalid claim information prior to forwarding for adjudication.
Note: Some payers may also have a partner clearinghouse that validates claims prior to forwarding them to the payer for processing.
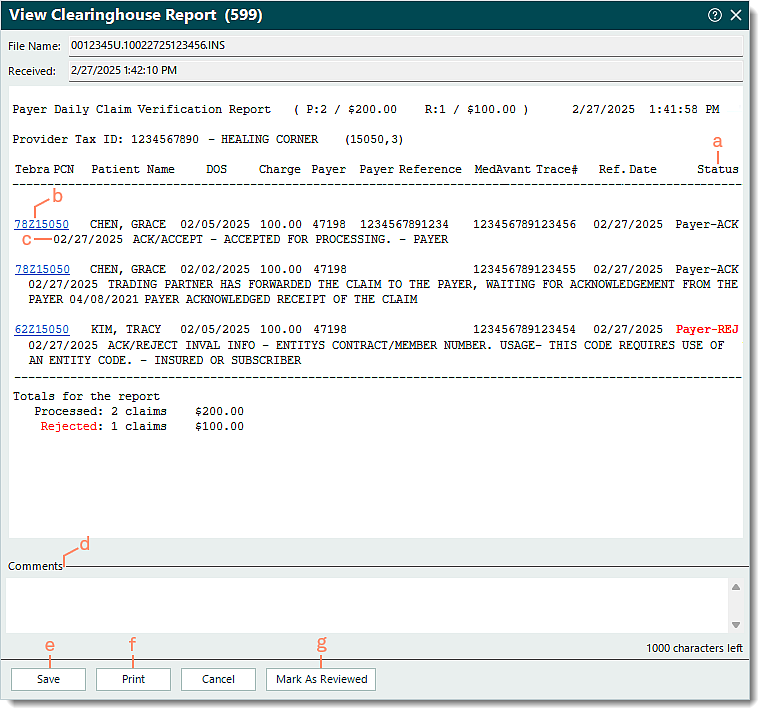
- Example payer acknowledgement/rejection report received via Change Healthcare.
Note: Payer acknowledgement/rejection report details vary depending on the payer and clearinghouse.
- Status: Indicates the claim is acknowledged (ACK) or rejected (REJ).
- Tebra PCN: Click to access the Encounter record.
Note: The numerics before the Z is the encounter ID and the numerics after is the Tebra account ID.
- Acknowledgement or rejection message details. If the claim is rejected, click on the link (if available) to view the related help article.
Note: To find a help article related to a specific rejection, search Claim Rejections.
- Comments: Enter internal comments to add reminders or collaborate with other staff members.
- Save: Click to close the window and save any comments entered.
- Print: Click to print the report (excludes comments).
- Mark As Reviewed: After reviewing the report and determining no further action is needed, click to mark the report as reviewed.
|
 |


