Find, Edit, and Delete Document
- Last updated
-
-
Save as PDF
Updated: 02/20/2026 | Views: 1746
The Documents feature allows faxed, scanned, or digital (e.g., Word, Excel, PDF) documents to be stored and attached to various records (e.g., Patient, Encounter, Payment, Provider, Appointment). Once uploaded, you can view, edit, print, and delete documents as necessary.
Find Document
- Click Documents > Find Documents. The Find Document window opens.
 Tip: For faster navigation, click the Find Documents icon, click Documents under the Navigation pane Shortcuts menu, or press F11 on the keyboard. Tip: For faster navigation, click the Find Documents icon, click Documents under the Navigation pane Shortcuts menu, or press F11 on the keyboard.
- Use the filters to find a document then click Find Now. The search results are listed.
- Filter by Status: Defaults to All. Click the drop-down arrow to select a specific status (e.g., New, In-Process, Processed).
- Look For: Enter all or part of a keyword to search for the document.
- Search In: Defaults to All fields. Click the drop-down arrow to select a specific field (e.g., Label, Name, File type).
|
 |
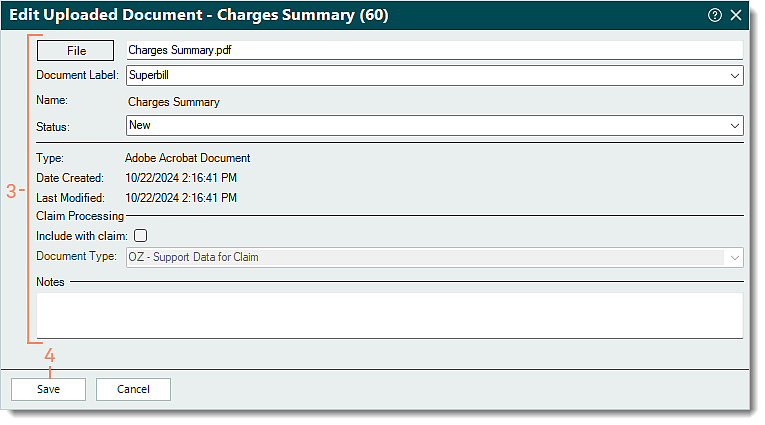
Edit Document
- Find the document then click once to select and highlight.
- Click Info. The Edit Uploaded Document window opens.
- Make the necessary changes.
- File: To upload a different file (.exe and .html files are not supported) for the document, click File.
- Document Label: To select a different label, click the drop-down arrow and make the appropriate selection.
- Status: To update the status, click the drop-down arrow and make the appropriate selection.
- Claim Processing section: Applicable for supporting documentation being added to the Encounter record. Review Electronic Claim Attachments for more information.
- Notes: Enter or modify notes related to the document.
- Click Save.
|
 |
Delete Document
Deleting a document that is attached to a record (e.g., Patient, Encounter, Payment, Provider, Appointment) will also delete the document from the record.
- Find the document then click once to select and highlight.
- Click Delete. A confirmation pop-up appears.
- Click Yes to confirm the deletion. The document is deleted.
|
 |