Updated: 06/13/2025 | Views: 3647
The Documents feature allows faxed, scanned, or digital (e.g., Word, Excel, PDF) documents to be uploaded, stored, and attached to various records (e.g., Patient, Encounter, Payment, Provider, Appointment). Depending on the file type, view the document in the browser, associated software application, or Document Viewer.
View Document
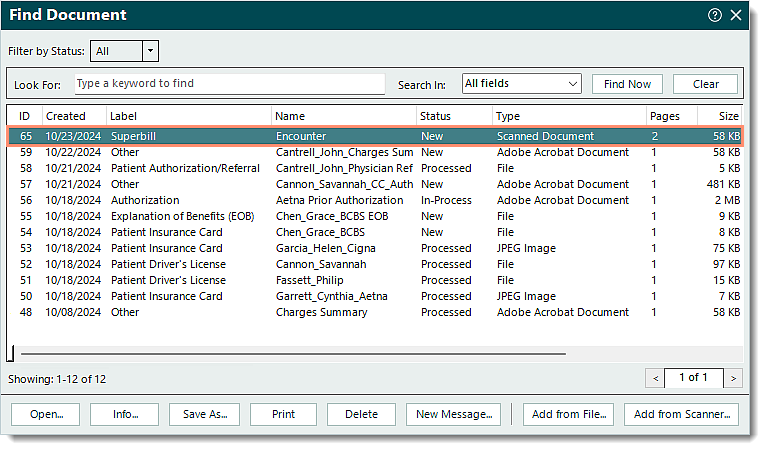
- Find the document then double click to open or click once to select then click Open.
- If the document is a digital file (e.g., Word, Excel, PDF), the browser or associated software application opens to view the document.
- If the document is a faxed document received via kFax, a PDF file opens in the browser or associated software application opens to view the document.
- If the document is a previously scanned document, the Document Viewer opens
|
 |
Document Viewer
Use the Document Viewer tools to adjust the view of the document in various ways.
- Scroll Bars: When the document page is larger than the viewing area, use the scroll bars to move the page up or down and left or right.
- Hand Tool: When hovering over a document page that is larger than the viewing area, the pointer changes to a hand tool. Drag the page in any direction.
- Zoom: Click to zoom in and out of the document. To use the keyboard and mouse, press Ctrl (the pointer changes to a magnifying glass), then click to zoom in and right click to zoom out.
- Fit: Click to fit the full page within the document viewer.
- Rotate: Click to rotate the document by 90 degrees.
- Full Screen: Click to view the document in full screen mode. To exit full screen mode, click Full Screen again.
- Pagination: Click the single arrows to navigate forward or back, click the double arrows to jump to the first or last page of the document, or enter a specific page number then press Enter on the keyboard.
|
 |
Print Scanned/Faxed Document
You can use the Print Document wizard to print a scanned/faxed document. To print a document that is a digital file (e.g., Word, Excel, PDF), open the document in the browser or associated software application then use the browser or application's print function.
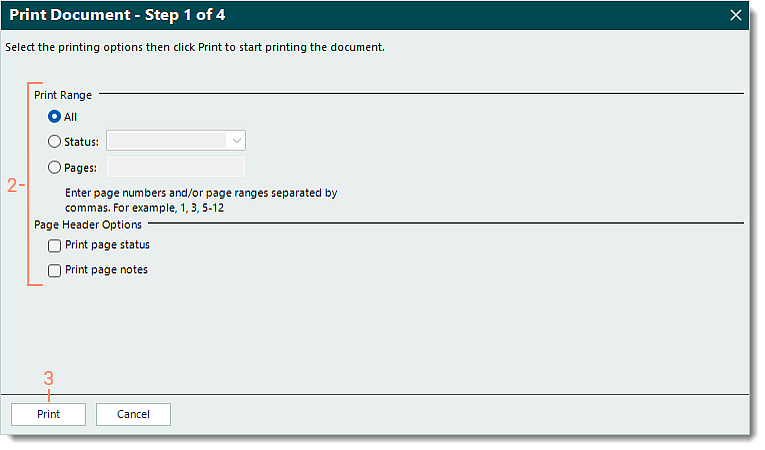
- Find the document that was scanned/faxed and click once to select then click Print. The Print Document wizard opens.
- If the scanned/faxed document is open, click Print on the bottom of the window. The Print Document wizard opens.
- Select the printing options as necessary.
- Print Range: Select the pages to print.
- "All": Selected by default and prints all pages.
- "Status": Click to print pages based on the page status.
- "Pages": Click to enter specific page numbers and/or page ranges to print.
- Page Header Options: Select to print the page status and/or notes on the page header.
- "Print page status": Click to print the Page Status (e.g., Normal, Error, Unprocessed).
- "Print page notes": Click to print notes entered in the Page Notes.
- Click Print. A progress bar appears and the computer's print dialog window opens then print when ready.
|
 |
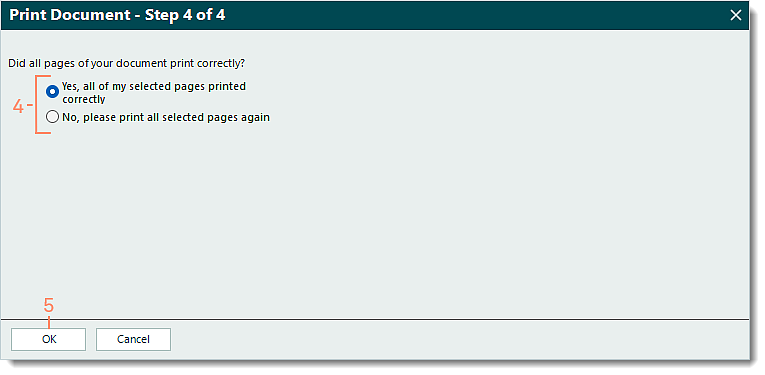
- When finished, click to select if the pages printed correctly. Then, click OK.
- "Yes": Selected by default. All document pages printed correctly.
- "No": Click to select if the document pages did not print correctly.
- Click OK.
- If "Yes" was selected in step 4, the Print Document wizard closes.
- If "No" was selected in step 4, the progress bar appears and the computer's print dialog window opens then print again when ready. Repeat as necessary.
|
 |