Post Payments from Electronic Remittance Advice (ERA)
- Last updated
-
-
Save as PDF
Updated: 01/08/2026 | Views: 24749
Payments received electronically and reported in an Electronic Remittance Advice (ERA) can be automatically posted. The automatic posting supports denials, reversals, underpayments, over-payments, and other complex electronic remittance scenarios.
Note: For practices that receive large ERA reports containing a high count of Claim Reference IDs, the ERA Splitting Options feature is available to automatically split ERA reports into several, more manageable reports.
Post Electronic Remittance Advice (ERA) Payment
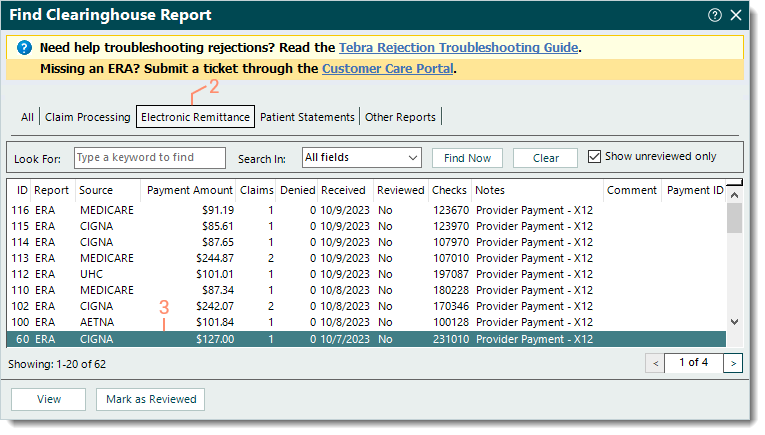
- Click Encounters > Clearinghouse Reports. The Find Clearinghouse Report window opens.
- Click the Electronic Remittance tab. The Electronic Remittance reports list displays.
- Double click the ERA report to open. The View Electronic Remittance Advice window opens.
Note: It is recommended to address the ERA reports from oldest to newest and confirm payment was received by check or bank deposit prior to applying ERA payments.
|
 |
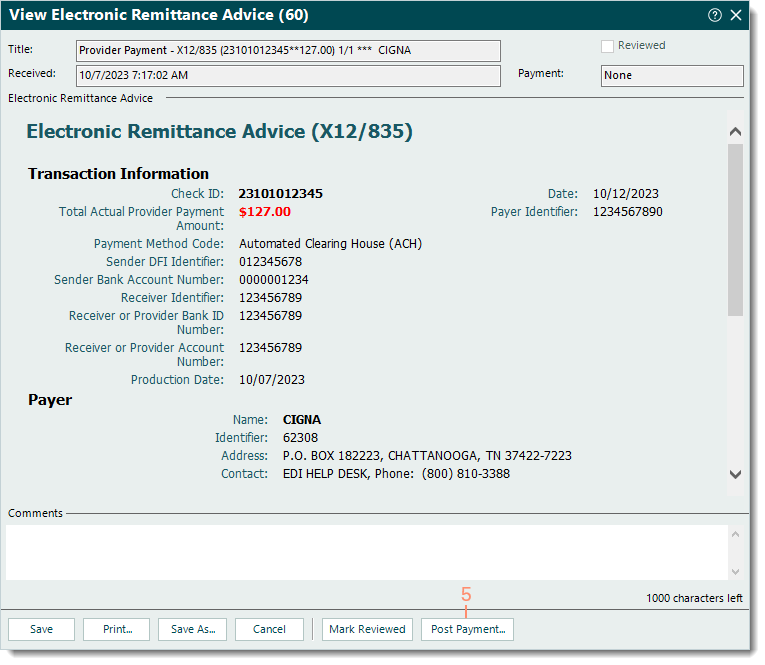
- Scroll as necessary to review the ERA report information.
- When finished, click Post Payment. The ERA payment amount(s) automatically posts then the General tab of the New Payment from ERA window opens.
|
 |
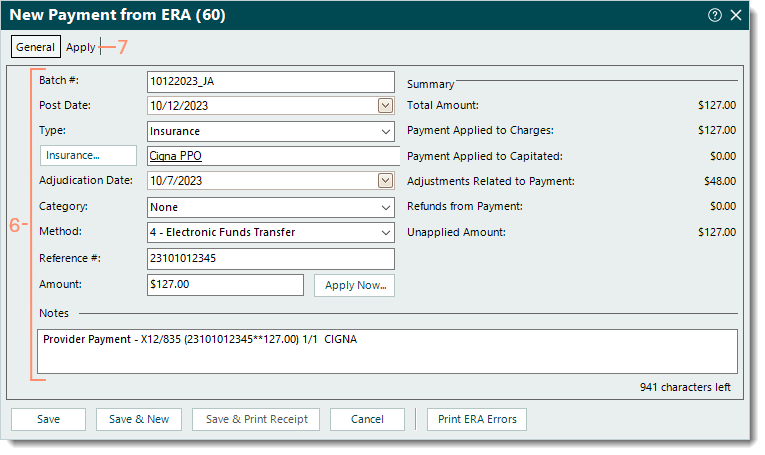
- Review the auto-populated General payment information for accuracy and make any changes as necessary. Then, enter the following information if applicable.
- Batch #: The batch number for the payment.
 Tip: Entering a batch number is helpful for running reports when there is a consistent naming convention such as the posting date with the user's initials (e.g., MMDDYYYYAB). Then, when running a report (e.g. Payments Detail), customize and filter by that specific batch number. Tip: Entering a batch number is helpful for running reports when there is a consistent naming convention such as the posting date with the user's initials (e.g., MMDDYYYYAB). Then, when running a report (e.g. Payments Detail), customize and filter by that specific batch number.
- Category: If the practice uses categories for certain payment reports, click the drop-down arrow and select the appropriate category.
- Select the Apply tab. Additional payment details display.
|
 |
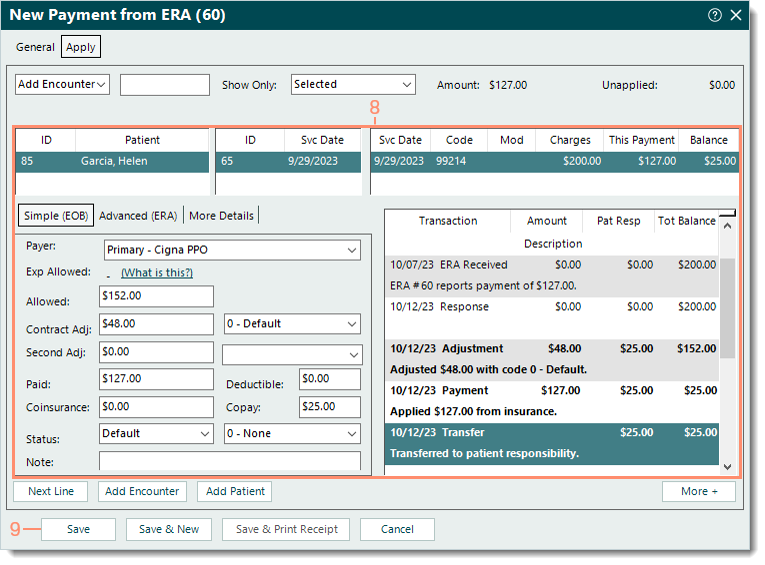
- Click to select each service line and review the auto-populated Simple (EOB) and posted transaction line information. Make any changes as necessary.
Tip: The Next Line button can also be used to navigate to the next service line.
Note: For balances transferred to secondary insurance policies, ensure the amounts are correct as this information is sent to payers that support secondary electronic claims submission.
- When finished, click Save. The payment is saved and the ERA report is marked as reviewed.
Tip: To view a report of how the payment was allocated, open the Payment record, click Reports on the bottom of the Edit Payment window and select Payments Application.
|
 |