Updated: 01/08/2026 | Views: 18096
Tracking claim denials help determine internal patterns and trends, as well as those with specific payers, to quickly identify and remediate the common issues causing the denials. To more effectively track and report denied claims, you can manually post paper denials received from insurance companies.
Manually Post Denial
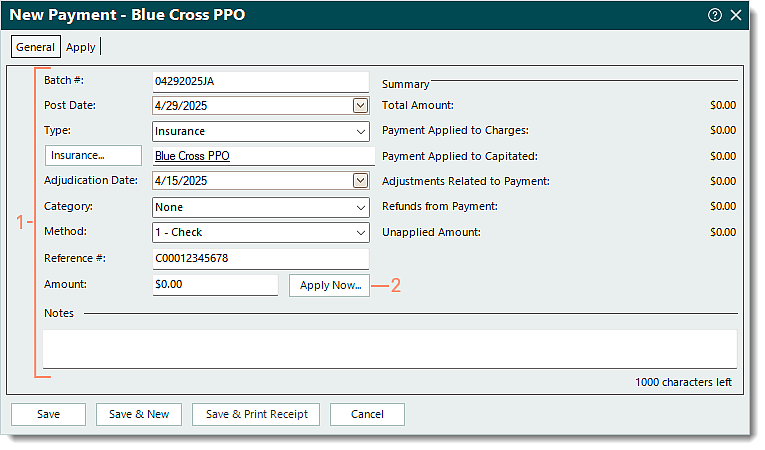
- Create a new insurance payment and enter the information under the General tab with the following.
- Method: Click the drop-down arrow and select 1 - Check as the method since this is a zero dollar amount payment.
- Amount: Leave as $0.00.
- Once finished, click Apply Now. The Apply tab opens.
|
 |
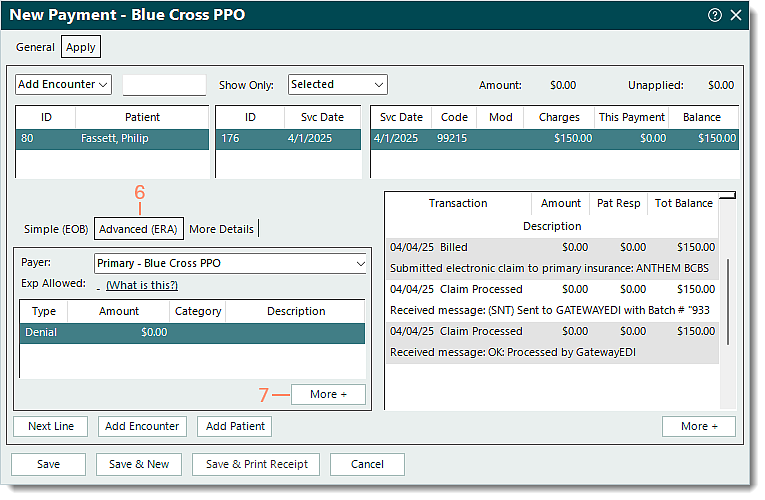
- Use the top options to add the encounter or patient.
- The first drop-down menu defaults to Add Encounter. To add service lines by patient ID instead, click the drop-down arrow and select Add Patient.
Note: When an encounter is added, all service lines associated with the encounter are listed. When a patient is added, all open service lines associated with the patient are listed.
- In the open text field, enter the encounter ID, patient's name, or patient ID. Then, press Enter on the keyboard. The service lines are listed.
Note: The encounter ID may be indicated as the Patient Account Number or Claim Reference ID on the payer report as follows: Encounter ID + Z + Tebra Account ID (e.g., 176Z15050).
 Tip: To limit results and avoid having to search and select the Encounter record, enter the encounter ID + Z (e.g., 176Z) to quickly add the encounter. Tip: To limit results and avoid having to search and select the Encounter record, enter the encounter ID + Z (e.g., 176Z) to quickly add the encounter.
- If the Select Encounter or Find Patient window opens, search and select the record.
- Show Only: Defaults to Selected. Click the drop-down arrow to select a different option.
- Click once to select the patient, encounter, and/or service line for the denial.
- Under the Simple (EOB) tab, leave all amount fields as $0.00 and ensure the Status is set to Default.
|
_Denial.png?revision=1) |
- Select the Advanced (ERA) tab. The Advanced (ERA) information displays.
- Click More +. Additional options display.
|
1_Denial.png?revision=1) |
- Click the drop-down arrow and select Reason. Once selected, additional fields become available.
- In the open text field, enter the denied amount.
- Click the first drop-down arrow and select the reported denial reason code.
- Click the second drop-down arrow and select the reported claim adjustment group code.
- Click Post. The Reason line for the denial is added.
Note: This will display when viewing the Denial transaction line information in the Claim record.
- When finished with the selected service line, continue as necessary.
- If the denial applies to the next service line listed, click Next Line, or click to select the appropriate service line. Then, repeat steps 5-10 as necessary.
- To return to the top options and add another encounter or patient, click Add Encounter or Add Patient. Then, repeat steps 3-10 as necessary.
- If finished with posting the denial, click Save. If a confirmation pop-up appears, click Yes to post the payment with a $0.00 amount.
|
2_Denial.png?revision=1) |
Find and View Denied Claim
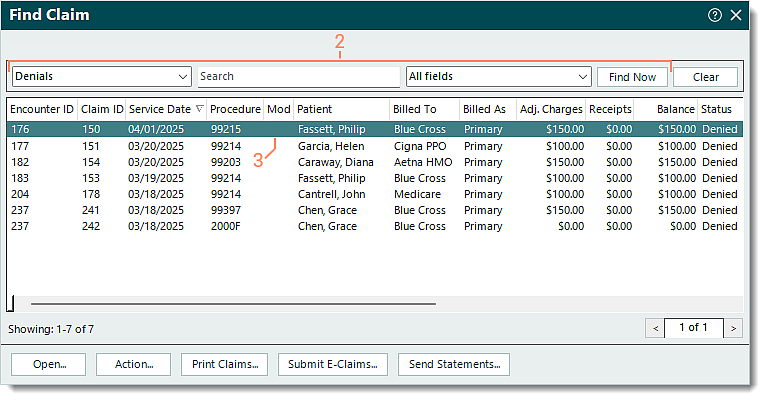
- Click Encounters > Track Claim Status. The Find Claim window opens.
- Click the drop-down arrow and select Denials. If necessary, use the Search box to enter all or part of a keyword for the claim. Then, click Find Now.
- Find the denied claim and double click to open. The Edit Claim window opens.
|
 |
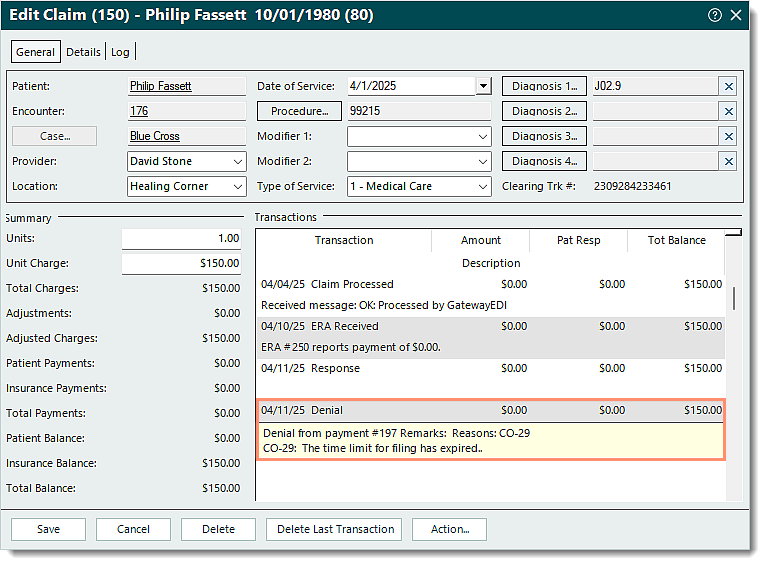
- Under the Transactions section, scroll as necessary to find the Denial transaction line then hover over the line to display the denial information.
Tip: Right click on a transaction line and select View Details to view additional details related to the transaction if applicable.
|
 |