Updated: 07/16/2026 | Views: 372074
The customer service experience provides you better visibility throughout the entire support process. The Customer Care Portal empowers users to submit support requests, upload attachments, and track case progress with statuses in real-time. After a case is created, you can communicate with the Customer Care Team directly in the portal as the case progresses.
The Customer Care Portal can be accessed from the Platform, Desktop Application (PM), My Account, and Practice Growth or by navigating directly to support.tebra.com and then log in.
|
|
 |
Create New Case
- Click New. The New Case pop-up window opens.
- Select the appropriate team that best matches the reason for the inquiry.
- Customer Support: Select this option for questions that are not related to Enrollments, Integration, or Training.
- Enrollments Support: Select this option for questions related to clinical (e.g., eRx, EPCS, etc.) and insurance enrollments (e.g., payer, EDI, etc.).
- Integration Request: Select this option for questions related to integrations (e.g., domain, immunizations, API, etc.).
- Training: Select this option for questions related to training services (e.g., Tebra University troubleshooting, advanced training requests, professional services, etc.).
- Click Next. The New Case pop-up window opens.
|
 |
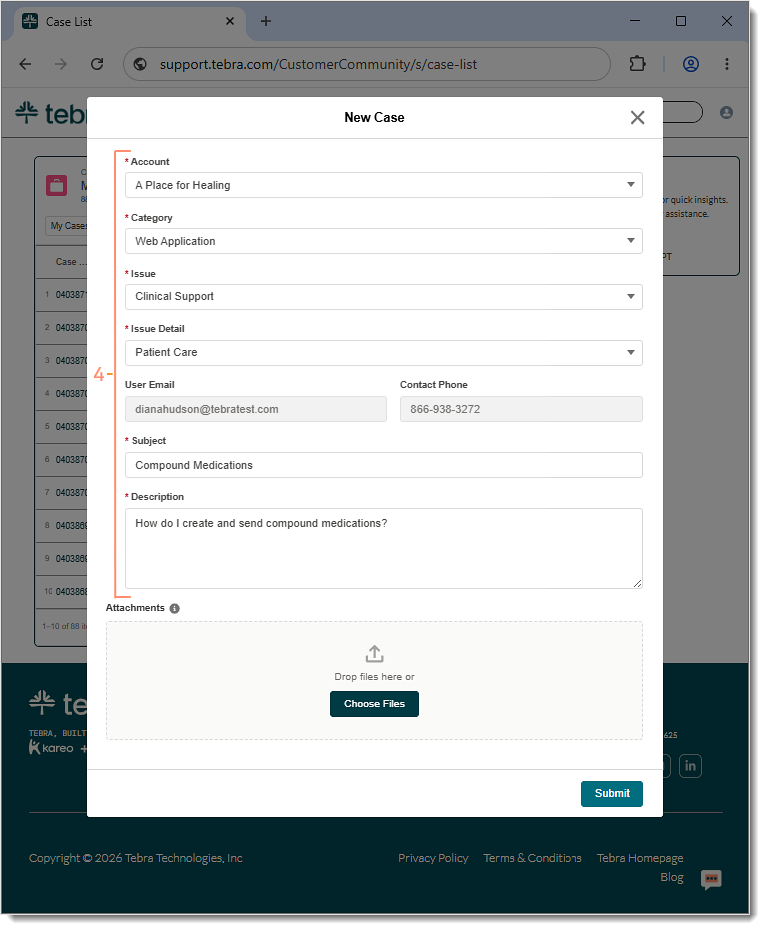
- Enter or select the appropriate options:
Note: Options may vary based on the selected team.
- Account: If applicable, select the appropriate account.
- Category: Select the appropriate option for the inquiry.
- Issue: Select the appropriate option for the case.
Note: Available options display based on the selected category.
- User Email Address: The user's email address from their user profile is automatically populated.
- Contact Phone: The user's phone number from their user profile is automatically populated.
- Subject: Enter the subject of the inquiry.
- Description: Enter details of the inquiry (e.g., when, where, or how) and examples, as applicable.
- Description: Enter details of the inquiry (e.g., when, where, or how) and examples, as applicable.
- If applicable, drag a file from your device or click Upload Files and select a file from your device. Continue to drag or upload additional files, as necessary. The files can be any file type (e.g., .CSV, .PDF, etc.) and the combined file size for all attached files must be smaller than 2MB.
- To remove an attachment, click the x icon.
- Click Submit when finished. A confirmation message displays and the new case is sent to the Customer Care team. Users can track the progress of the case in the portal.
|
 |
View Case List
- Filter: Select a different Account, Status or search to filter the case list.
- Account: If applicable, click to select a specific or multiple accounts.
- Status: By default, all cases are displayed. If applicable, click the drop-down to filter by Open or Closed cases.
- Search: Enter a case number or additional information (e.g., subject, contact name, etc.) to filter cases.
- Sort Column: Click on the Case Number, Subject, Account Name, Status, or Case Type column to sort by ascending or descending.
- Case Details: Click the case number to review details and comments. The Case Detail page opens.
- Pagination: By default, each page displays up to 10 cases.
- To navigate forward or back, click the arrows.
|
 |