Electronic Workers' Compensation and Auto Insurance Companies
- Last updated
-
-
Save as PDF
Updated: 03/19/2025 | Views: 5808
Through Tebra's clearinghouse connection with Jopari, you can set up workers' compensation and auto insurance companies:
- To submit electronic claims and attachments directly to payers that support the submission.
- As ePaper Payers (also known as drop-to-paper payers) for payers that do not support electronic claims submission. This unique option allows your practice to submit claims electronically to Jopari where they will be printed and mailed to the payer when ready. There is no charge for the electronic submission, however, an additional fee applies for Jopari to print and mail the claim to the payer. Refer to our Pricing Policy page for more information.
 Important Notes:
- If you wish to print and mail claims to a workers' compensation or auto insurance company that does not support electronic claims submission, you can set the payer up as a paper-based insurance company.
- Jopari does not support Tebra clearinghouse reports. Upon claim acceptance, you will receive acknowledgement from the clearinghouse. Claim denials are mailed to you directly from the insurance company.
Add Insurance Company
- Click Settings > Insurance > Insurance Companies. The Insurance Companies window opens.
- To prevent duplication, verify the insurance company is not in the system.
- If the insurance company was already added, click the insurance company name to open. Then, review and configure the insurance company settings as necessary.
- If the insurance company is not in the system, click + Add Insurance on the upper right of the window. The Most Commonly Requested tab of the Add Insurance window opens by default. Proceed to step 3.
|
 |
- Select the Search Other tab. Additional options display.
- Select the filter criteria.
- Type: Click to select Worker's Comp/Auto Accident in the drop-down menu.
- Clearinghouse: Click to select Jopari (WC and Auto Only) in the drop-down menu.
- State: If necessary, click to select a specific state in the drop-down menu.
- Begin typing the payer's name and select it from the search results drop-down list. Then, click Add.
- If the payer does not appear in the results list, enter the payer's name in full. Then, click Add to create a custom payer.
Note: Electronic services are not available for custom payers. Review and configure paper claims settings.
- If the payer needs to be set up as an ePaper Payer, type "paper" and select ePaper Payers #PAPER from the results drop-down. Then, click Add.
- Added insurance companies display under the Selected Insurances section.
Note: A payer that displays with an orange icon is either a duplicate in the list or is an existing insurance company in the practice.
- To remove an insurance company from the list, click X.
- Once all insurance companies have been added, click Save. The Add Insurance window closes and the selected insurance(s) displays in the insurance companies list.
|
 |
Configure Insurance Company Settings
Once insurance companies are added, it is important to review and configure each insurance company's settings to ensure proper electronic claims submission.
- Click Settings > Insurance > Insurance Companies. The Insurance Companies window opens. Then, click the insurance company name to open. The General tab of the Edit Insurance Company window opens by default.
- Review the General settings and enter information as necessary.
- Name and Address: The name and address of the insurance company.
Note: The address is informational and not used for claims submission. The address where claims should be sent is entered in the Insurance Plan record.
- Contact section: If available, the contact information for the insurance company.
|
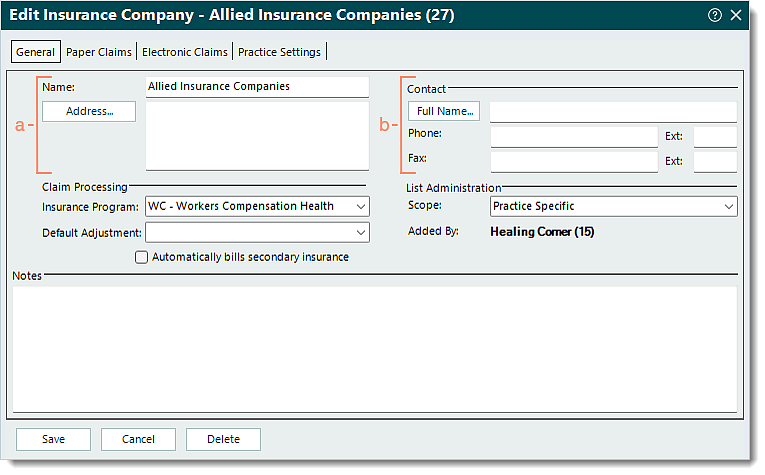 |
- Claim Processing section:
- Insurance Program: Click the drop-down arrow and select the appropriate option.
- For workers' compensation, select WC - Workers Compensation Health Claim.
- For auto insurance, select AM - Automobile Medical.
- Default Adjustment: If applicable, click the drop-down arrow to select a default adjustment code. The adjustment code selected auto-populates when manually posting a payment received from this payer.
- List Administration section:
- Scope: Applicable for Tebra accounts with multiple practices.
- If the insurance company was added by the currently open practice, the scope is available for selection in the drop-down menu.
- Practice Specific: Selected by default. The insurance company should only be available within the currently opened practice.
- All Practices: The insurance company should be available for selection across all practices within the Tebra account.
- If the insurance company was added by a different practice, the scope will be shaded and cannot be edited.
- Added by: Displays the name of the practice where the insurance company was created.
- Notes: If applicable, notes related to the insurance company.
|
 |
- Select the Practice Settings tab. The practice specific settings display.
- Review the Practice Settings and make any necessary changes.
Note: These settings are specific to the currently opened practice and do not affect other practices (when there are multiple) within the Tebra account.
- Enrollment Status: Click the drop-down arrow and select Enrolled in live mode.
Note: The Not enrolled status and all other statuses prevent electronic claims submission.
- Click to select or clear the selection for the options as necessary.
- "Disable electronic claims for this payer": Disables electronic claims submission to this payer.
- "Use electronic billing when this payer is secondary": Allows secondary electronic claims submission to this payer.
- "Send Coordination of Benefits (COB) information": Includes the COB information on secondary electronic claims.
- "Provider accepts assignment of benefits": Generally indicates the provider agrees to accept what this payer allows or approves as payment in full for the claim.
- "Exclude patient payments from claims sent to insurance": Bills the total charge amount to this payer excluding any patient payments applied.
- "Allow zero balance transfers on claims": Transfers all line items of the claim including those with zero balances.
- Click Save when finished.
|
 |