Updated: 03/06/2025 | Views: 3204
System Administrators have the ability to customize reports (e.g., specify filters or hide/show specific columns) to fit the needs of their practice. Once the customizations are made, save the report as a customized report to share with all users in the practice with permissions or with other System Administrators only.
System Administrators can also edit the customized reports settings, update and save new customizations to an existing customized report, and delete a customized report.
Note: For practices also using the Desktop Application (PM), saved customized reports and any modifications made will also reflect in the Desktop Application (PM). Review Customize Analytics Reports for more information about customized reports in the Desktop Application (PM).
Create New Customized Report
- Access the report:
- For the All Patients report, hover over the Analytics icon and click Patients. The All Patients report page opens.
- For the All Appointments report, hover over the Analytics icon and click Appointments. The All Appointments report page opens by default.
- For the Missed Charges report, hover over the Analytics icon and click Appointments. The All Appointments report page opens by default then select Missed Charges under the Appointments reports menu. The Missed Charges report page opens.
- For the All Encounters report, hover over the Analytics icon and click Encounters. The All Encounters report page opens.
- For the Insurance Collections report, hover over the Analytics icon and click Claims. The Insurance Collections report page opens.
- Customize the report to display the needed data and click the refresh icon to refresh the data as necessary
Note: Data grouping and aggregation does not save for customized reports.
- Click Table Actions and select Create new report. The New Report page opens.
|
 |
- Name and Description: Enter the name and brief description for the customized report.
- Share Report: Click to select who can access the customized report.
- Across Practice: All users with permissions can access the report but only System Administrators can edit it.
- Only System Admins: Only System Administrators can access and edit the report.
- Click Save when finished. The customized report is created and accessible from the Reports menu.
|
 |
Edit Customized Report
System Administrators can edit the customized report name, description, and who can access the report.
- Access the customized report that needs to be edited:
- For a customized Patients report, hover over the Analytics icon and click Patients. The All Patients report page opens then select the customized report under the Patients reports menu. The customized report page opens.
- For a customized Appointments report, hover over the Analytics icon and click Appointments. The All Appointments report page opens by default then select the customized report under the Appointments reports menu. The customized report page opens.
- For a customized Encounters report, hover over the Analytics icon and click Encounters. The All Encounters report displays then select the customized report under the Encounters reports menu. The customized report page opens.
- For a customized Claims report, hover over the Analytics icon and click Claims. The Insurance Collections report page opens then select the customized report under the Claims reports menu. The customized report page opens.
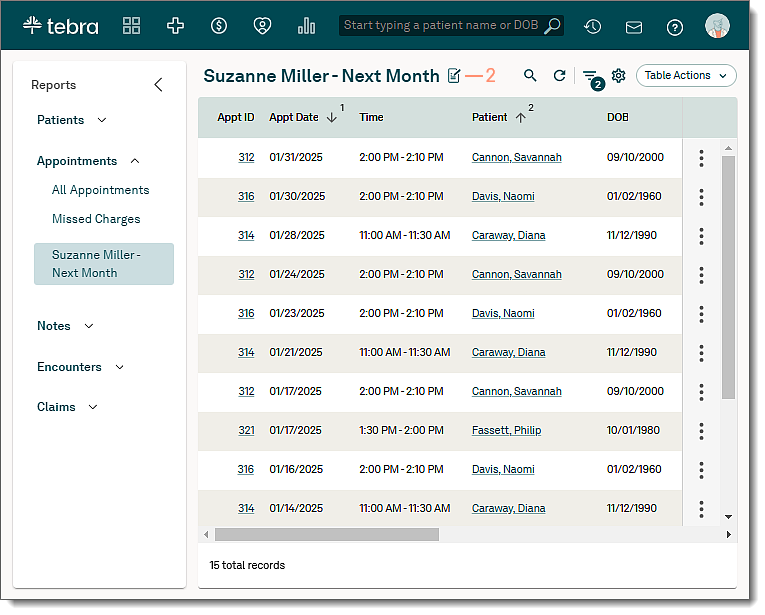
- Click the edit icon. The Update Report page opens.
|
 |
- Edit the report information as necessary.
- Click Save when finished.
|
 |
Update Customized Report Settings
System Administrators can update a customized report to change what data to include and how it displays.
- Access the customized report that needs to be updated:
- For a customized Patients report, hover over the Analytics icon and click Patients. The All Patients report displays then select the customized report under the Patients reports menu. The customized report page opens.
- For a customized Appointments report, hover over the Analytics icon and click Appointments. The All Appointments report page opens by default then select the customized report under the Appointments reports menu. The customized report page opens.
- For a customized Encounters report, hover over the Analytics icon and click Encounters. The All Encounters report displays then select the customized report under the Encounters reports menu. The customized report page opens.
- For a customized Claims report, hover over the Analytics icon and click Claims. The Insurance Collections report displays then select the customized report under the Claims reports menu. The customized report page opens.
- Customize the report to display the needed data.
Note: Data grouping and aggregation does not save for customized reports.
- Click Table Actions and select Save report. The Update Report Settings?confirmation pop-up appears.
- Click Confirm to save the customization.
|
 |
Delete Customized Report
System Administrators can permanently remove a customized report (for all users with access) when the report is no longer applicable for the practice.
- Access the customized report that needs to be deleted:
- For a customized Patients report, hover over the Analytics icon and click Patients. The All Patients report page opens then select the customized report under the Patients reports menu. The customized report page opens.
- For a customized Appointments report, hover over the Analytics icon and click Appointments. The All Appointments report page opens by default then select the customized report under the Appointments reports menu. The customized report page opens.
- For a customized Encounters report, hover over the Analytics icon and click Encounters. The All Encounters report displays then select the customized report under the Encounters reports menu. The customized report page opens.
- For a customized Claims report, hover over the Analytics icon and click Claims. The Insurance Collections report page opens then select the customized report under the Claims reports menu. The customized report page opens.
- Click Table Actions and select Delete report. The Delete Report? confirmation pop-up appears.
- Click Confirm to permanently delete the report.
|
 |


