Navigate Unapproved Encounters Report
- Last updated
-
-
Save as PDF
Updated: 07/22/2026 | Views: 146
AI Claim Review enabled practices can also access the Unapproved Encounters report that lists the denial risk level and probability allowing billers to quickly identify and prioritize encounters that require further review. To access the Unapproved Encounters report in the Desktop Application (PM), review Navigate Unapproved Encounters Report.
Note: This feature is included with Tebra's AI Billing Assistant. For more information, contact your Sales Representative or Account Manager.
Access Unapproved Encounters Report
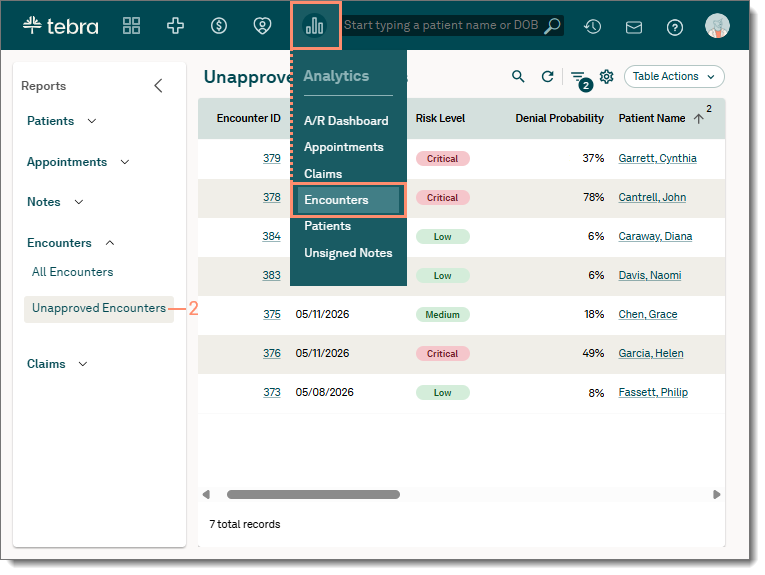
- Hover over the Analytics icon and click Encounters. The Unapproved Encounters report page opens.
- Under the Encounters reports menu, select Unapproved Encounters. The Unapproved Encounters report page opens.
|
 |
Navigate Unapproved Encounters Report
The Unapproved Encounters report includes unapproved encounters created in the Desktop Application (PM) and charges created and sent to the Desktop Application (PM). The report can also be customized to include specific data and how the data displays.
Note: Customization of the report does not automatically save. Once a user navigates away from the report, the default report view displays when the report is accessed again. To save the customization, use the Save As option under Table Actions to save the report as a new customized report.
- Search: Click the search icon to search for specific report data.
- Refresh Data: Click the refresh icon to refresh the report data as necessary.
- Table Filters: By default, encounters with a Draft, Review, or Rejected status within the past seven days display.
- To filter by specific criteria, click the filter icon and add the appropriate filter(s) (e.g., Patient Name, Encounter Status, Rendering Provider).
- To remove a filter, click X.
- Table Configuration: Click the gear icon to adjust the table density (e.g., Compact, Standard, Comfortable) and/or manage the table columns to hide/show a column.
- Table Actions: Click to export the report to CSV or Excel, or to save as a new customized report.
|
 |
- Columns: Customize the report to only display specific columns and in the preferred order. Available options depend on the column data.
Note: Data grouping and aggregation does not save when creating a new report.
- To reorder the columns, click the column header then drag and drop in the preferred order.
- To sort by ascending or descending, hover over the column header and click the arrow.
- To sort more than one column, hold down the Shift key on the keyboard and click to select the column(s).
- To sort, unsort, hide or manage columns, hover over the column header and click the more options icon.
- To group all records by a specific column, hover over the column header and click the more options icon. Then, select Group by (column name).
Note: Once applied, an additional column displays with the grouping.
- To aggregate a column by size (count), sum, average, etc., hover over the column header and click the more options icon. Then, select the appropriate option from the Aggregation drop-down menu.
Note: Once applied, values display at the footer of the report table and at the group level when grouping data.
- Encounter Summary: Displays information such as the Risk Level and Denial Probability to help prioritize encounters that need additional review. Scroll as necessary to view more information.
- To view the Procedure Details, click the arrow on the left of the encounter ID number to expand.
- To open and view the Charge Capture, click the Encounter ID
- To open and view the Patient Facesheet, click the Patient Name.
|
 |
