Kareo and PatientPop are now Tebra. Becoming Tebra will take time and we appreciate your patience as we transition to the new brand experience.Learn More
Tebra Help Center

Activate Patient Portal

Updated: 10/25/2023|Views: 24845

The Patient Portal integrates with Tebra and lets the practice securely communicate with patients, post eLab results, health information, and provide patients access to online statements. Invite the patient to create a Patient Portal account to access their clinical data. With Tebra Payments or Tebra Patient Collect enabled, patients can pay outstanding balance online through their Patient Portal.

Review Navigate Patient Portal to learn more about the Patient Portal Dashboard. Review Patient Experience: Patient Portal to learn more about the patient's view.

Access Portal Settings

  1. Hover over the User icon and click on Practice Settings. The Practice Settings page opens.
  2. Click Misc on the left menu. Additional setting options expands.
  3. Click Portal Settings. The Patient Portal page opens in a new browser.
    • If prompted, click Get Started.
Platform_PatientPortal_Access.png

Activate Patient Portal

The Patient Portal only needs to be activated once for the practice.

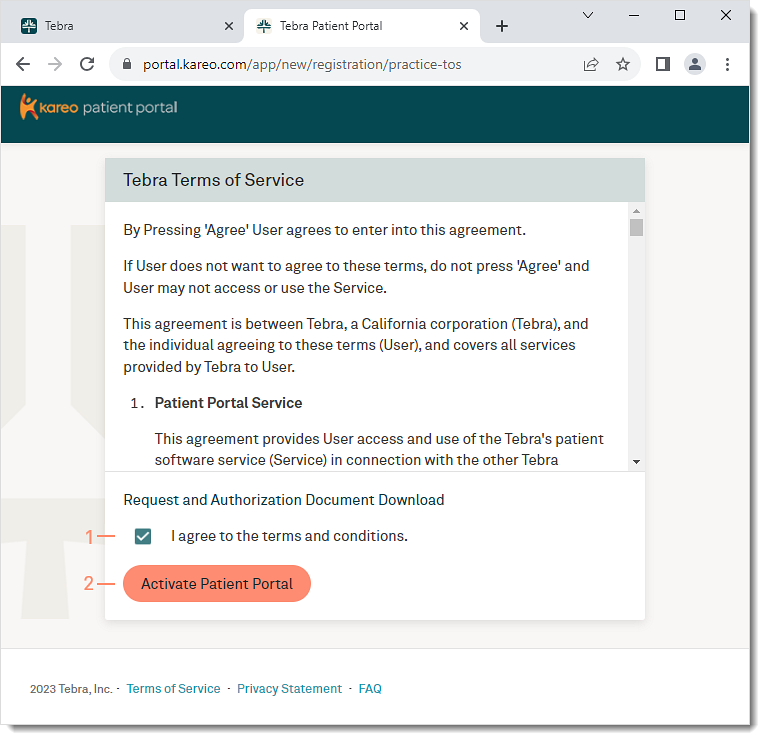
  1. Read the terms and click to select "I agree to the terms and conditions" to agree.
  2. Click Activate Patient Portal. The Payment Setup pop-up window opens.
  3. Payment Setup:
    • To allow patients to securely make payments online and collect patient balances faster, click Activate. The Tebra Payments or Tebra Patient Collect page opens.
    • To skip setting up payments, click Do this later. The Patient Portal Dashboard opens.
Platform_PatientPortal_Terms.png

Patient Portal Settings

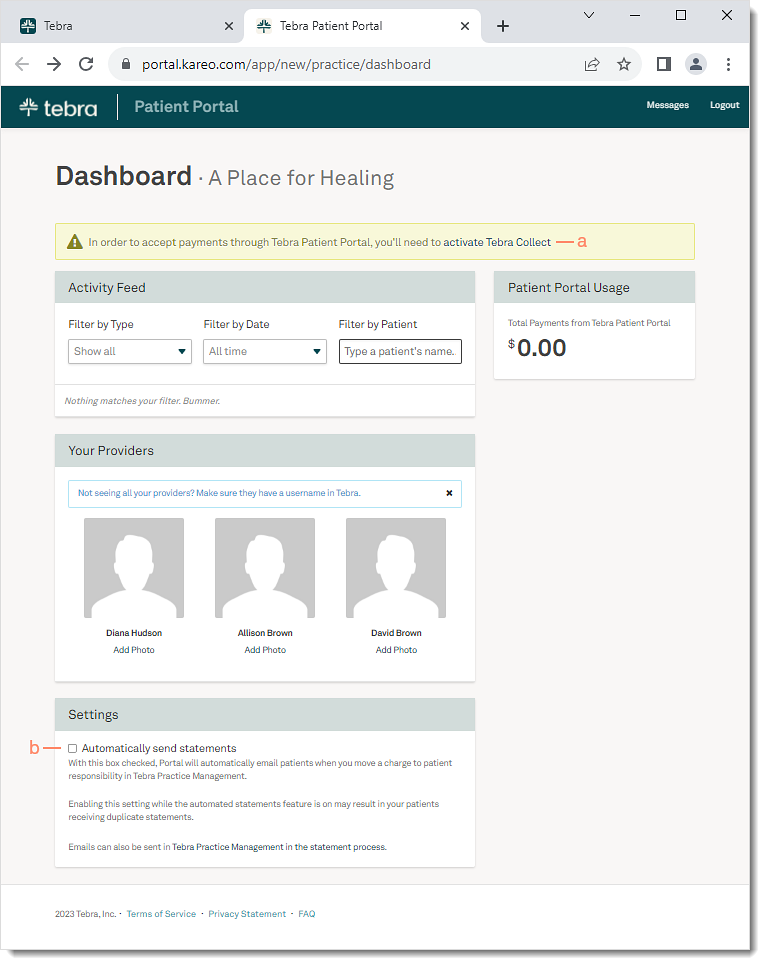
  1. If patients payments has not been activated, click activate Tebra Collect to open the Tebra Payments or Tebra Patient Collect page. Enabling payments to allow patients to securely make payments online and collect patient balances faster.
  2. By default, the setting to automatically email patients when a balance is moved to patient responsibility in the Desktop Application (PM) is disabled.
    Note: This setting is automatically disabled once Automated Patient Billing is enabled to prevent patients from receiving duplicate statements.
    • To enable the setting , click to select “Automatically send statements”.
Platform_PatientPortal_Settings.png
  • Was this article helpful?