Automated Patient Billing Settings
- Last updated
-
-
Save as PDF
Updated: 12/19/2025 | Views: 11243
Practices have the option to enable automated patient billing and take the guesswork out of patient statements. Our intelligent patient messaging optimizes both digital and mailed statements to save you time and get you paid faster. For more information or questions about the Automated Patient Billing feature, review the Automated Patient Billing FAQs.
Users with the System Administrator and/or Biller web role(s) can access the Automated Patient Billing Settings to enable, update, disable, and set exclusions for automated patient billing.
Note: Prior to enabling automated patient billing, configure the Patient Statement Options and prepare patient statements in the Desktop Application (PM) as necessary to ensure patient statement information is correct and up to date. Once enabled, a transaction fee applies for each paper statement. Refer to the Pricing Policy for cost details.
Access Automated Patient Billing
- Hover over the Billing icon and click Automated Patient Billing. The Patient Statements page opens, and by default, Settings is selected and displays.
|
 |
Enable Automated Patient Billing
Prior to enabling the Automated Patient Billing feature, configure the Patient Statement Options and prepare patient statements in the Desktop Application (PM) as necessary to ensure patient statement information is correct and up to date.
Note: Once enabled, the Deactivate Automated Patient Billing option displays on the bottom left of the page to disable the feature when necessary.
- Access Automated Patient Billing. The Patient Statements page opens, and by default, Settings is selected and displays.
- Select your delivery schedule: Click to select the pre-set schedule for sending statements to eligible patients in the automated billing cycle.
Note: Click the arrows to expand or collapse the schedule details.
- Monthly (Paper Only): Available for Billing subscribers. A 180-day schedule that sends a paper statement every 30 days.
Note: The QR code and pay online payment options are only included on patient statements for Tebra Payments and Patient Collect (Stripe) activated practices.
- Monthly (Paper + Digital): Available for Tebra Payments and Patient Collect (Stripe) activated practices. The recommended 180-day schedule that sends an email, text, and paper statement on each day (e.g., Day 1, Day 30, etc.) of the schedule.
- Accelerated (Paper + Digital): Available for Tebra Payments and Patient Collect (Stripe) activated practices. A 90-day schedule that more frequently sends an email, text, and/or paper statement depending on the day (e.g., Day 1, Day 3, etc.) of the schedule.
- Minimum balance amount: Enter the minimum patient balance amount that must be met in order to generate the patient statement.
- Exclusions: The following criteria indicates patients excluded from automated patient billing.
- Patients: If a specific patient needs to be excluded, enter the first few letters of the patient's name in the search box. Then, click to select the patient from the auto-populated results list.
- Collection Categories: Auto-populates based on the Collection Categories in the Desktop Application (PM). Patients associated with a Collection Category record that indicates "Send Statement?" is disabled are excluded from automated patient billing.
- Payer Scenarios: Auto-populates based on the Payer Scenarios in the Desktop Application (PM). Patients with charges associated with a Payer Scenario record that indicates "Send patient statements?" is disabled are excluded from automated patient billing.
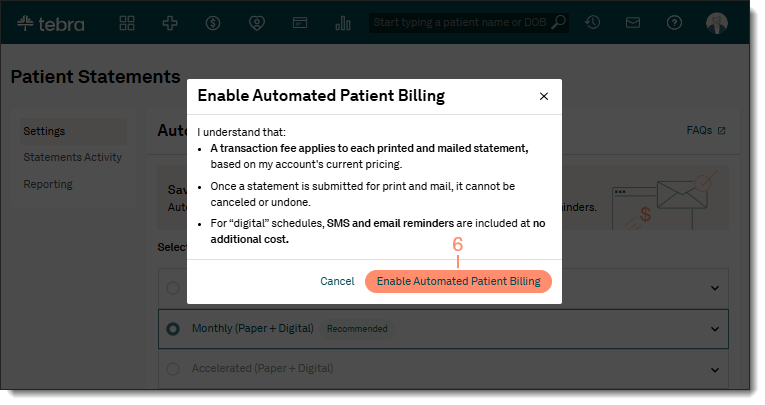
- When finished, click Enable Automated Patient Billing. The Enable Automated Patient Billing pop-up window opens.
|
 |
- Review the information. Then, click Enable Automated Patient Billing. Automated patient billing is enabled.
Once enabled:
|
 |
Update Automated Patient Billing Schedule
The automated patient billing schedule can be changed at any time. Once the schedule is updated, the previous schedule ends and the billing cycle restarts on the new schedule.
- Access Automated Patient Billing. The Patient Statements page opens, and by default, Settings is selected and displays.
- Select your delivery schedule: Click to select the new schedule.
- If necessary, make changes to the Minimum balance amount and/or excluded Patients.
- Click Save Changes. The Update Schedule? pop-up window opens.
- Review the information. Then, click Update Schedule.
Once updated, all eligible patients, including patients that were in the previous cycle, will be sent the Day 1 patient statement (of the new schedule) the following business day starting at noon for each time zone (based on the service location's address).
Note: Statements are not sent on weekends and practice holidays.
|
 |
Disable Automated Patient Billing
- Access Automated Patient Billing. The Patient Statements page opens, and by default, Settings is selected and displays.
- Click Disable Automated Patient Billing. The Disable Automated Patient Billing? pop-up window opens.
- Review the information. Then, click Disable Automated Patient Billing. Automated patient billing is disabled.
Once disabled, automated patient billing for all patients currently in a cycle ends and they will not receive any additional statements. If automated patient billing is enabled at a future date, the billing cycle restarts (on Day 1 of the selected schedule) for all eligible patients to begin receiving statements. Additionally, the cycle will only begin for a patient once a new balance amount is transferred and added to their patient responsibility.
|
 |


