Add, Edit, or Delete Visit Reasons
- Last updated
-
-
Save as PDF
Updated: 03/19/2026 | Views: 11677
Visit Reasons enable you to create templates for common types of appointments within the practice. Visit Reasons can be configured with a name, color coding, appointment duration, and default procedure codes. When a new appointment is scheduled, simply select a visit reason and the configured template will apply. After the appointment is complete, create a charge capture from the patient's appointment card or clinical note (with an appointment) to auto-populate the configured procedure code(s) based on the associated appointment's visit reason.
Visit Reasons can also be modified. Changes made to the name or color of the visit reason will affect all past and upcoming appointments. Changes in duration will only affect appointments scheduled after the change is made. Visit reasons can be deleted when necessary. An updated visit reason will be required for upcoming appointments linked to the deleted visit reason.
Access Visit Reasons
- Hover over the User icon and click on Practice Settings. The Practice Settings page opens.
- Click Visit Reasons. The Visit Reasons page opens.
|
 |
Add New Visit Reason
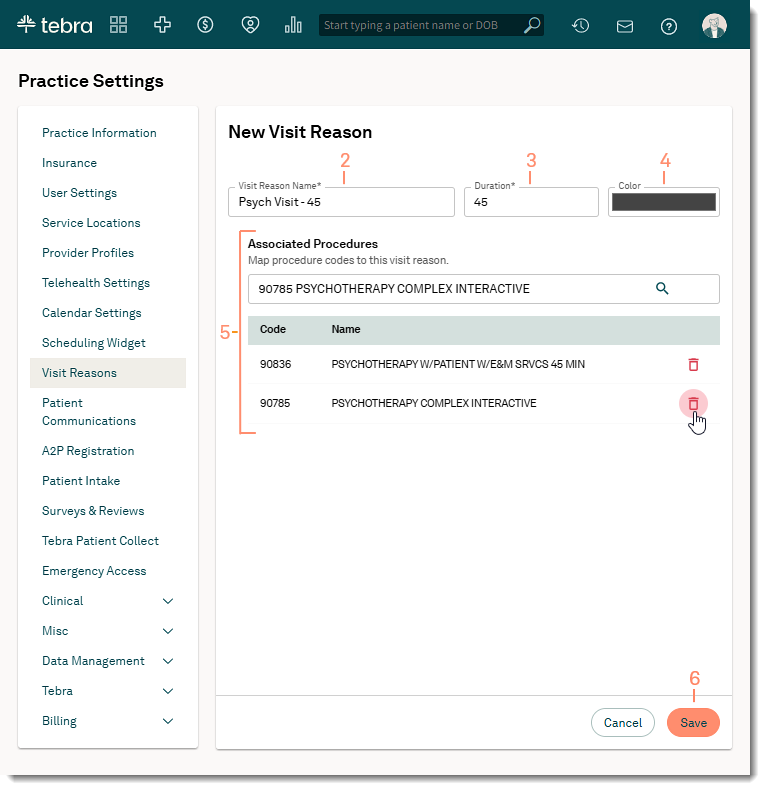
- Click + Create Visit Reason. The Visit Reason page opens.
- Visit Reason Name: Enter the visit reason name.
- Duration: Enter the the length of the visit in minutes.
- Color: Click and select a color for the visit reason using the color palette, hue slider, or eyedropper. By default, the RGB color value displays for the selected color.
- Custom Color: If applicable, specify a color using RGB (e.g., 0, 73, 82), HSL (e.g., 187, 100%, 16%), or HEX (e.g., #004952). Click the color mode to change the mode and enter the color value or code.
Note: Multiple clicks may be required to display the applicable color mode.
- Associated Procedures: If applicable, configure procedure code(s) for the visit reason. Configured procedure code(s) will auto-populate on charge captures created from the patient's appointment card or clinical note (with an appointment) based on the associated appointment's visit reason.
- To add a procedure, enter at least three characters of the code or name. Then, select the code from the results drop-down list.
- To delete a procedure code, click the trash icon.
- Click Save when finished. The visit reason is now available to select when scheduling an appointment.
|
 |
Edit Visit Reason
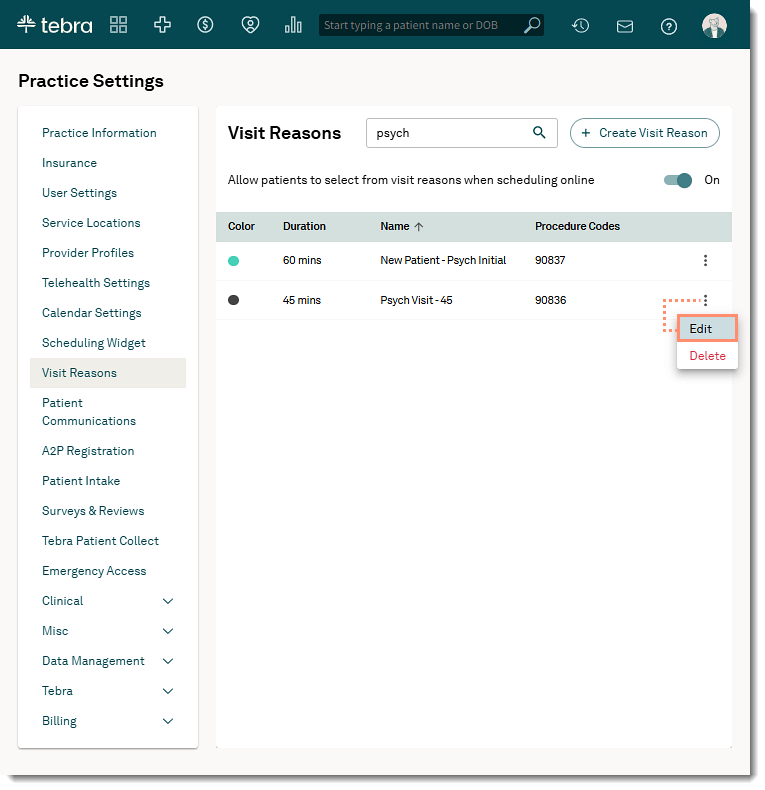
- Click the more option icon and select Edit. The Edit Visit Reason panel opens.
 Tip: Use the search bar to find a specific visit reason. Tip: Use the search bar to find a specific visit reason.
|
 |
- Enter applicable changes for the visit reason.
- Visit Reason Name: Update the visit reason name.
Note: Changes to the visit reason name updates all scheduled appointments and will apply to new appointments.
- Duration: Update the the length of the visit in minutes.
Note: Changes to the visit reason duration only applies to new appointments.
- Color: Click and select a color for the visit reason using the color palette, hue slider, or eyedropper. By default, the RGB color value displays for the selected color.
Note: Changes to the visit reason color updates all scheduled appointments and will apply to new appointments.
- Custom Color: If applicable, specify a color using RGB (e.g., 0, 73, 82), HSL (e.g., 187, 100%, 16%), or HEX (e.g., #004952). Click the color mode to change the mode and enter the color value or code.
Note: Multiple clicks may be required to display the applicable color mode.
- Associated Procedures: Add or delete applicable procedure code(s). Configured procedure code(s) will auto-populate on new charge captures created from the patient's appointment card or clinical note (with an appointment) based on the associated appointment's visit reason.
Note: Changes to the visit reason services will not update charges in progress or completed charges.
- To add a procedure, enter at least three characters of the code or name. Then, select the code from the results drop-down list.
- To delete a procedure code, click the trash icon.
- Click Save when finished. The visit reason is updated for all associated scheduled appointments and displays when scheduling a new appointment.
|
|
Delete Visit Reason
Remove visit reasons when they are no longer applicable to the practice. If upcoming appointments are associated with the deleted visit reason, office staff must associate a new visit reason to those appointments.
Note: Deleting a visit reason will not affect auto-populated procedure codes in charges in progress or completed charges.
- Click the more option icon and select Delete. A confirmation pop-up window opens.
- Click Delete to confirm. The visit reason is permanently removed.
- Edit upcoming scheduled appointments to remove the deleted visit reason and select a new visit reason for the appointment.
|
 |