Updated: 04/23/2026 | Views: 30947
The Dashboard provides an efficient interface to manage daily patient appointments, access high-priority tasks, and navigate to other sections in the system. The patient appointments displays for the day and allows you to manage the entire appointment workflow — from check-in to checkout — including running insurance eligibility checks and collecting patient payments.
Navigate Toolbar
- The Platform, Clinical, Billing, Patient Experience, Tebra Payments (if applicable), and Analytics module icons display on the left of the top navigation bar.
- An white icon displays when a module is active on the practice account or is grayed out when inactive. Modules subscriptions are provider based. If your practice has multiple providers, an icon may display in color for all users once a module is activated for a single provider. However, the module features will only be available to the subscribing provider.
- Hover over an icon to view module functions and navigate to other sections in the system.
- Displays the name of the practice.
- Use the top search box to quickly find a patient record, access the last 5 Recent Patients, or to create a new patient chart.
- Click the envelope icon to access the Message Center.
- Click the help icon to access the Help Center in-app to search and view help articles.
- Hover over the User icon to view the Account ID and to access Tebra Community, Customer Care, My Settings, Practice Settings, connect to the Solution Center (if applicable), or sign out of the system.
Note: Users are logged out after 15 minutes of inactivity.
|
 |
Navigate Dashboard
- Change View: Click Dashboard or Calendar to switch views.
- Print: Click the drop-down to print the following options:
- Daily Schedule: Print patient appointments for the day.
- Encounter Forms by Last Name: Print paper encounter forms sorted by the patient's last name.
Note: A provider-specific encounter form must be added to the desktop application (Billing subscribers only).
- Encounter Forms by Time: Print paper encounter forms sorted by the appointment time (Billing subscribers only).
Note: A provider-specific encounter form must be added to the desktop application.
- Patient Balances: Print statements for patients with a balance who are scheduled that day (Billing subscribers only).
- Check Eligibility for All: Click to check primary insurance eligibility for all patients scheduled that day (Billing subscribers only).
- Find Available Appointment: Click to find and book appointments using key filters like provider, visit reason, and location.
- Calendar: Click to navigate to a specific date.
- Filters: Set filters to view appointments.
- Click to select all or specific Providers, Staff, Rooms, Equipment, or Service Locations to view their appointments. The service location filter will not be shown if the practice only has one location.
- Appointment Flow: Click on a tab to view patients as they move through the appointment flow.
- Scheduled: Shows patients scheduled for the day who have not yet arrived. Late Scheduled or Confirmed appointment times displays in yellow.
- In Office: Shows patients for the day with an appointment status of Arrived, Checked In, or Roomed.
- The status of the note displays as Note not started, Note in progress, or Note signed (Clinical subscribers only).
- Roomed appointments status displays in blue.
- Finished: Shows patients for the day with an appointment status of Checked Out, No Show, Rescheduled, or Cancelled.
- No Show, Rescheduled, and Cancelled appointments status displays in red.
- Appointment Details: Displays a preview of the appointment.
- Patient Name: Click to view the patient chart. Or hover over the patient name to view the patient's primary phone number, email, address, last and next appointment, and alert.
- Details: Appointment time, appointment reason, and scheduled provider, staff member, room, and/or equipment shows. Eligibility status shows, when available.
- Video Icon: For Telehealth subscribers, the telehealth video icon displays when the appointment mode is set to "Telehealth".
- Charge Capture Status: View the status of the appointment's charge capture.
- Charge not started: The charge capture has not been created for the appointment.
- Charge in progress: The charge has been created and is currently being worked on.
- Charge in billing: The charge is completed and has been Submitted to biller or Approved.
- Charge completed: The charge is completed and has been Submitted to biller or Approved with the full balance paid.
- Appointment Status: Click to change the status of the appointment.
- Outstanding Items: Click to access high priority tasks that requires your attention.
|
 |
Navigate Appointment Card
Click on the patient appointment to view the appointment card.
- Patient Name: Click to view the patient chart.
- Appointment Status: Click to change the status of the appointment.
- Patient Alert: View alerts added to the patient account.
- Appointment Details:
- Resources: Scheduled provider, staff member, room, and/or equipment.
- Appointment Mode: Indicates if the appointment is in-office or telehealth.
- For telehealth appointments, click Join to start a video visit. It displays 30 minutes before the appointment start time and remains available until two hours after the appointment end time. Click the more options icon to select Copy Patient Link or Resend Link to Patient.
- Location: The service location of the visit.
- Visit Reason: The reason for the visit.
- Appt Note: Displays notes added to the appointment.
- Patient Intake: Displays patient intake status Not sent to patient, Not submitted by patient, Pending Review, Merged, or Rejected.
- When available, click the more options icon to select the option to Send, Start Intake on Kiosk, Print Forms, or Review.
Note: The Patient Intake form sent from the appointment card only includes demographics. To include consent forms or medical history, edit the appointment to send all forms.
- If the provider is not an Engage or Patient Experience subscriber, click Upgrade your account.
- Balance: The patient's account balance and any payment made today.
- Insurance Policy: A policy displays when an insurance case is associated to the appointment.
- Effective: The policy start and end dates.
- Copay: The copay amount.
- Authorizations: If available, the number of visits remaining for the authorization.
- Eligibility: View eligibility status (Billing subscribers only).
- Click the more options icon to select the option to View Report or Check Eligibility.
- Create Clinical Note: Click to open the default clinical note type (Clinical subscribers only).
- To select a different note type, click the drop-down arrow and select the note.
- More Options: Click to select the following options.
|
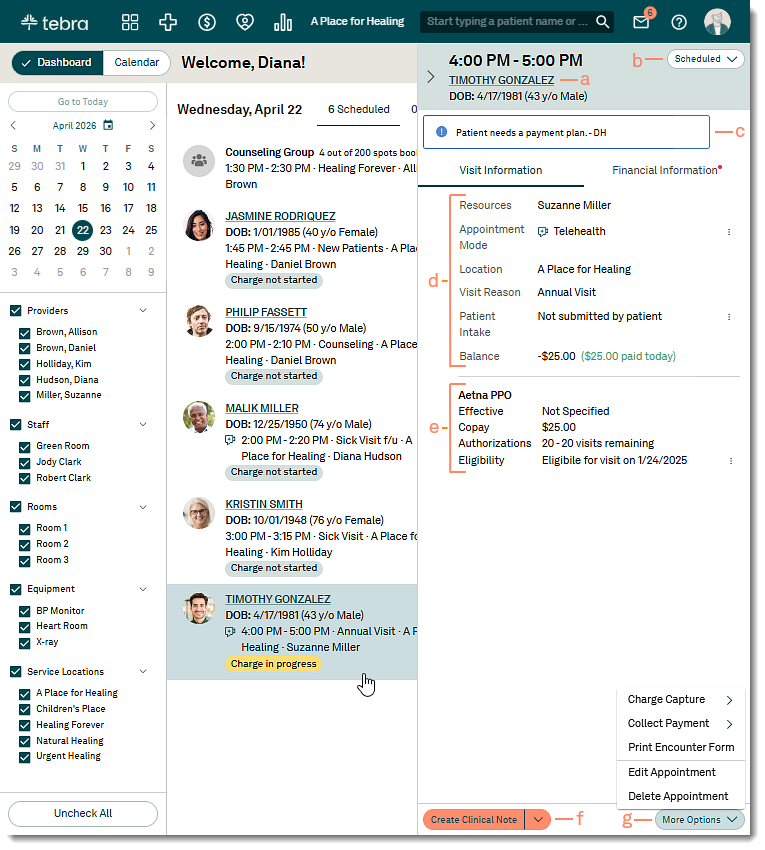 |
- Financial Information: Click the tab to view the charge and payments related to the appointment.
- A red dot in the Financial Information header indicates the charge capture has an outstanding balance.
- Charge Status:
- Charge not started: The charge capture has not been created for the appointment.
- Charge in progress: The charge has been created and is currently being worked on.
- Charge in billing: The charge is completed and has been Submitted to biller or Approved.
- Charge completed: The charge is completed and has been Submitted to biller or Approved with the full balance paid.
- Services: When available, view the details of the charge capture.
- Service: The procedure code(s) assigned to the charge.
- Units: The number of units per assigned service.
- Charge: The charge amount per unit for the assigned service.
- Total: The calculated amount based on the Units multiplied by the Charge.
- Payments Collected: When available, view the details of payment(s) collected or assigned to the charge capture.
- Payment: Displays the date, method, and amount of the payment collected.
- The assigned amount indicates the amount of the payment that will be applied to the charge capture upon approval.
- The posted amount indicates the charge has been approved and the payment has been applied.
Note: If there are multiple payments collected for the appointment, only the posted payments display. The patient's unapplied payment can be viewed in their Account tab.
- To print a non-itemized receipt for the payment, click the print icon.
- Totals: When applicable, view the total amounts of the charge capture.
- Total Service Charge: The calculated amount based on the sum of all service Total.
- Total Payments: The total payments assigned to the charge capture.
Note: The amount is shown as a negative amount.
- Outstanding Balance: The calculated amount based on the Total Service Charge plus the Total Payments amount.
- Print Receipt: Click to print or download an itemized receipt for out-of-network (OON) billing, health savings account (HSA), or flexible spending account (FSA) purposes. The itemized receipt includes information such as provider name, practice tax ID, services provided, charge amounts, patient payments, diagnoses, and the option to include provider NPI and notes.
- Collect Payment: Click to collect a new payment for the appointment.
|
 |
Navigate Group Appointment Card
Click on the group appointment to view the appointment card.
- Appointment Status: Click to change the status of the appointment.
- Group Appointment Details:
- Resources: Scheduled provider, staff member, room, and/or equipment.
- Appointment Mode: Indicates if the appointment is in-office or telehealth.
- For telehealth appointments, click Join to start a video visit. It displays 30 minutes before the appointment start time and remains available until 2 hours after the appointment end time. Click the more options icon to select Copy Patient Link or Resend Link to Patient.
- Location: The service location of the visit.
- Attendees: Displays the list of patients scheduled in the group appointment. If applicable, click the x icon to remove a patient from the group appointment.
- Patient Name: Click to view the patient chart. Or hover over the patient name to view the patient's primary phone number, email, address, last and next appointment, and alert. Optionally, collect a payment or create a charge capture for the patient.
- Create Group Note: Click to create a group note.
- More Options: Click to Edit Appointment details or to Delete Appointment.
|
 |