Schedule Follow-Up Appointment
- Last updated
-
-
Save as PDF
Updated: 01/15/2026 | Views: 5539
Once a patient has been checked out, a follow-up visit is easily scheduled from the Dashboard.
Access Appointment
- From the Finished tab, click on the appointment to view the Appointment Card.
- Click More Options and select Schedule Follow-up. The Find Next Available Appointment page opens.
|
 |
Schedule Follow-up Appointment
- By default the filters are populated based on the appointment. Change the Start Date, Provider, Visit Reason, and Service Location as applicable.
- Click an appointment time slot.
- Click the back or forward button to navigate to a previous or next week.
- Book Appointment:
- To book the appointment and add additional details (e.g., telehealth visit, send patient intake, etc.), click Review & Add Details. The Edit Appointment page opens.
- To book the appointment without adding additional details, click Book (time) On (day . The confirmation message displays. Available actions after the appointment is booked:
- Book Another Appointment: Click to book another appointment for the patient using the same filters.
- To clear the filters to book a new appointment, click Reset Filters.
- View on Calendar: Click to view the appointment on the calendar.
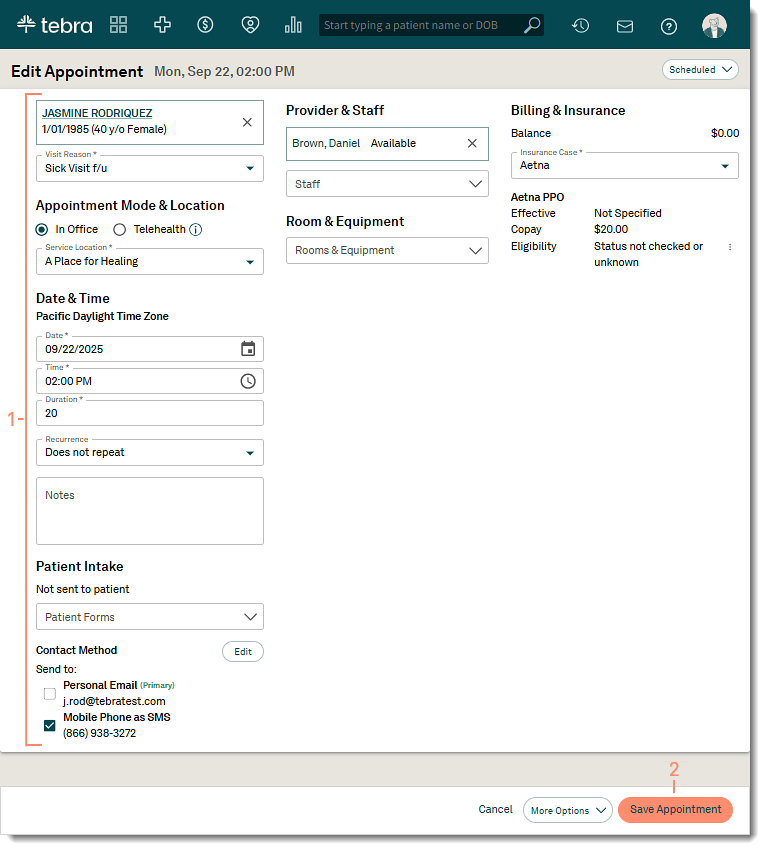
- Edit Appointment: Click to change the appointment mode, set recurrences, add a note, send intake forms, add staff/room/equipment, or select a different insurance case.
|
 |
Edit Appointment
If applicable, edit the scheduled appointment to change the appointment details or send intake forms.
- Make the applicable changes.
- Appointment Mode: The default Appointment Mode is "In-Office". To schedule a telehealth appointment, select "Telehealth" (Telehealth subscribers only).
- Recurrence: Select a pre-set or custom recurring appointment option if necessary.
- Notes: Add an optional note about the appointment that populates as the chief complaint of the patient’s clinical note (Clinical subscribers only).
Note: The note will not populate in the chief complaint of an AI note.
- Patient Intake: Click to select which patient intake forms to send (Engage subscribers and accounts with access to Patient Intake only).
- Staff: Search for and select a staff member if necessary. Multiple staff members may be selected.
- Room & Equipment: Search for and select a room/equipment if necessary. Multiple rooms and equipments may be selected.
- Billing & Insurance: If the patient has multiple insurance cases, click the drop-down arrow to select a different insurance case.
- Click Save Appointment when finished.
|
 |


