Enter New Payment and Process Virtual Card
- Last updated
-
-
Save as PDF
Updated: 03/11/2026 | Views: 368
Tebra Payments and Patient Collect (Stripe) activated practices can manually enter and process virtual card payments received from insurance companies, health plans, or third-party payment vendors. The virtual card payment feature securely deposits virtual card payments into the bank account designated for their payouts.
To process virtual card payments in the web platform, review Tebra Payments: Process Virtual Card Payment or Patient Collect (Stripe): Process Virtual Card Payment.
Note: The image examples provided in this article are of a Tebra Payments activated practice.
Enter New Payment and Process Virtual Card
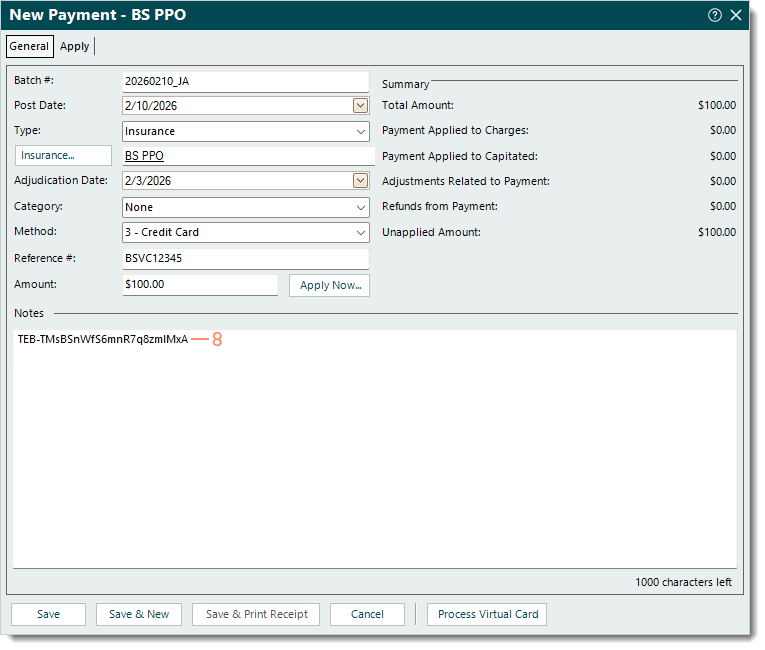
- To prevent duplication, find the payment and verify the payment is not in the system. Then, click New. The General tab of the New Payment window opens.
- Enter the following information as necessary.
- Batch #: If applicable, the batch number for the payment.
 Tip: Entering a batch number is helpful for running reports when there is a consistent naming convention such as the posting date with the user's initials (e.g., MMDDYYYYAB). Then, when running a report (e.g. Payments Detail), customize and filter by that specific batch number. Tip: Entering a batch number is helpful for running reports when there is a consistent naming convention such as the posting date with the user's initials (e.g., MMDDYYYYAB). Then, when running a report (e.g. Payments Detail), customize and filter by that specific batch number.
- Post Date: Defaults to the current date. If necessary, enter a different posting date for the payment.
- Type: Click the drop-down arrow and select the type of payment. Additional options display depending on the type selected.
- If Insurance is selected, click Insurance to search and select the appropriate payer. Then, enter the Adjudication Date provided on the explanation of payment which indicates the date the payer processed the claim(s).
- If Other is selected, enter the source of the payment. Then, click Appointment to search and select the appropriate patient appointment if applicable.
- Category: If the practice uses categories for certain payment reports, click the drop-down arrow and select the appropriate category.
- Method: Click the drop-down arrow to select how the payment is being made.
- Reference #: The reference number for the payment if applicable.
- Amount: The total amount of the payment.
- Click Process Virtual Card. The Process Virtual Card window opens and Virtual Card Payment displays.
|
 |
- Enter the Payment Amount and optional billing address Zip Code (listed on the virtual card statement for card processing).
- Enter the payment card details.
- For Tebra Payments activated customers, click Enter Credit Card Details then enter the Card Number, Expiration month and year, and the CVV code.
- For Patient Collect (Stripe) activated customers, enter the Card Number, Expiration Date (month/year), and CVC code.
- Click Process Transaction when finished. The Payment Receipt displays.
Note: For Tebra Payments activated practices, the virtual card payment displays in the web platform under the Transactions (with Virtual Card as the Type). For Patient Collect (Stripe) activated practices, the payment displays in the Stripe Dashboard under the Payments section of the Transactions.
|
 |
- For future reference purposes, click the copy icon to copy the Confirmation number. Then, close the window to return to the General tab of the New Payment window.
|
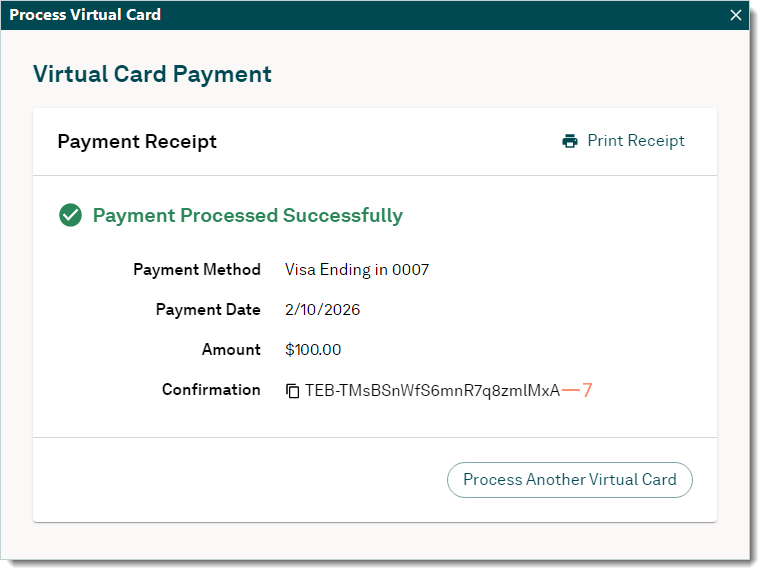 |
- Paste the Confirmation number in the Notes field. If applicable, enter any additional internal notes related to the payment.
- Proceed as necessary.
- To apply payment(s) to the appropriate service line(s), click Apply Now.
- To save the Payment record and apply payment(s) at a later time, click Save. A confirmation pop-up appears. Click Yes to continue without applying the payment.
- To save the Payment record and enter a new payment using the same batch number, post date, and payer type, click Save & New. A confirmation pop-up appears. Click Yes to continue without applying the payment.
|
 |