Send New Message
Updated: 06/08/2026
| Views: 4489
The Message Center enables users to easily send and receive messages within the practice and communicate with patients through email or text.
Navigate to New Message
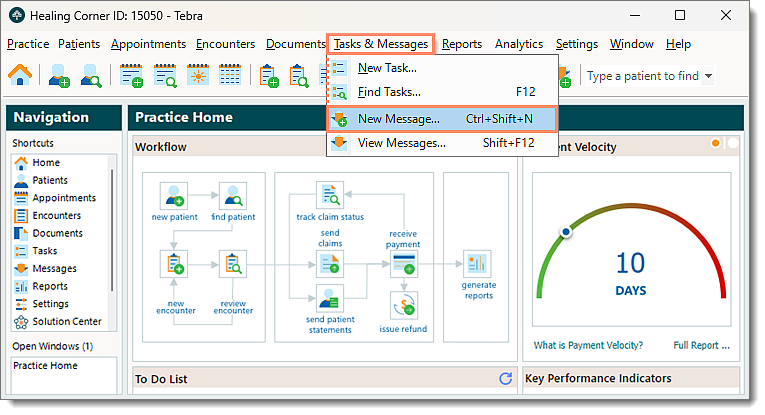
- Click Tasks & Messages > New Message. The New Message window opens.
 Tip: For faster navigation, click the envelope icon on the Toolbar or press Ctrl+Shift+N on the keyboard. Tip: For faster navigation, click the envelope icon on the Toolbar or press Ctrl+Shift+N on the keyboard.
- If the Messages window also known as the Message Center is already open, click + New Message.
|
 |
New Message to Staff
Users within the practice can easily and securely send messages to one another through the Message Center. The system also allows you to reference patients, encounters, and documents.
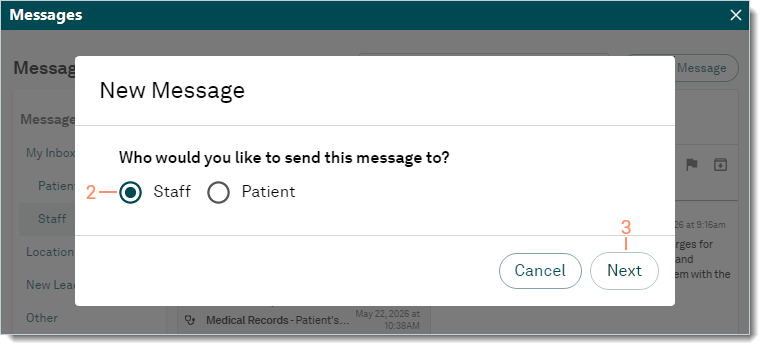
- Navigate to New Message. The New Message window opens.
- Click to select "Staff".
- Click Next. The New Message to Staff window opens.
|
 |
- Enter the information.
- To: Enter one or more recipients.
- Reference: If applicable, reference patient(s), document(s), and/or encounter(s) related to the message.
- Add Patient: Enter all or part of a patient's name to search and select a Patient record.
- Add Document: Click to browse and attach a document (up to 10MB in size).
- Add Encounter: Click to search and select an Encounter record.
- Subject and Body: The message subject and details.
- Click Send when finished. The message is sent.
|
 |
New Email to Patient
Messages can be emailed directly to individual patients or to a Patient Group. If the email has more than one patient selected, the email is sent to each patient individually and the other recipients are undisclosed.
 Important Note: Do not include PHI as this method is non-secure. To send sensitive information, use the Patient Portal. Important Note: Do not include PHI as this method is non-secure. To send sensitive information, use the Patient Portal.
- Navigate to New Message. The New Message window opens.
- Click to select to send this message to "Patient".
- Click to select to select to send the message by "E-mail".
- Click Next. The New Email to Patient window opens.
|
 |
- Enter the information.
- To: Enter one or more recipients.
Note: When more than one patient is selected, the email is sent to each patient individually and the other recipients are undisclosed.
- To send the message to a specific patient group, click Patient Group then select the group from the drop-down menu.
- From: Click to select who the message is from.
- Provider: Select the specific provider from the drop-down menu.
- Location: The location name auto-populates for single-location practices. If the practice has multiple locations, select the specific location from the drop-down menu.
- Template: If applicable, select a message template from the drop-down menu. Once selected, the template information auto-populates the Subject and Body.
- If a template was not selected, enter the Subject of the message and the message details in the Body.
- If both a Patient Group and message template was selected, the Schedule option becomes available.
- To send the message right away, keep the default selection of "Send Immediately".
- To select a future date and time to send the message, click to select "Set Specific Date/Time". Then, enter the date and time.
- Click Preview Email to see how the message appears to recipients. Then, click Send Email to send the message or click Edit to revise the message.
|
 |
New Text to Patient
Text messages can be sent to patient(s) from a provider or service location and when a patient replies, the message displays in the Location Inbox. Text messages are sent to patients within an hour so it is important to only send them during normal business hours (ideally between 8:00 AM and 3:00 PM).
- If the message is sent to multiple patients, each patient receives individual messages and the other recipients are undisclosed.
Important Note: Do not include PHI as this method is non-secure. To send sensitive information, use the Patient Portal.
- Navigate to New Message. The New Message window opens.
- Click to select to send this message to "Patient".
- Click to select to select to send the message by "Text".
- Click Next. The New Text to Patient window opens.
|
 |
- Enter the information.
- To: Enter one or more recipients.
Note: When more than one patient is selected to receive the message, the text is sent to each patient individually and the other recipients are undisclosed.
- From: Click to select who the message is from.
- Provider: Select the specific provider from the drop-down menu.
- Location: The location name auto-populates for single-location practices. If the practice has multiple locations, select the specific location from the drop-down menu.
- Body: Enter the message details.
- Click Send. The text message is sent.
|
 |