Updated: 02/27/2025 | Views: 2987
On February 20, 2025, your Tebra account will be upgraded to the latest version. Features will be available the following day with the exception of specified timelines.
Billing Reports: All Encounters Report
Increase practice productivity with the customizable All Encounters report. Quickly identify encounters that are ready to be approved and which encounters require further review to avoid rejections and claim denials. Feature will be available by the end of February 2025.
February 27, 2025 Update: Feature availability for all customers has been moved to end of March 2025.
|
Navigate All Encounters Report
- Hover over the Analytics icon and click Encounters. The All Encounters report page opens.
- Search: Click to search for specific report data.
- Refresh Data: Click to refresh the report data.
- Table Filters: By default, all encounters within the past seven days display.
- To filter by specific criteria, click the filter icon and add the appropriate filter(s) (e.g., Patient Name, Encounter Status, Rendering Provider).
- To remove a filter, click X.
- Table Configuration: Click to adjust the table density (e.g., Compact, Standard, Comfortable) and/or manage the table columns to hide/show a column.
- Table Actions: Click to export the report to CSV or Excel, create a new report, or to save or delete a customized report.
- Columns: Customize the report to only display specific columns and in the preferred order. Available options depend on the column data.
Note: Data grouping and aggregation does not save when creating a new report.
- To reorder the columns, click the column header then drag and drop in the preferred order.
- To sort by ascending or descending, hover over the column header and click the arrow.
- To sort more than one column, hold down the Shift key on the keyboard and click to select the column(s).
- To sort, unsort, hide or manage columns, hover over the column header and click the more options icon.
- To group all records by a specific column, hover over the column header and click the more options icon. Then, select Group by (column name).
Note: Once applied, an additional column displays with the grouping.
- To aggregate a column by count (size), sum, average, etc., hover over the column header and click the more options icon. Then, select the appropriate option from the Aggregation drop-down menu.
Note: Once applied, values display at the footer of the report table and at the group level when grouping data.
- Encounter Summary: Displays information such as the encounter ID number, date of service, patient name, rendering provider, payer scenario, encounter status, etc. Scroll as necessary to view more information.
- To view the Procedure Details, click the arrow on the left of the encounter ID number to expand.
- To open and view the Charge Capture, click the Encounter ID.
- To open and view the Patient Facesheet, click the Patient Name.
|
 |
Desktop Application (PM) Analytics: All Encounters Report
The All Encounters report is also accessible from within the Desktop Application (PM). Feature will be available by the end of February 2025.
February 27, 2025 Update: Feature availability for all customers has been moved to end of March 2025.
|
Navigate to All Encounters Report
- On the top menu bar, click Analytics > Encounters > All Encounters. The All Encounters report displays.
|
 |
Electronic Claim Attachments
Tebra’s integrated electronic claim attachment functionality streamlines the submission of supporting documentation directly within our platform, eliminating the need for manual methods like faxing or mailing. This reduces claim processing times, lowers costs, and minimizes errors that lead to denials. Practices and billers benefit from faster reimbursements, improved workflows and secure handling of sensitive patient information.
Electronic claim attachments (up to 10 attachments per claim) can be included for an additional charge. For details, refer to the Pricing section of the Pricing Policy page.
|
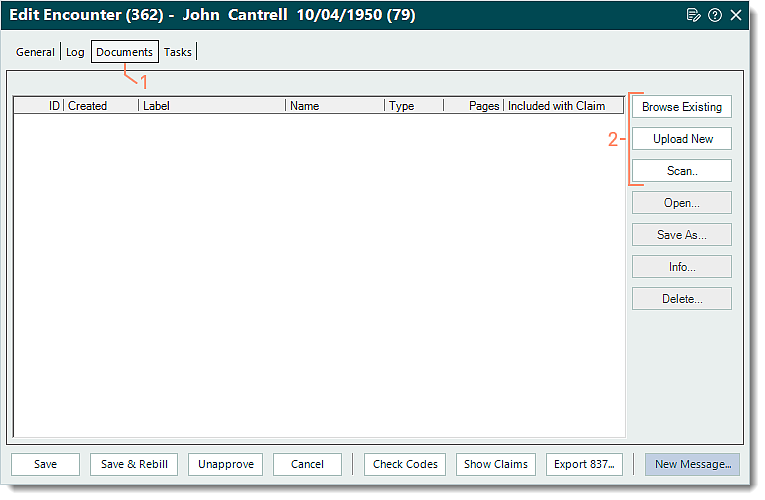
Include Document with Claim
- Create or edit an encounter that requires the supporting documentation. Then, select the Documents tab. The documents list displays.
- Click the appropriate option to add the document to the Encounter record. If the document was previously added to the Encounter record and is already listed, review the Include Existing Encounter Document section of the Electronic Claim Attachments help article.
Note: Supporting documents for electronic claims must be in PDF or TIFF format.
- To select a document that is already uploaded and stored under Documents, click Browse Existing.
- To add a new document file from the computer, click Upload New.
- To add a new document using the scanner, click Scan.
Note: In order to use the scanning feature, the scanner must be TWAIN compliant. For more information, visit the TWAIN website.
|
 |
Billing Resolved Issues
- Fixed an issue where some Jopari ERAs were missing
Back to top
Clinical
Clinical Resolved Issues
- Fixed an issue where providers received an error message when attempting to view a batch prescription
- Fixed an issue where users experience a continuous loading icon when accessing a patient note
- Fixed an issue where users were unable to access actions items when viewing a document through a clinical note
Engage
Patient Intake Modifications
Patient intake modification allows customers the flexibility to decide which fields are required in standard intake forms. This ensures only necessary information for the practice is collected prior to the appointment. Modifying patient intake forms saves the practice valuable time by reducing follow-up calls for missing information. It also minimizes liability by avoiding the collection of unnecessary data, such as Social Security Numbers, and simplifies the process for both patients and healthcare providers.
Modifications are available for the following forms:
- Basic Information
- Demographics
- Emergency Contact
- Financial Information
- Additional Information
Feature available for Engage subscribers and accounts with access to Patient Intake.
Modify Intake Forms
- Hover over the User icon and click on Practice Settings. The Practice Settings page opens.
- Click Patient Intake. The Patient Intake settings page opens.
- Click the more options icon next to a profile intake form. Then, click Edit form. The form opens.
|
 |
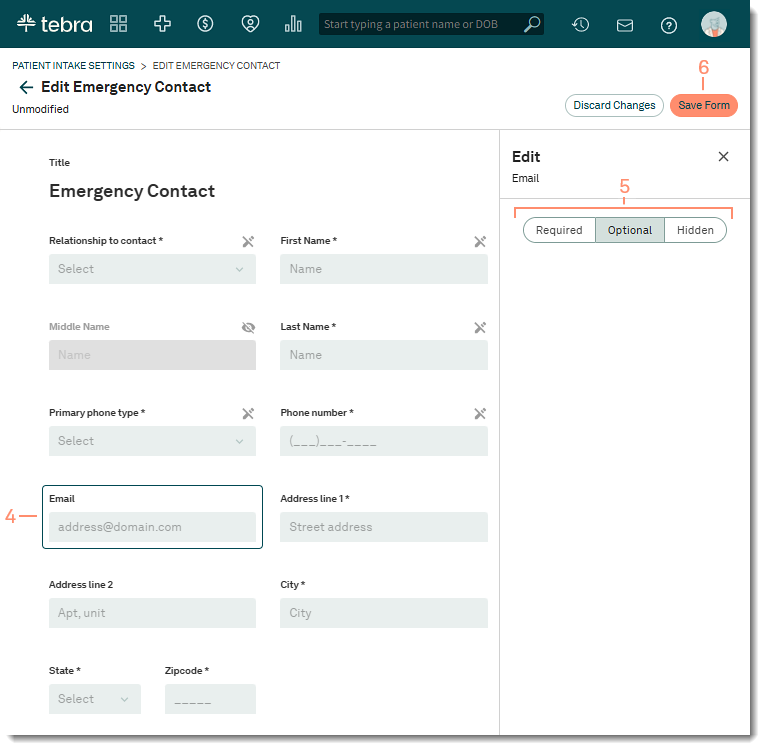
- Click the field. The Edit panel opens.
Note: Fields marked with an asterisk (*) and a disabled edit icon indicates the field is required to retain the quality of data and cannot be modified.
- Click Required, Optional, or Hidden to customize the form. The field status updates:
- Available Status:
- Required: Fields marked with an asterisk (*) indicates the field is required.
- Optional: Fields without an icon is optional and patients can skip or enter the information into the field.
- Hidden: Fields marked with a hidden icon will be removed from the form when the patient intake is sent.
- Click Save Form when finished.
|
 |
Engage General Improvements
- The new enhanced OBGYN intake forms improves productivity and operational efficiency by merging the patient's gynecological and pregnancy history data within the intake forms directly into patient charts.
Feature available for Engage subscribers and accounts with access to Patient Intake.
Tebra Payments
Tebra Payments Resolved Issues
- Fixed an issue where users received an error message when attempting to process a payment