Updated: 01/16/2026 | Views: 15490
Insurance policies that may provide reimbursement of services are added and managed within patient cases.
Unless you are adding an insurance policy at the time of creating a new patient record, you typically begin with navigating to the Cases tab (of the Patient record) before adding, editing, reordering or removing an insurance policy.
Add Insurance Policy
One or more insurance policies can be added to the Patient record either at the time of creating a new patient record or when adding or editing a case within an existing Patient record.
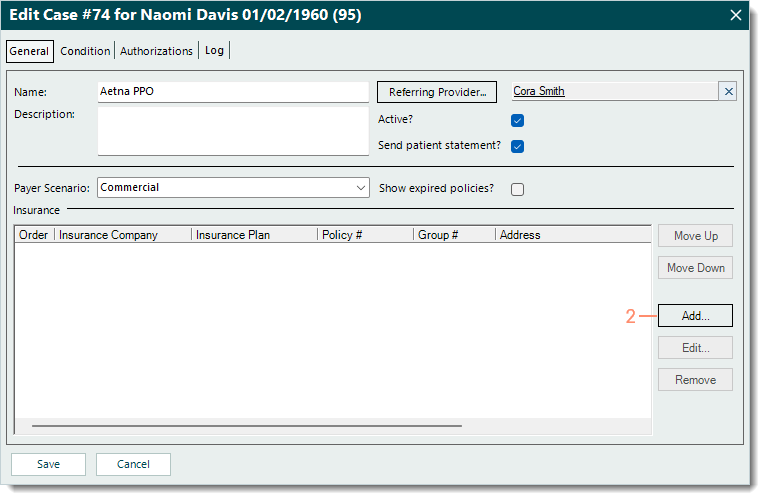
- Navigate to Cases then double click the case to open (or add a new case). The Edit Case (or New Case) window opens.
Note: Add a new case if the payer scenario has changed. For example, a patient that previously received treatment under their commercial insurance comes into the practice with an injury that is related to workers' compensation or an auto accident.
- Under the Insurance section, click Add on the right of the window. The Select Insurance Plan window opens.
|
 |
- To narrow down the list of plans, enter the zip code or PO Box number found on the patient's insurance card in the Look for search box. Then, click Find Now.
- Double click to select the insurance plan from the listed results. The General tab of the New Insurance Policy window displays by default.
Note: It is best practice to select an existing insurance plan only if the Insurance Company, Plan Name, and Address match what is on the patient's insurance card.
- If the insurance plan is not listed, click New at the bottom of the window and create a new insurance plan.
|
 |
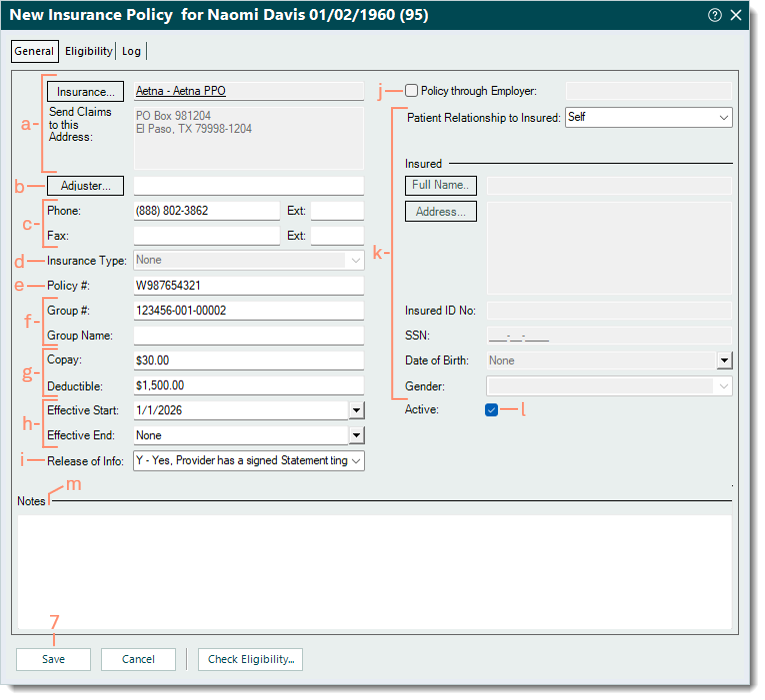
- Enter the General tab information:
- Insurance: Auto-populates with the information from the insurance plan selected.
- Adjuster: If applicable, the insurance adjuster's name.
- Phone and Fax: The phone and fax numbers auto-populates with the information from the insurance plan selected. Edit the number(s) as necessary.
- Insurance Type: Applicable for secondary Medicare only. Click the drop-down arrow to select the insurance type code.
- Policy #: The patient's policy number as shown on their insurance card.
- Group # and Name: If applicable, the group number and name as shown on the patient's insurance card.
- Copay and Deductible: If available, the patient copay and/or deductible amounts indicated by their policy.
- Effective Start and End: The policy's effective start and end dates.
- Release of Info: Y - Yes is selected by default. Click the drop-down arrow to select a different HIPAA release of information code.
- "Policy through Employer": Click to select to enter the employer name.
- Patient Relationship to Insured: Click the drop-down arrow to select the relationship if the the patient is different than the insured. Otherwise, leave it set to Self.
- If the relationship selected is other than Self, enter the subscriber's information under the Insured section.
- "Active": Selected by default. To change the policy to inactive at any time, click to clear the selection.
- Notes: If applicable, notes related to the insurance policy.
- If available, check patient eligibility.
- Click Save at the bottom of each relevant window until it is no longer available.
|
 |
| |
|
Edit Insurance Policy
- Navigate to Cases then double click the case to open. The Edit Case window opens.
- Under the Insurance section, double click the policy to open. The General tab of the Insurance Policy window displays by default.
- Make the necessary changes to the General tab information.
- Click Save at the bottom of each relevant window until it is no longer available.
|
 |
Change Insurance Policy Order
Two or more insurance policies for a case are listed in the order in which they are to be billed (e.g. Primary, Secondary, Tertiary) and can be changed as needed.
- Navigate to Cases then double click the case to open. The Edit Case window opens.
- Under the Insurance section, click once to select the policy.
- Then, click Move Up or Move Down. The policy is moved.
- Click Save at the bottom of each relevant window until it is no longer available.
|
 |
Remove Insurance Policy
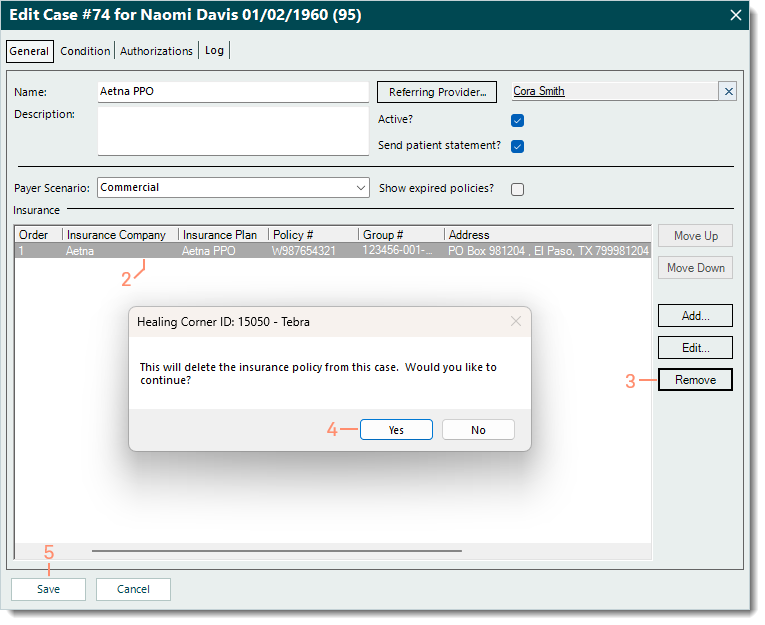
- Navigate to Cases then double click the case to open. The Edit Case window opens.
- Under the Insurance section, click once to select the policy to remove.
- Click Remove. A confirmation pop-up appears.
- Click Yes to confirm the removal. The policy is deleted from the case.
Note: Only insurance policies with no other records associated, such as a claim, can be deleted.
- Click Save at the bottom of each relevant window until it is no longer available.
|
 |