Updated: 01/08/2026 | Views: 58552
Patient records are used to manage patient information (e.g., demographics, insurance policies, account details) under several tabs at the top of the record. Once the General information has been entered and saved, select the tabs to enter Cases and patient Alerts, view Account information and Tasks, and attach Documents. You can also perform real-time eligibility checks on one or more insurance policies within the Patient record.
You always begin with finding the patient before creating, editing, deactivating, reactivating, or deleting a patient.
Find Patient
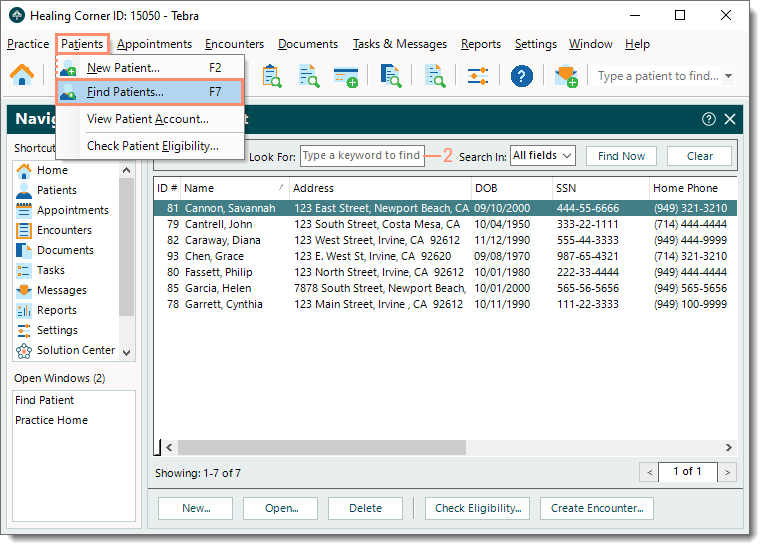
- On the top menu bar, click Patients > Find Patients. The Find Patient window opens.
 Tip: For faster navigation, click Patients under the Navigation pane Shortcuts, click the Find Patients icon, use the patient search box on the Toolbar, or press F7 on the keyboard. Tip: For faster navigation, click Patients under the Navigation pane Shortcuts, click the Find Patients icon, use the patient search box on the Toolbar, or press F7 on the keyboard.
- In the Look For search bar, enter all or part of a keyword for the patient then click Find Now. The search results are listed.
Note: A maximum of 20 results per page is listed. Click the arrows on the bottom right of the window to navigate between pages or click in the page number field and type a page number then press Enter on the keyboard.
|
 |
New Patient
- To prevent duplication, verify the patient is not in the system then click New at the bottom. The New Patient window opens.
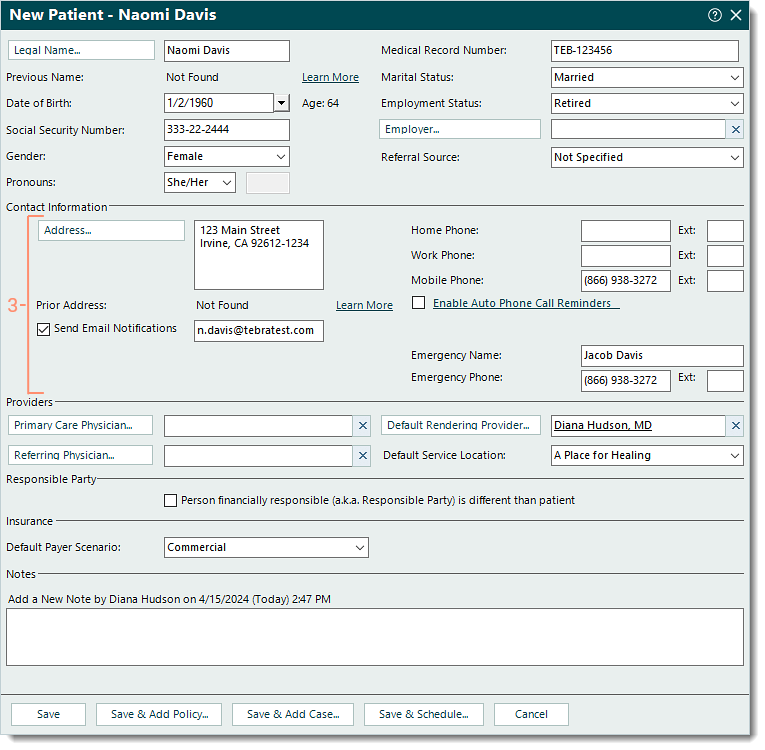
- Enter the information.
- Legal Name: The patient's first, middle, and last name.
- Previous Name: Displays Not Found by default until the patient's previous name is entered on the Patient Profile in the web platform.
- Date of Birth: The patient's date of birth (DOB). Once entered, the age in years displays.
- Social Security Number: The patient's social security number.
- Gender: Click the drop-down arrow to select Female, Male, or Unknown.
- Pronouns: Click the drop-down arrow to select He/Him, She/Her, They/Them, Ze/Zir, Xie/Hir, Co/Co, En/En, Ey/Em, Yo/Yo, Ve/Vis, or Other.
- If Other is selected, enter the patient's specific pronoun.
- Medical Record Number: The patient's medical record number (MRN) if applicable.
- Marital Status: Click the drop-down arrow to select Annulled, Divorced, Interlocutory, Legally Separated, Married, Polygamous, Never Married, Domestic Partner, or Widowed.
- Employment Status: Click the drop-down arrow to select Employed, Retired, Student (Full-Time, Part-Time), or Unknown.
- If applicable, click Employer to search and select an employer. If the employer is not listed, click New at the bottom of the Find Employer window and enter the information. Then, click Save.
- Referral Source: Defaults to Not Specified. Click the drop-down arrow to select the appropriate referral source.
|
 |
- Enter the Contact Information.
- Address: The patient's address. Tebra supports United States and Canadian addresses.
- Prior Address: Displays Not Found by default until the patient's prior address is entered on the Patient Profile in the web platform.
- "Send Email Notifications" is selected by default. To opt the patient out of email notifications (e.g., appointment reminders, email statements), click to clear the selection.
- If applicable, enter a valid email address for the patient.
- Home, Work, and Mobile Phone: Contact phone number(s) for the patient.
- To opt the patient into receiving automated phone call appointment reminders, click to select "Enable Auto Phone Call Reminders".
Note: The automated reminder first searches for a mobile number; if one is not entered, it will search for the home number.
- Emergency Name and Phone: Emergency contact information for the patient.
|
 |
- Enter the Providers information.
- If applicable, click Primary Care Physician and Referring Physician to search and select a physician.
- If the physician is not listed, click New at the bottom of the Select Physician window and enter the information. Then, click Save.
- To auto-populate the Rendering Provider when creating new encounters, click Default Rendering Provider to search and select a provider.
- If the provider is not listed, click New at the bottom of the Select Default Rendering Provider window and enter the information. Then, click Save.
- To auto-populate the Location when creating new encounters or appointments for this patient, click the drop-down arrow to select the Default Service Location.
|
 |
- To enter Responsible Party information, click to select "Person financially responsible is different than patient". Once selected, additional fields display.
- To create a Default Case once the Patient record is saved, click the drop-down arrow to select the Default Payer Scenario.
Note: The case created will only have the default information. Edit the case as necessary to add details (e.g., specific name, policy).
- Notes: Internal notes related to the patient. Patient record notes (also known as patient journal notes) are permanent and cannot be deleted, only hidden.
- Click Save or continue to do one of the following as necessary.
- To save the record and add one or more insurance policies, click Save & Add Policy
Note: This option requires the selection of a Default Payer Scenario as the system creates a Default Case for the policy.
- To save the record and add one or more cases, click Save & Add Case.
- To save the record and schedule an appointment for the patient, click Save & Schedule.
|
 |
Edit Patient
- Find the patient then double click to open. The General tab of the Edit Patient window opens by default.
- Make the necessary changes.
Note: The patient's Previous Name and Prior Address that displays can be updated on the Patient Profile in the web platform.
- Click Save.
|
 |
Deactivate/Reactivate Patient
Deactivate a patient's record so that it no longer appears when searching for patients in tasks such as Appointment Details or Encounter Details. Then, restore availability by reactivating the patient record when necessary.
Note: Deactivated patients still appear in the Find Patient window but are indicated with No under the Active column.
- Find the patient then double click to open. The General tab of the Edit Patient window opens by default.
- Locate the "Active" option on the right of the patient's name and deactivate or reactivate the patient.
- To deactivate, click to clear the selection.
- To reactivate, click to select.
- Click Save.
|
 |
Delete Patient
Only patients with no other records associated, such as a case, an encounter or appointment, can be deleted.
Note: For Clinical subscribers, clinical data associated with the patient does not prevent the patient from being deleted. To prevent the loss of historical clinical data that may be associated with the patient, it is recommended to deactivate the patient instead.
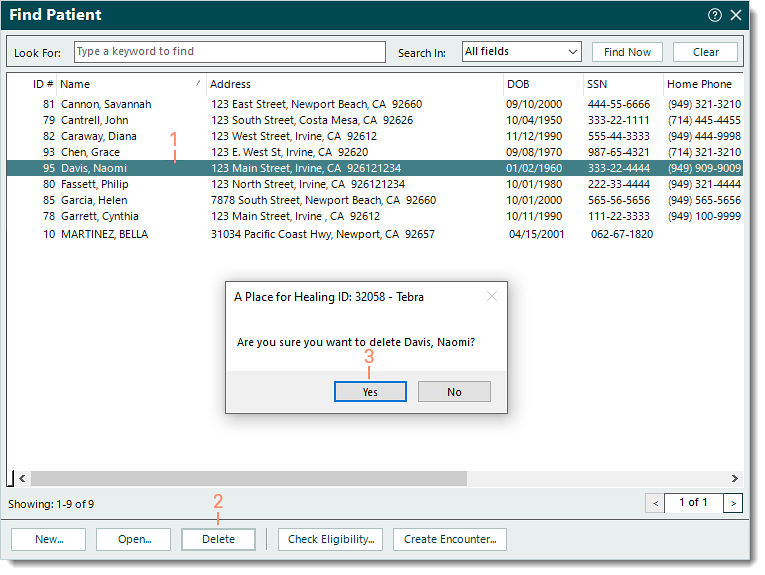
- Find the patient then click to select. The patient is highlighted.
- Click Delete. A confirmation pop-up appears.
- Click Yes to confirm the deletion. The patient is deleted.
|
 |


