Updated: 01/08/2026 | Views: 8714
Tebra offers the flexibility to go paperless by ordering patient lab tests electronically. With electronic lab ordering (eLab), providers can instantly send requests to labs of their choice and receive real-time results that automatically record in a patient's chart. After the provider creates a lab order request, the staff member responsible for processing the eLab order can select the lab facility, patient diagnosis, lab test(s), and generate lab labels, as necessary.
Tebra has two lab experiences based on when the practice enrolled for electronic labs. If this help article does not reflect the lab experience for your practice, review Process an eLab Order.
Access eLab Order
 Tip: Before processing an eLab, verify the patient's demographics, insurance information, and guarantor is up to date. Tip: Before processing an eLab, verify the patient's demographics, insurance information, and guarantor is up to date.
- Hover over the Clinical icon and click on Labs/Studies. The Labs/Studies page opens.
- Click Pending. Pending lab orders displays.
- Click Create eLab. The Create Order pop-up window opens.
|
 |
Process eLab Order
- Review and edit the lab type, as necessary.
- Order Type: By default, Order is selected.
Note: To indicate that the specimen will be drawn later at the lab, set the Collection Date to a future date.
- Bill Type: The lab order is billed to the responsible party listed on the patient’s chart (e.g., insurance). If applicable, click to change the responsible party. Available options:
- Client: The lab bills the practice.
- Patient: The lab bills the patient.
- Third Party: The lab bills the patient's insurance.
- Cancel Order: If necessary, click to cancel the lab order. Enter the reason for cancellation in the pop-up window and click Cancel Order. Then, click X to close the window.
- Review and edit the order information, as necessary.
- Ordering Provider: By default, the ordering provider from the create lab window populates. If applicable, click to select a different provider.
- Lab: If the provider is enrolled with multiple labs, click to select which lab the order will be sent to.
- Review and edit the patient details, as necessary.
 Important Note: Changes saved in the lab order window will not update the patient's chart. Important Note: Changes saved in the lab order window will not update the patient's chart.
- To edit the Patient Demographics, Guarantor, or Insurance, click Edit next to the section. Make the changes and click Save when finished.
- Click Next when finished. The Tests tab displays.
|
 |
- Add lab test(s) by searching, selecting from the recent lab list, or select a test group.
- To search for a test, enter the test name or order code in the Search Tests field and select from the list of results.
- To select from the patient's recently ordered test(s) with the lab, click to select from the top section of the list.
Note: The top section is only available if lab tests were previously ordered for the patient from the selected lab.
- To select a test group, click to select the test group name.
- To preview which tests are included in the group, click the plus icon.
- To create a new test group for the selected lab, click Manage Test Groups.
- To select recently ordered test(s) with the lab, click to select from the list.
Note: The list automatically displays tests frequently or recently ordered by the practice and cannot be edited.
- Click Next when finished. The Diagnosis tab displays.
- If the selected test is an Ask at Order Entry (AOE) test, the Clinical tab displays. Select applicable answers, then click Next to proceed.
|
 |
- The patient's diagnosis is auto-populated from the create lab window. If applicable, remove or add additional diagnoses.
- To remove the diagnosis, click to clear the selected diagnosis.
- To search for a diagnosis, enter the code name or number Search Diagnosis field and select from the list of results.
- To select from the patient's recent diagnosis with the lab, click to select from the top section of the list.
Note: The top section is only available if a lab was previously ordered with the diagnosis for the patient from the selected lab.
- To select from the recent diagnosis list, click to select the diagnosis.
Note: The list automatically displays diagnoses frequently or recently ordered by the practice and cannot be edited.
- Click Next when finished. The Review tab displays.
- If an Advance Beneficiary Notice of Non-coverage (ABN) is required, the Coverage tab displays. Review the Medical Necessity Checks and resolve as applicable. Then, click Next to proceed.
|
 |
- Review and edit the lab details, as necessary.
- Order Date: The current date and time displays. If applicable, enter a different order date and/or time.
- Coll. Date: The current collection date and time displays. If applicable, enter a different collection date and/or time.
- Coll. by: The current user logged in displays. If applicable, enter a different collector.
- Priority: By default, Routine is selected. If necessary, click to select Stat or Timed.
- Copy to: To send a copy of the lab order results via email, fax, paper, or call to another provider, click Add. The Ordering Provider pop-window opens.
- Result CopyTo Option: By default, Paper is selected. To change the send option, click to select Email, Fax, or Call.
- Common List: If applicable, click to select a previously copied provider. The previously entered information displays.
- Provider Details: Enter the provider's First and Last Name, NPI, Code, Country, Address, Phone, Fax, and Email as applicable.
Note: The required fields may vary based on the selected copy to option.
- Click Save to Order when finished.
- Referring: To document the referring provider in the lab order, click Add. Enter the provider's First and Last Name in the pop-up window. Then, click Add.
Note: Referring provider(s) added to the lab order will not be added to the practice's referring provider list.
- Diagnosis: Displays the selected diagnosis. If edits are necessary, go back to the Diagnosis section to update.
- To go back to the Diagnosis section, click Back until the Diagnosis section displays or click Diagnosis in the navigation bar.
- Test Specific Information: Displays the selected test(s). If edits are necessary, go back to the Tests section to update.
- To go back to the Tests section, click Back until the Tests section displays or click Tests in the navigation bar.
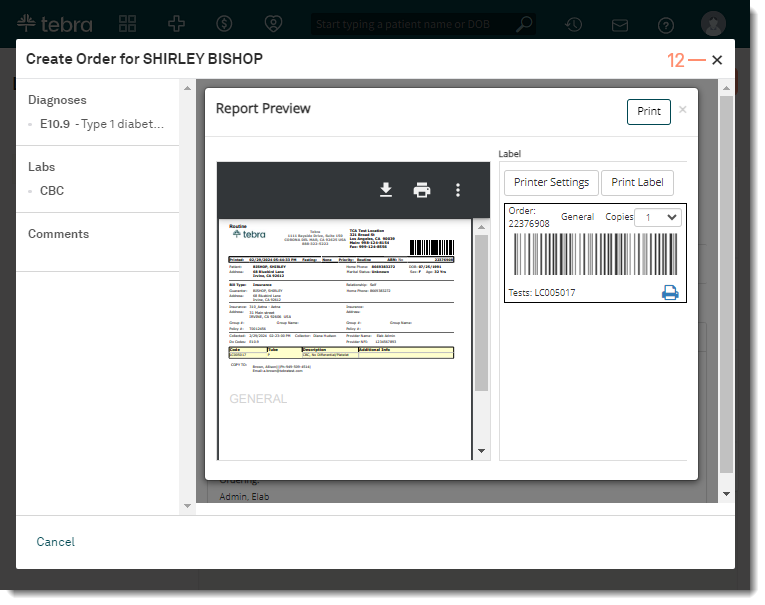
- Click Completed when finished. The Report Preview pop-up window opens.
|
 |
- If applicable, print a copy of the lab order or a label.
- To generate a PDF of the electronic lab order, click Print.
- To generate a label, click Print Label.
Note: The user's device must be connected to a label printer (e.g., Dymo) to generate a label. Labels are saved as an attachment in the pending lab order for clinical staff members to view and print again as necessary.
- Click the X to close the lab order window. The lab status is now Pending under Labs/Studies and in the patient's chart. Once results are received, the provider can review and sign the lab.
Tip: Refresh the Labs/Studies page to show the updated lab status.
|
 |