Patient Statements Troubleshooting
- Last updated
-
-
Save as PDF
Updated: 11/10/2021
Views: 8082
In Kareo, you may sometimes experience issues while sending or printing patient statements such as patients missing in the patient list or on-demand patient statements missing details (e.g., service lines, balance due amount).
Prior to sending or printing patient statements, ensure all patient's responsibility amounts are up-to-date and correct. Apply payments and/or transfer patient balance amount(s) to the patient's responsibility as necessary. Once all of the appropriate claims statuses are Ready for patient statements, prepare the statements then attempt to send or print them again. If you are still experiencing issues after applying payments and/or transferring balances, and preparing the patient statements, follow the steps below as needed.
Patient List is Missing Patient
When a patient is missing in the Send Patient Statements - Confirm Patient List window, the patient's balance or statement history may not meet the Filter Patients criteria and/or specific settings could be causing the issue.
- Find the patient then double click to open. The Edit Patient window opens.
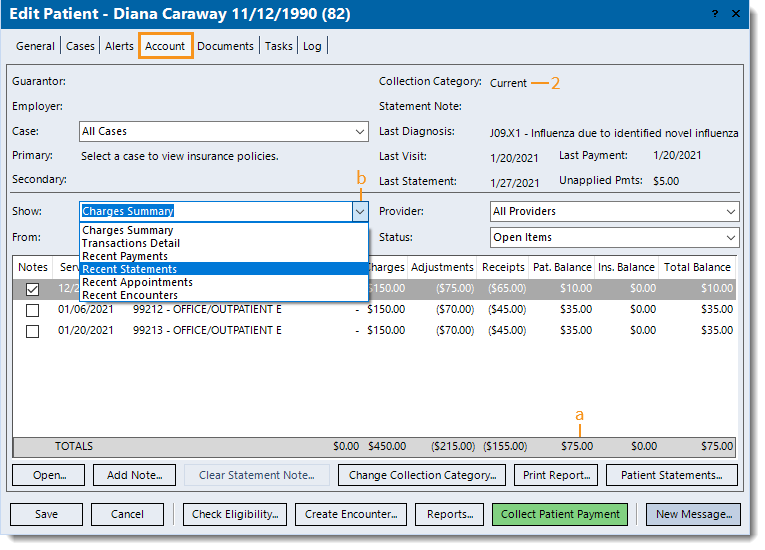
- Review the patient account details. Click the Account tab and verify the patient meets the Filter Patients criteria.
- Verify the Pat. Balance total (with unapplied payments factored in) is "greater than (_)". If not, change the criteria by decreasing the balance amount as necessary.
- Click the drop-down arrow > select Recent Statements from the Show drop-down menu. The Recent Statements list displays.
- Verify the patient has "not received a statement in the last (_) days". If not, change the criteria by decreasing the amount of days as necessary.
- Verify the patient has "received fewer than (_) statements since" the Last Payment date. If not, change the criteria by increasing the amount of statements as necessary.
- Take note of the Collection Category (e.g., Current, Collections). Then, proceed to step 3.
|
 |
- Review the Collection Category associated with the patient's account.
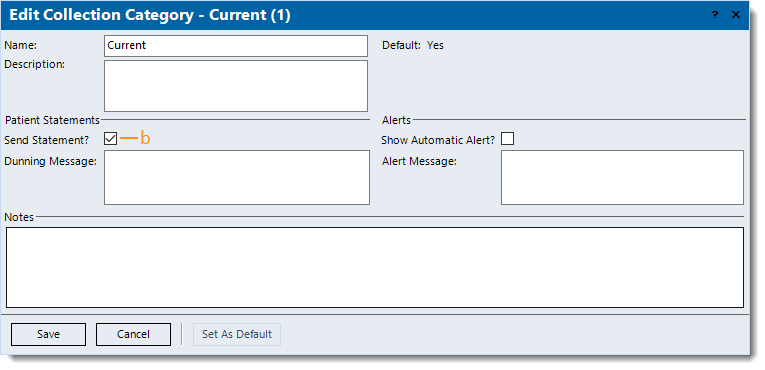
- Find the appropriate Collection Category then double click to open. The Edit Collection Category window opens.
- Verify the "Send Statement?" checkbox is selected. If not, click to select then click Save. Proceed to step 4.
|
 |
- Return to the Patient record and view the patient's case associated with the charge(s).
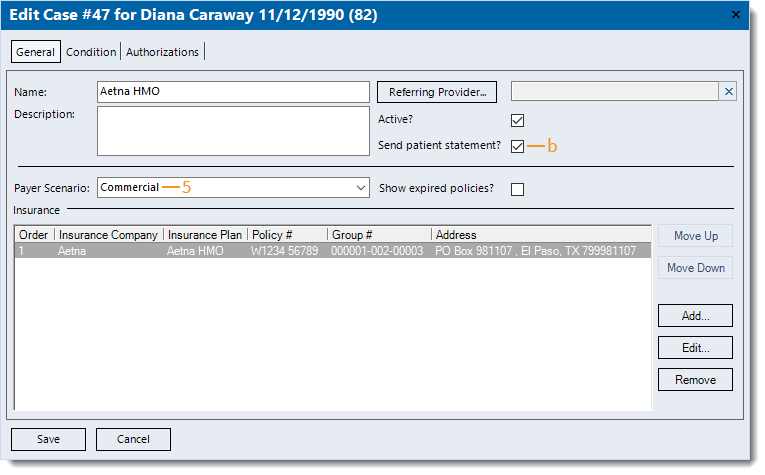
- Click the Cases tab then double click to open the appropriate case. The Edit Case window opens.
- Verify the "Send patient statement?" checkbox is selected. If not, click to select then click Save at the bottom of each window until it is no longer available.
- Take note of the Payer Scenario (e.g., Commercial, HMO, PPO). Then, proceed to step 6.
|
 |
- Review the Payer Scenario associated with the patient's case.
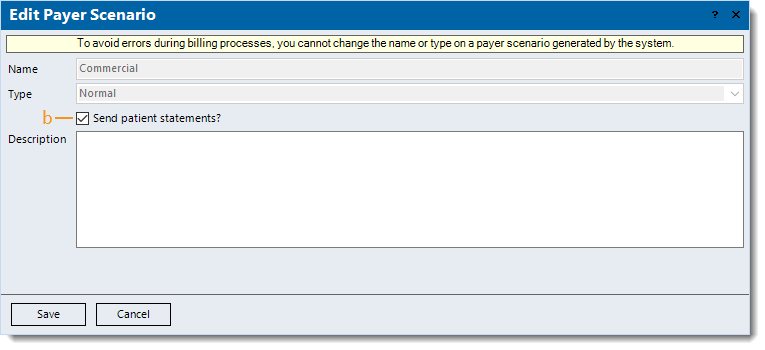
- Find the appropriate Payer Scenario then double click to open. The Edit Payer Scenario window opens.
- Verify the "Send patient statement?" checkbox is selected. If not, click to select then click Save.
- Once finished, attempt to send or print patient statements again.
|
 |
Patient Statement Missing Details
When an on-demand patient statement is missing details (e.g., service lines, balance due amount), a specific setting in the patient's account, case, and/or payer scenario could be causing the issue.
- Find the patient then double click to open. The Edit Patient window opens.
- Review the Collection Category associated with the patient's account. Click the Account tab and take note of the Collection Category (e.g., Current, Collections).
- Find the appropriate Collection Category then double click to open. The Edit Collection Category window opens.
- Verify the "Send Statement?" checkbox is selected. If not, click to select then click Save. Proceed to step 2.
|
 |
- Review the patient's case associated with the charge(s).
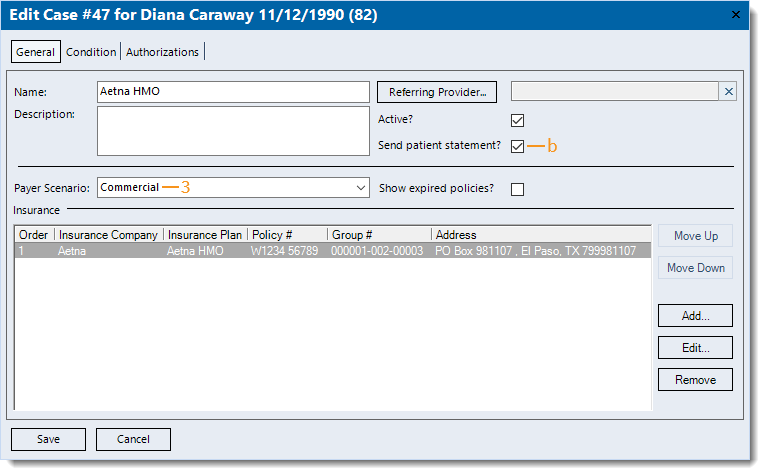
- Click the Cases tab then double click to open the appropriate case. The Edit Case window opens.
- Verify the "Send patient statement?" checkbox is selected. If not, click to select then click Save at the bottom of each window until it is no longer available.
- Take note of the Payer Scenario (e.g., Commercial, HMO, PPO). Then, proceed to step 4.
|
 |
- Review the Payer Scenario associated with the patient's case.
- Find the appropriate Payer Scenario then double click to open. The Edit Payer Scenario window opens.
- Verify the "Send patient statement?" checkbox is selected. If not, click to select then click Save.
- Once finished, attempt to send or print patient statements again.
|
 |


