Release Notes August 2025
On August 20, 2025, your Tebra account will be upgraded to the latest version. Features will be available the following day with the exception of specified timelines.
Billing |
Billing General Improvements
-
Civilian Health & Medical Program of the Department of Veterans Affairs (CHAMPVA) and Veterans Affairs (VA) Fee Basis Programs now support electronic claim attachments.
Clinical
Integration: Fullscript
Tebra’s Fullscript integration enables providers to streamline supplement prescribing, education, and fulfillment within a single, end-to-end workflow. This embedded experience allows US based practitioners to recommend and manage professional-grade supplements from Fullscript's extensive catalog.
Create Supplement Plan
|
 |
|
 |
|
 |
Clinical General Improvements
- Providers can now view up to 5,000 drug favorites when prescribing medications.
Clinical Resolved Issues
- Fixed an issue where users received an error message when attempting to review the patient's previous notes in a new note page
- Fixed an issue where providers were not redirected back to Tebra after validating a prescription
- Fixed an issue where the patient's date of birth shows one day prior when reviewing a prescription
- Fixed an issue where users received an error message when prescribing an EPCS favorite drug
- Fixed an issue where users received an error message when attempting to create a note via the mobile app
Engage
Engage Resolved Issues
- Fixed an issue where intake forms did not display the internal form names when creating a new appointment
- Fixed an issue where patients were unable to save a credit card in the patient intake workflow when using an iOS device
- Fixed an issue where users experience a continuous spinning wheel attempting to access broadcast history
Platform
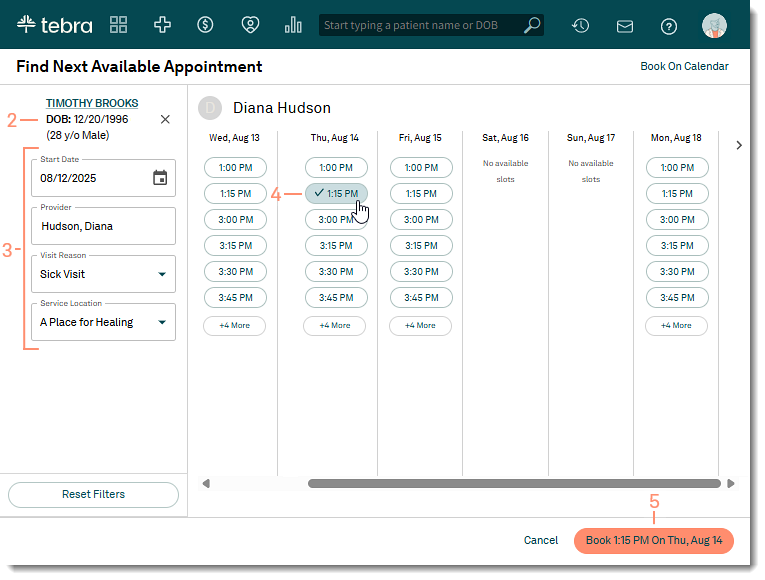
First Available Appointment
The First Available Appointment feature transforms how the office staff books appointments. It streamlines daily workflows to boost the practice's efficiency by finding and booking appointments using key filters like provider, visit reason, and location. This workflow is available for new appointments and follow up appointments.
Available appointments are based on the provider’s Office Hours, Holidays, Time Offs, and Schedules.
Feature will be deployed to customers in phases and completed by end of August 2025.
Schedule First Available Appointment
|
 |
|
 |
|
 |
Schedule Follow-Up Appointment
|
 |
|
 |
Platform Resolved Issues
- Fixed an issue where users did not receive email notification that a new Patient Portal message was received
Patient Experience
AI Review Insights
Tebra’s newest AI Review Insights slashes admin time and workload by distilling reviews from various channels into an actionable summary that categorizes feedback across wait times, scheduling, staff, communication, and care, giving busy practices a simple, one-stop workflow to elevate patient experience and loyalty.
This feature is available for Patient Experience only subscribers and Practice Growth only subscribers.
Feature will be available by the end of August 2025.
Access AI Review Insights (Practice Growth)
|
 |