Updated: 10/30/2025 | Views: 2493
Prescription order delegation helps streamline the prescription writing process by allowing clinical staff to queue up medication orders for approval. Clinical staff with a Clinical Assistant user role can add medications (including controlled substances) to prepare prescriptions. Providers can then quickly review and approve the medication order, reducing the provider's administrative burden.
Clinical Assistant Workflow
The following steps are completed by users with a Clinical Assistant user role to propose a medication order. After the order is queued, the provider can review the pending medication and send the prescription to the pharmacy.
The pending order is available for 7 days from its creation date. Orders not sent within 7 days will be removed from the patient's chart and a new order will need to be prepared (if applicable).
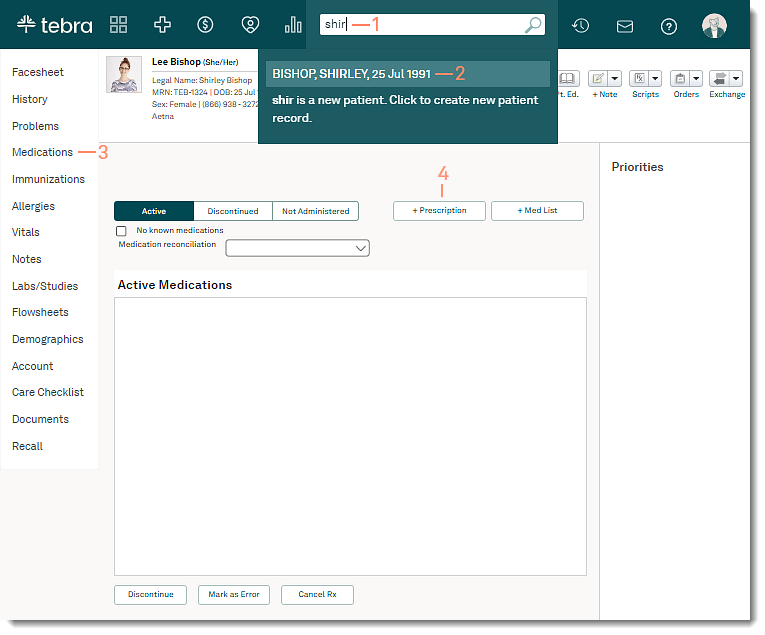
Access Prescribe Medications
- Enter the first 2–3 letters of the patient's name or date of birth (mm/dd/yyyy) in the top navigation bar search box.
- Click to select the patient from the auto-populated results. The patient's Facesheet page opens.
- Click Medications. The Active Medications page opens.
- Click + Prescription. The Prescribe Medication page opens.
|
 |
Prescribe Medications
- Drug Information:
- Drug Name: Enter the name of the drug, DME, or supplies to return a list of matching results with the applicable dosage and dispense forms. Select the desired result from the list.
 Tip: When the desired drug is not listed, enter additional drug information (e.g., generic drug name, entire drug name, "ER" for extended release drugs, dosage, or dispense form) to narrow the search. Tip: When the desired drug is not listed, enter additional drug information (e.g., generic drug name, entire drug name, "ER" for extended release drugs, dosage, or dispense form) to narrow the search.
- If the desired drug is not listed, click to select "Advanced Search". Enter the name of the drug, DME, or supply to return a list of matching results with the the available dispensable drugs and the brand name or generic form of the drug. Select the desired result from the list.
- By default, "Allow Substitution" is selected to allow the use of a generic version of the drug. To disable, click to clear "Allow Substitution".
- Quantity: Click the drop-down and select from available quantity options for the drug or enter a custom quantity. The unit description of the selected drug displays to the right of the Quantity amount.
- To indicate a partial dispensing, enter a decimal value leading with a zero (e.g., "0.5") as the Quantity.
- Refill: Click the drop-down and select the number of refills for the prescription.
- Days supply: Enter the prescription days supply.
Note: For CQM reporting purposes only. The days supply does not populate on a printed prescription.
- Service Location: If applicable, click to select a service location.
- Reason For Rx: If applicable, enter an ICD-10 code or click Open ICD-10 Browser for more options.
- To enter a second diagnosis, click Add Another Reason.
- Patient Instructions: By default, recommended sigs are displayed based on the selected Drug Name. Click to select the applicable instructions or enter the prescription instructions for the patient.
- Pharmacy: Send the medication to the patient's preferred pharmacy or select a new pharmacy.
- Preferred Pharmacy: By default, the patient's preferred pharmacy is populated. If the patient has multiple preferred pharmacies, click to select different pharmacy from the list.
- Search Pharmacy: Click the field and click Search for Pharmacy. The Find a Pharmacy pop-up window opens.
- Click to select a pharmacy from the auto generated results based on the patient's zip code or search for a pharmacy.
- To search for a pharmacy, remove the zip code and enter any of the following search criteria: Pharmacy Name, City, State, Zip, Phone Number, Pharmacy Type, and/or EPCS Certified. Then, click to select the pharmacy from the results.
Tip: Search by a city name or zip code only for broader results.
- Click Select Pharmacy to add to the prescription.
- Pharmacy Instructions: Enter any instructions for the pharmacy; these notes will not appear on the prescription label.
- Click Add Rx.
- If applicable, continue to add prescriptions and click Add Rx.
- When the last prescription is populated, click View Order Summary. The Order Summary page opens.
|
 |
Propose Order
- Review all prescriptions in the order.
Note: Prescriptions cannot be edited. To make changes, delete the medication and add a new prescription.
- To permanently remove a medication from the order summary, click the trash icon.
- To add an additional prescription, click Add Another Rx.
- To cancel the order and permanently remove all medications from the order summary, click Cancel Order.
- Click Propose Order when finished. The order is ready for the provider to review and send to the pharmacy.
|
 |
Provider Workflow
The following steps are completed by an eRx enrolled prescriber. EPCS enrollment is also required when controlled substances are prescribed in the order.
Tip: Providers can also quickly review and approve medicationd for multiple patients from the Pending Orders list.
The pending order is available for 7 days from the day it was created. Orders not sent to the pharmacy within 7 days will be removed from the patient's chart and the medications will need to prescribed again (if applicable).
Review Pending Order
- Enter the first 2–3 letters of the patient's name or date of birth (mm/dd/yyyy) in the top navigation bar search box.
- Click to select the patient from the auto-populated results. The patient's Facesheet page opens.
- Click Pending on the Medications card. The Order Summary page opens.
|
 |
- Review the prescription(s) to verify the correct medication, quantity, refills, patient instructions, reason for prescription (optional), and pharmacy is correct before sending to the pharmacy.
Note: Prescriptions cannot be edited. To make changes, delete the medication and add a new prescription.
- To permanently remove a medication from the order summary, click the trash icon.
- To add an additional prescription, click Add Another Rx.
- To cancel the order and permanently remove all medications from the order summary, click Cancel Order.
- Click Send to Pharmacy when finished. The prescriptions are sent to the pharmacy.
|
 |