Send Patient Statements Through Mailing Service
- Last updated
-
-
Save as PDF
Updated: 04/01/2026 | Views: 53598
Once patient statements are prepared, submit a batch for printing and mailing through Tebra's secure patient statement mailing service. There's no enrollment required and the service provides professional, easy-to-read, double-sided, color statements with an improved design that is not available through the self-printing option. View a sample patient statement or watch the video to learn more about how Tebra's mailing service can help you.
For the cost of a patient statement with postage included, review the Pricing Policy. Charges incurred are added to your next monthly invoice.
Notes:
- The QR code and pay online payment options are included on patient statements for Tebra Payments or Patient Collect (Stripe) activated practices with Patient Portal. For security purposes, the QR code expires after 60 days or after the fifth use (each time the Make a Payment page is loaded or refreshed). Should the QR code expire, the patient will need to contact the practice and request a new statement.
- Configure the Patient Statement Options if you have not already done so, and if your remit-to address is a PO Box, there are two additional steps to complete when configuring the settings.
Send Patient Statements through Mailing Service
- After preparing patient statements, click Send Statements at the bottom of the Find Claim window. The Send Patient Statements - Select Criteria window opens.
- To navigate from the Practice Home window, click Encounters > Send Patient Statements.
|
 |
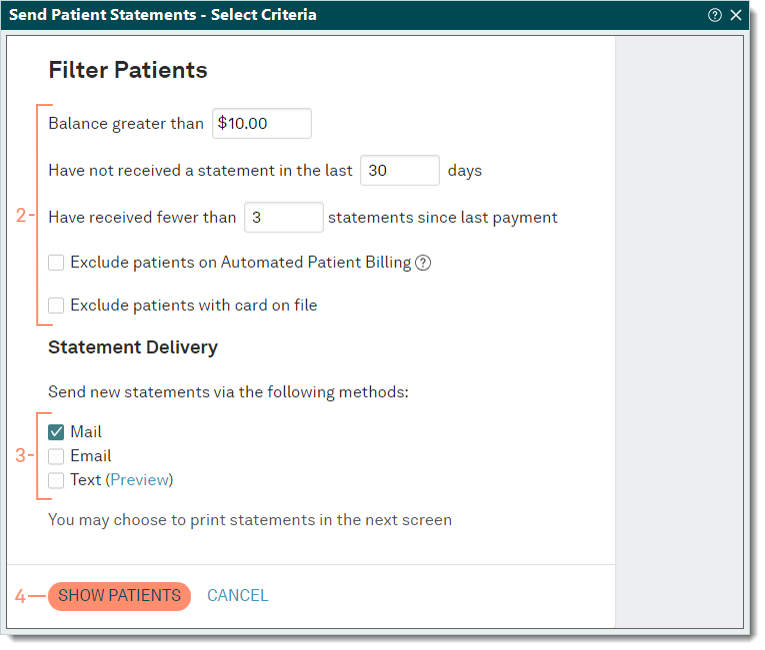
- Filter Patients: Enter the appropriate criteria to filter the patients.
Note: The criteria auto-populates with the default batch options set in the Patient Statement Options. The number of days from receiving a statement applies if no new balance has transferred to the patient's responsibility.
- Automated Patient Billing enabled practices: To exclude all patients scheduled to receive automated statements, click to select "Exclude patients on Automated Patient Billing".
- Tebra Payments or Patient Collect (Stripe) activated practices: To exclude patients with payment cards on file, click to select "Exclude patients with card on file".
- Statement Delivery: Click to select the "Mail" method.
- Click SHOW PATIENTS. The Send Patient Statements - Confirm Patient List window opens.
|
 |
- Review the patient list and information.
- If applicable, click to clear the checkbox on the left of the patient ID number to exclude the patient from receiving a statement.
- To view the mailing address on file, click the patient name to open the Patient record then select the General tab. Close the window to return to the patient list.
- Click Send Patient Statements. A confirmation pop-up appears.
- Click Yes to confirm. A transaction fee warning pop-up appears.
- To agree to the charges and submit the patient statements batch for printing and mailing, click Yes. The Patient Statements Sent window opens.
Note: Undeliverable and rejected statements by the USPS are still charged at the normal rate. Review the Pricing Policy for cost details.
|
 |
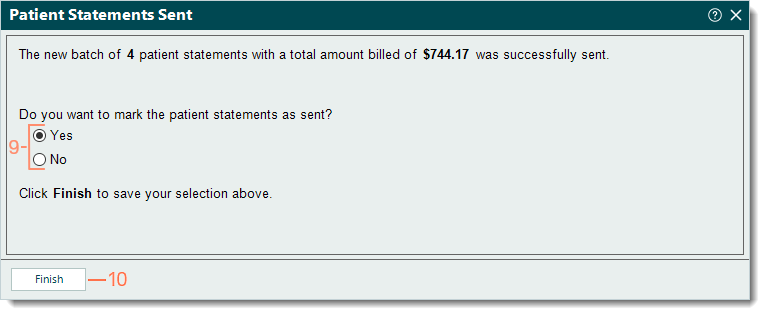
- Select whether or not to mark the patient statements as sent.
- "Yes": Selected by default and updates the status of the claim(s) to Pending patient.
- "No": Click to select "No" if the status of the claim(s) should remain as Ready to send statements
- Click Finish.
Within 24 hours, a confirmation report is received and can be found under the Patient Statements tab of the Clearinghouse Reports. If any statements were undeliverable, additional report(s) provide further explanation of the error(s) for resolution. Then, as part of the monthly closing activities, review the Patient Statements Delivery Report.
|
 |