Updated: 05/29/2025 | Views: 10181
Messages also known as the Message Center allows users within a practice to communicate with each other and with patients. Create timely and targeted messages with custom email templates and patient groups, schedule batch email messages to be delivered on a future date, or communicate freely by sending personalized, on-demand messages. This interactive system lets patients reply directly to any communication they receive and delivers responses right to your inbox.
Navigate to View Messages
- Click Tasks & Messages > View Messages. The Messages window also known as the Message Center opens.
 Tip: For faster navigation, click Messages under the Navigation pane Shortcuts menu or press Shift+F12 on the keyboard. Tip: For faster navigation, click Messages under the Navigation pane Shortcuts menu or press Shift+F12 on the keyboard.
|
 |
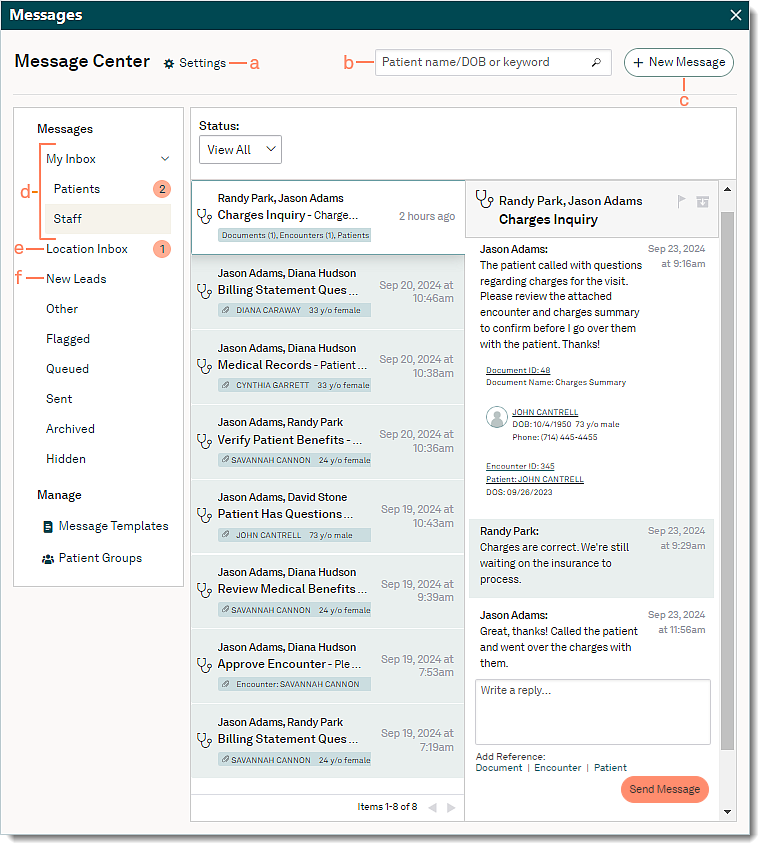
Navigate Messages
- Settings: Click to open and configure the Messages Settings.
- Search: Find messages by patient name or keyword.
- New Message: Click New Message to create and send a new message.
- My Inbox: Click to view and filter the messages as necessary. Available filters vary based on selection.
- Patients: Displays messages sent from the patient directly replying to the user via email, text, or Patient Portal.
- To filter messages from patients, use the Status and/or Message Type drop-down menus.
- Staff: Displays interoffice messages.
- To filter messages between staff members, use the Status drop-down menu.
- Location Inbox: Click to display email or text messages between a patient and a specific practice location. By default, users with the "Office Staff" web user role can view all emails and text messages between a patient and location. Providers can view messages between their patients and the location.
Note: If applicable, users with the "Provider" and "Clinical Assistant" web user roles can enable the Location Related option in the Messages Settings to view all patient messages to the practice.
- To filter messages between the patient and location, use the Status, Message Type, and/or Location drop-down menus.
- New Leads: For Practice Growth activated customers, click to display messages sent from Web-to-Text, Call-to-Text, or a direct text message from a potential patient to the practice location.
|
 |
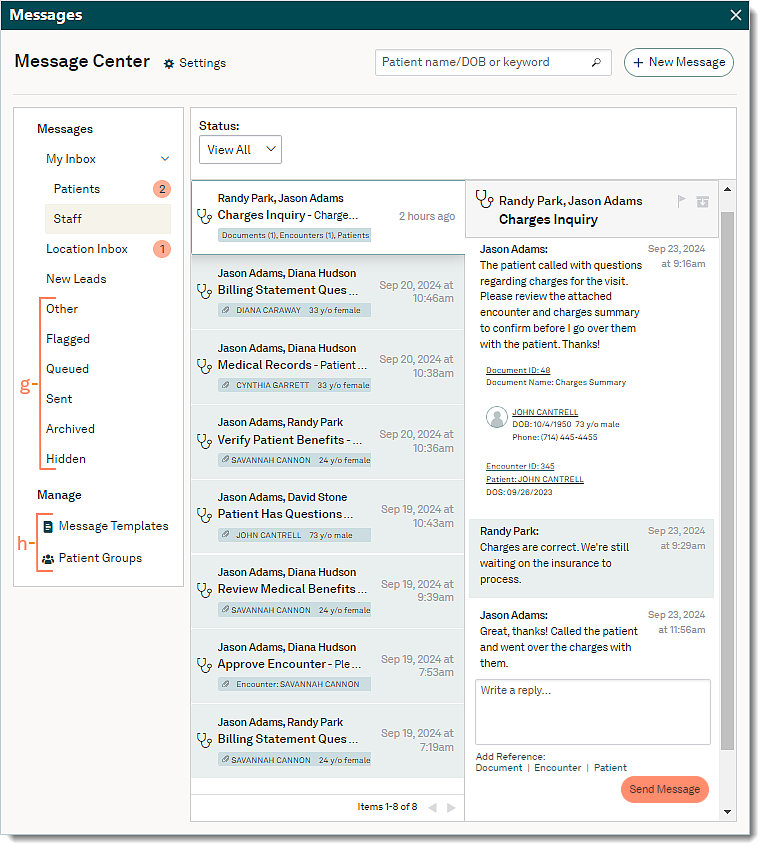
- Click to view additional messages. Available filters vary based on selection.
- Other: Displays New Appointment requests, messages from Tebra Customer Care, other reports, and announcements.
- To filter other messages, use the Status drop-down menu.
- Flagged: Displays messages that were flagged.
- To filter flagged messages, use the Message Type drop-down menu.
- Queued: Displays messages scheduled to be sent.
- To filter queued messages, use the Message Type drop-down menu.
- Sent: Displays messages sent by the user.
- To filter sent messages, use the Message Type drop-down menu.
- Archived: Displays messages that were archived.
- To filter archived messages, use the Message Type drop-down menu.
- Hidden: Displays messages between a patient to the practice location when the Location Related option is disabled in the Messages Settings.
- To filter hidden messages, use the Location drop-down menu.
- Manage: Click to create, view, edit, or delete Message Templates and Patient Groups.
|
 |
- Click a message to view details and take the appropriate action(s).
Note: The message preview displays the newest message. Messages with multiple participants in the conversation are grouped into one thread with the newest message at the bottom of the thread.
- Click the flag icon to indicate important messages and to also display them under the Flagged messages.
Note: Flagged messages are also accessible from the To Do List of the Desktop Application (PM) Dashboard and under the Outstanding Items of the web platform Dashboard.
- Messages cannot be deleted but can be archived. To archive messages, click the file box icon to remove messages from the inbox and move them to the Archived messages.
- Document, Encounter, and Patient: If applicable, click the Document ID, Encounter ID, or patient name to open an attached record referenced in the message.
- If applicable, reply to the message.
- If applicable, click the arrows to navigate forward or back to additional pages of messages.
|
 |