Release Notes May 2026
On May 20, 2026, your Tebra account will be upgraded to the latest version. Features will be available the following day with the exception of specified timelines.
Billing |
Billing Resolved Issues
- Fixed an issue where users received an error message when attempting to generate the Customer Account Summary report
- Fixed an issue where users were unable to select the Email and Text delivery method options when sending patient statements
Clinical
Custom AI Notes
Custom AI Notes extends Tebra’s AI Note Assist to work with any note type in your practice — not just the five standard templates. Whether you use H&P, Physical Therapy, Acupuncture, OB/GYN, Urgent Care, or your own custom clinical templates, Custom AI Notes generates structured documentation from your patient encounters automatically.
Tebra has also updated the base AI instructions, which is the global prompt guidance that shapes how the note content generates. The new instructions emphasizes billing defensibility and audit survival, requires clinical reasoning to be shown (not just decisions), allow appropriate redundancy across sections when it reinforces the same fact from different angles, and prohibit creating structure or content that is not supported by the transcript.
Notes:
- Chrome is the preferred browser for optimal use for AI Note Assist.
- Available for Clinical subscribers at a transaction rate per note or a subscription rate.
Feature will be deployed to customers in phases and completed by end of May 2026.
| Create Custom Note
Before getting started, verify the the practice or provider has at least one active custom note type. The first time any provider uses AI Note Assist with a new custom note type, the system performs a one-time setup:
|
 |
Create Custom AI Note
|
 |
Clinical Resolved Issues
- Fixed an issue where users received an error message when attempting to create a custom item under Social History
- Fixed an issue where the RXA-21 vaccine did not populate the correct action code of U (updated) or D (deleted)
- Fixed an issue where additional medication history is not listed in chronological order
- Fixed an issue where users experience a continuous spinning wheel attempting to save Family History in the patient’s chart
- Fixed an issue where users were unable to unlock or access a clinical note
- Fixed an issue where users experienced a blank page when attempting to submit a new lab order via the previous lab experience
- Fixed an issue where users received an error message when attempting to prescribe a controlled substance
- Fixed an issue where the log history did not display for discontinued medications
- Fixed an issue where discontinued medications incorrectly moved to the active medication list
- Fixed an issue where pulling the MedHistory via SureScript displayed the incorrect provider name for the Last Filled By
- Fixed an issue where users were unable to successfully generate a QRDA file
Patient Experience
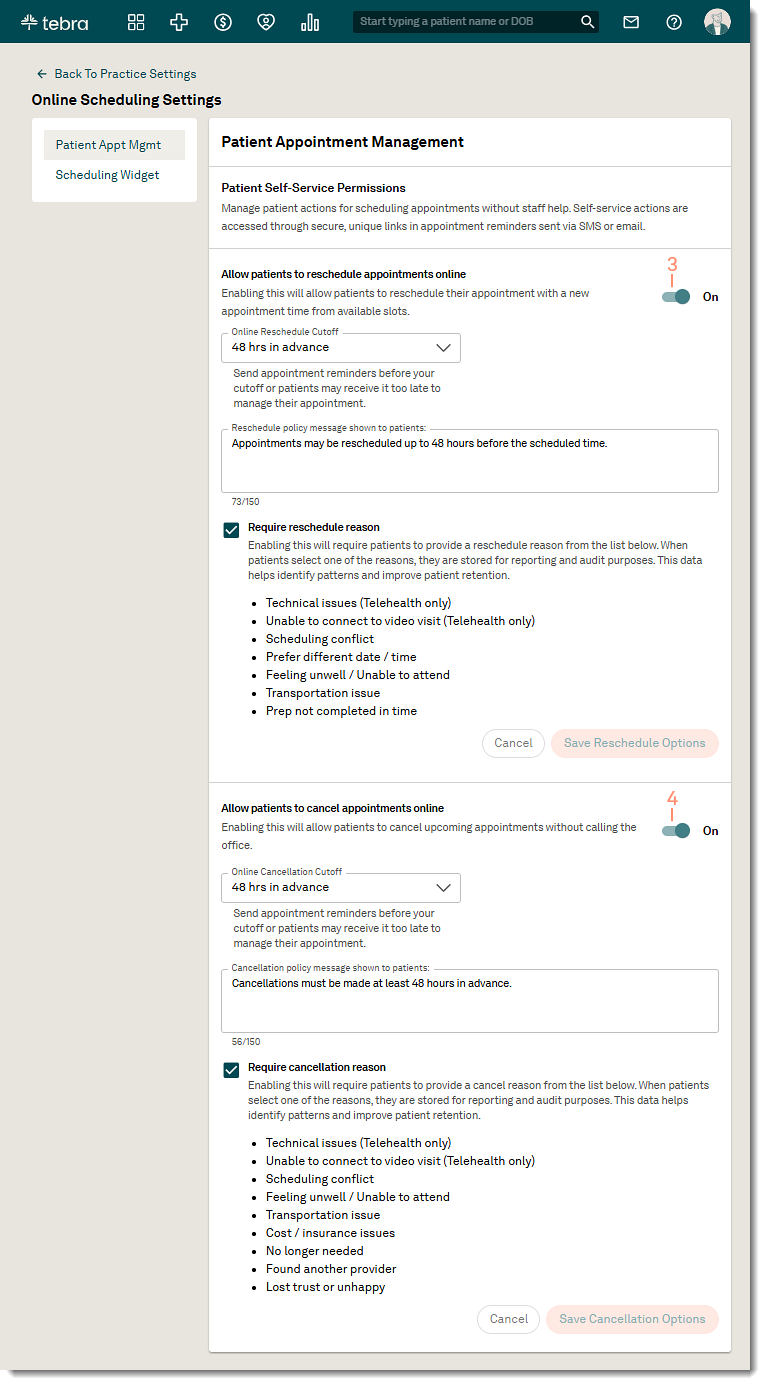
Patient Self-Service Cancel and Reschedule Appointments
Patients can cancel or reschedule appointments directly from SMS or email appointment reminders — no login, no app, no phone call— while practices maintain control through configurable Patient Appointment Management settings. This helps reduce no-shows, inbound calls, and messages by enabling patients to take action directly from appointment reminders. Patients get fast, self-service flexibility, while practices reduce staff workload.
Before you get started, verify the following settings are configured:
- Patient Communications and appointment reminders are enabled for each provider to allow patients to access the option to reschedule or cancel their appointment in a reminder.
- Online booking is enabled and configured for each provider to allow patients to request a new date and time for the appointment.
Available for Engage or Patient Experience subscribers.
Configure Patient Appointment Management
|
 |
| Patient Experience: Reschedule Appointment
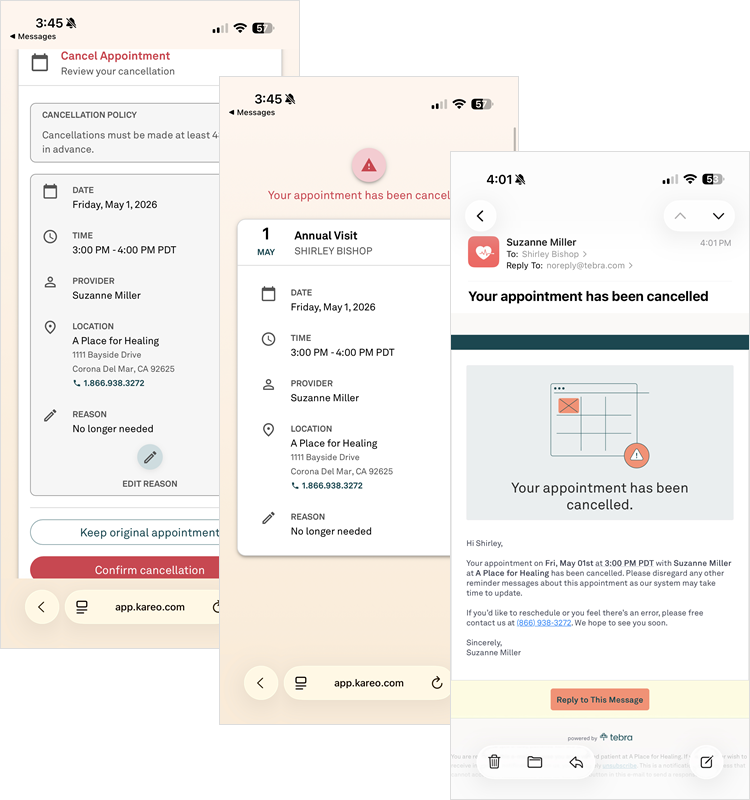
Patients can request to reschedule an appointment using the provider's online booking schedule with the same service location and visit reason of the original appointment. The practice can review the tentative appointment to confirm the request and the patient will receive an appointment confirmation email once completed.
|
 |
|
 |
| Patient Experience: Cancel Appointment Patients can cancel their appointment online and receive a confirmation email.
|
 |
|
 |
Expanded AI-Powered Review Management
Practice can now reply to reviews on Tebra Care Connect (TCC) from their reputation management dashboard. Once patients submit feedback, providers can respond using the same AI-Generated Review Replies available for Google reviews (single review and bulk reply). TCC reviews continue to also flow into AI Review Insights along with Google reviews.
Overall, Tebra’s AI-Generated Review Replies enables healthcare practices to quickly respond to patient reviews on TCC and Google through the power of AI. Responses are sentiment-based replies, saving time and enhancing patient engagement while improving online reputation and trust.
These features are available for Practice Operation subscribers with Patient Experience.
AI Generated Review Replies
|
 |
Private Reviews
Tebra Care Connect review management provides practices greater flexibility in how reviews are routed, managed, and answered across Tebra Care Connect. With configurable review routing and AI-assisted replies, practices can add context, respond faster, and build trust—without increasing staff workload or changing existing workflows.
For practices that require discretion (e.g., Mental Health), review requests can be configured to collect private patient feedback only, enabling insight and improvement without publishing public reviews.
Enable Private Reviews
|
 |
Patient Experience Resolved Issues
- Fixed an issue where printed custom intake forms with large paragraphs does not print with the correct formatting
- Fixed an issue where editing a pop-up image caused hero images to display in the wrong order or was deleted
Platform
Platform Resolved Issues
- Fixed an issue where the incorrect number of appointments displayed when moving between the Week and Monthly view
- Fixed an issue where users were unable to add a pharmacy to the patient’s chart