Access AI Generated Note
Generate a note using AI Note Assist for an office visit or Telehealth visit before proceeding. If necessary, access the generated note from the patient's chart.
- Enter the first 2–3 letters of the patient's name or date of birth (mm/dd/yyyy) in the top navigation bar search box.
- Click to select the patient from the auto-populated results. The patient's Facesheet page opens.
- Click Notes. The Notes page opens.
- Click Open.
Note: An AI-Assisted label displays for clinical notes generated by AI Note Assist.
|
 |
Edit Generated Details
Review Navigate Clinical Note to learn more about available features of a note such as: viewing Treatment Plans or Flowsheets, customizing the note sections, and more. Additionally, review Edit Clinical Note to learn how to edit the specific note sections.
The example clinical note used for this article is a standard SOAP note. Depending on the AI Note Assist note type or custom note type selected, sections and templates of the note will vary.
- Scribed documentation from AI Note Assist are populated as free text in the note sections.
- Review each section and edit as necessary.
- CC: Click on the chief complaint section header to add or edit the documentation using free-form text or a Text Shortcut. Then, click X to close the section.
- Subjective: Click on the section header to add or edit the documentation using free-form text, Text Shortcut, or Template. Then, click X to close the section.
- Mental/Functional: Click on the section header to add or edit the documentation using free-form text, Text Shortcut, or Template. Then, click X to close the section.
- Objective: Click on the section header to add or edit the documentation using free-form text, Text Shortcut, or Template. Then, click X to close the section.
|
 |
Assessment
AI Note Assist adds suggested problem(s) to the Assessment section. Providers must confirm the problem is accurate for the patient as the problem is used to populate the ICD codes in the Diagnosis Code section of the charge capture, the Plan section of the note, and in the patient's problem list.
From within the note, perform a problem reconciliation, add new problems, mark the problem as an error, or resolve previously documented problems.
- Click on the Assessment section header to include problems.
- Click Include Problems. The Include Problem pop-up window opens.
- Review the selected problem(s) to add to the note.
Note: For CQM reporting, all problems must have a start date. To add a date, click the problem and add a Start Date. Click Save when finished.
- If the problem is incorrect, verify only the incorrect problem is selected and click Mark as Error. Then, add a Comment in the pop-up window. Click Mark as Error to confirm to remove the problem from the Active list.
- + Problem: If the problem is not documented, click to add a new problem.
- Deactivate: If applicable, select the problem(s) and click to deactivate the problem(s).
- To document the reconciliation, click "Problem reconciliation performed".
- Click Include. The problems populate in the Assessment and Plan section.
- Click X to close the Assessment section.
|
 |
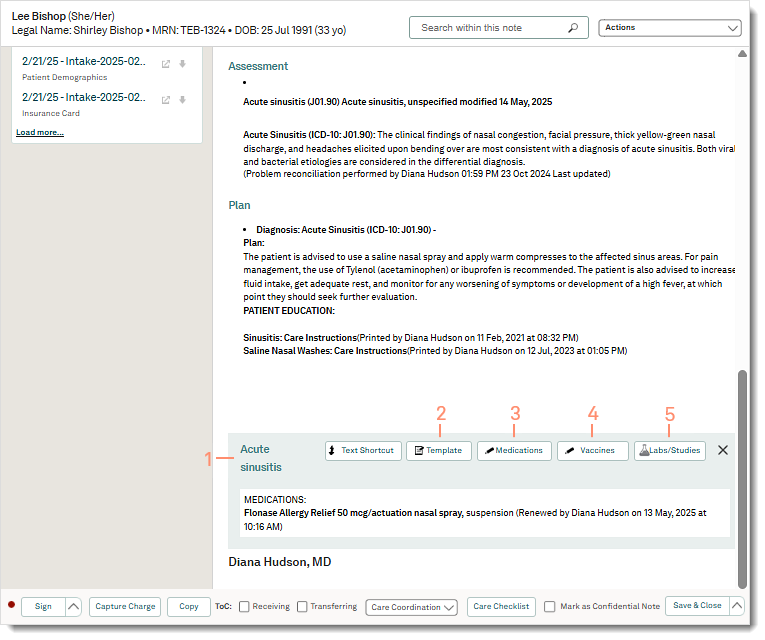
Plan
Provide patient education by sending the documents to the Patient Portal or print a copy in-office.
- Click on the Plan section header.
- Click Patient Education. The Patient Education pop-up window opens.
- Patient education documents related to the patient's problem auto-populates. If necessary, use the search bar to find additional documents.
- To preview the content, click on the document name.
- Hover over the document name and click the basket icon. The patient education is added to the cart.
- If necessary, repeat to add additional patient education.
- Optionally, click the note icon to include additional comments from the patient.
- Provide documents by sending and/or printing the patient education:
- To send the patient education to the Patient Portal, click the send icon. The Prescribed Patient Education confirmation window opens. The documents are now available in the patient's portal.
- To print the patient education, click the print icon. The Prescribed Patient Education confirmation window opens and a PDF of the patient education opens in a new browser tab. Use the browser printer function to print the document.
- Click Close on the Prescribed Patient Education confirmation window.
- Click X to close the Patient Education pop-up window. The document names of the patient education populate in the Plan section.
- Click X to close the Plan section.
|
 |
Document a treatment plan for individual problems. Additionally, prescribe medications, document vaccines, and create labs.
- Click on the problem section header to add notes using free-form text, Text Shortcut, or Template.
- Template: Click to indicate a treatment plan.
Note: Selecting Labs, Imaging, or Medications from the Default template will not generate a prescription or lab order.
- Medications: Click to prescribe medications or ePrescribe controlled substances.
Note: If applicable, add the Medication note section to review the patient's medications before prescribing medication(s).
- Vaccines: Click to order new, administer new, add historical, or not administered vaccine.
- Labs/Studies: Click to create a lab.
- Click X to close the Plan section when finished.
|
 |
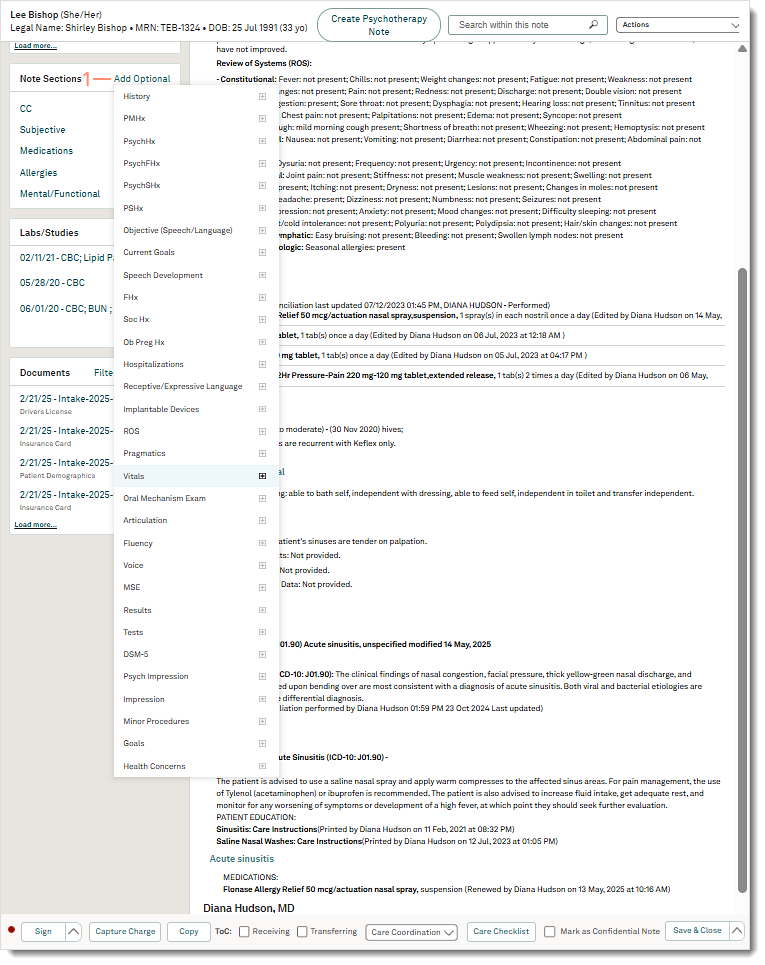
Document Structured Data
Clinical structured data must be added to the corresponding note sections to populate in flowsheets the patient's facesheet, and the Patient Portal.
For providers participating in any CMS incentive programs, specific structured data and reconciliations must be documented to be included in the Quality Measures Report.
If structured data for the visit has already been documented, review the detail for each section and edit as necessary.
Add Note Sections
- Hover over Add Optional and click the plus icon next to the section (vitals, medications, etc). The section is added to the note.
- Continue to add additional section(s), as necessary.
|
 |
Medications
The patient's active medications populate in the note from the patient facesheet. From within the note, perform and document a medication reconciliation. If necessary, add active medications, discontinue medications, or retrieve medication history.
It is recommended to prescribe medications from the Plan section. If prescriptions were prepared by the clinical assistants, complete the order delegation workflow to send the order.
- Click on the Medication section header. The Medications pop-up window opens.
- Medication Reconciliation: Obtain and verify the patient’s active medications. Then, document the medication reconciliation.
- Select Performed or Excepted - Medical Contraindication from the Medication reconciliation drop-down. The name of the user who performed the medication reconciliation, and date and time it was last updated displays.
- + Med List: Click to add the patient's past and present medications.
- Discontinue Medication: If applicable, select the medication(s) and click to discontinue the medication(s).
- Retrieve Med History: Pull the patient's medication history from Surescripts with their consent and copy the medications to the Active or Discontinued medication list.
- Click Close when finished.
- Click the refresh icon to update the Medication section.
|
 |
Allergies
The patient's allergies populate in the note from the patient facesheet. From within the note, perform an allergy reconciliation. If necessary, add a new allergen or modify/resolve a documented allergy.
- Click the Allergies section header. The Allergies panel opens.
- If the patient does not have any allergies, click to select "No known allergies" and/or "No known medication allergies".
- To document allergens, click + Allergy. The New Allergen pop-up window opens.
- Enter the allergen details:
- Allergen: Start typing the allergen and select one from the list. If the allergen does not appear in the list, create a custom allergen.
Note: Custom allergens are not included in drug-allergy interaction checking.
- Reaction(s): Start typing the reaction and select from the list. If the reaction is not in the list, enter the reaction in the field. Repeat for additional reactions.
- Allergy severities: Select the severity from the drop-down menu.
- Date of Onset: Enter a date when the allergy began, if known.
- Comments: Enter applicable notes.
- Click Save or Save & Add Another when finished.
- To modify or resolve an allergy, click Edit.
- To document the reconciliation, click "Allergy reconciliation performed".
- Click Close when finished.
|
 |
Vitals
Record new vitals within the note or include previously recorded vitals from the patient's chart.
Note: Vitals recorded through the note may be edited until the note is signed. Vitals recorded through the patient's chart may be edited within 24 hours of the initial entry.
- Click on the Vitals section header to add vitals.
- To record new vitals, click + Vitals. The New Vitals pop-up window opens.
- Populate the results in the corresponding fields.
- Enter applicable Comments.
- Click Save. The details are populated in the Vitals section.
- To include previously recorded vitals, click to select the vitals. Then, click Ok when finished. The details are populated in the Vitals section.
|
 |
Patient Care
If necessary, perform the following processes to complete the patient care documentation.
- Capture Charge: Click to create a charge to capture a comprehensive list of charges for the visit.
- Transition of Care (ToC): Click to select "Receiving" or "Transferring".
- If the patient is a new referral, select "Receiving". To complete the transition of care, a reconciliation for medication, problems, and allergies must be completed within 24 hours of the visit.
- If the patient is being referred to another provider, select "Transferring". Then, send a referral.
- Care Coordination: Click to Send Referral or Send Continuity of Care.
- To send a Summary of Care to another provider for referral, click Send Referral. Providers can send the referral by Direct Messaging or eFax.
- To send an update with a Summary of Care to the patient's referring provider, click Send Continuity of Care. Providers can send the message by Direct Messaging or eFax.
- Care Checklist: Click to document the completion status of preventative screenings and exams for regulatory requirements. The Care Checklist must be completed the same day as the visit and before the note is signed.
|
 |
Complete Note
Save the note without a signature to continue editing. To finalize the note, providers can sign the note or request a co-sign.
 Tip: Once the clinical note is signed, patients can access their health record in the Patient Portal to review their summary of care. If applicable, click to select "Mark as Confidential Note" to exclude the note from the Patient Portal. Tip: Once the clinical note is signed, patients can access their health record in the Patient Portal to review their summary of care. If applicable, click to select "Mark as Confidential Note" to exclude the note from the Patient Portal.
- To allow additional revisions to the note, click Save & Close. The note is saved and the status is Open.
- To request a co-sign, click the up arrow and select Sign and request Co-sign. The AI-Generated Documentation Confirmation pop-up window opens.
Note: Only providers have the ability to sign a clinical note.
- Click Confirm to agree. The Request Co-Sign pop-up window opens.
- Select the co-signing provider from the drop-down.
- Click Sign & Notify when finished. The note is saved and the status is Needs Co-Sign.
|
 |
- To finalize the note, click Sign. The AI-Generated Documentation Confirmation pop-up window opens.
Note: Only providers have the ability to sign a clinical note.
- Click Confirm to agree. The note is saved and the status is Signed.
|
 |