Release Notes November 2025
On November 19, 2025, your Tebra account will be upgraded to the latest version. Features will be available the following day with the exception of specified timelines.
Billing |
Automated Patient Billing Enhancements
The Automated Patient Billing feature was enhanced to save time, reduce manual work, and help collect patient balance revenue faster - on a schedule that matches your practice’s billing philosophy. There are now three different schedules to choose from, including a Monthly (Paper Only) option that does not require practices to have Tebra Payments or Patient Collect (Stripe) activated. For more information about the Automated Patient Billing feature, review the Automated Patient Billing FAQs.
Note: Prior to enabling the Automated Patient Billing feature, configure the Patient Statement Options and prepare patient statements in the Desktop Application (PM) as necessary to ensure patient statement information is correct and up to date. Once enabled, a transaction fee applies for each paper statement. Refer to the Pricing Policy for cost details.
|
Navigate Automated Patient Billing Settings
|
 |
Billing General Improvements
- Tebra was updated with the new AMA 2026 CPT code set that goes into effect January 1, 2026. Visit the AMA website for more general information about the 2026 CPT Code Set.
- The encounter option, "Enable claim attachment recommendation upon procedure code selection", now also includes the following procedure codes to prompt the recommendation banner:
- Level 4 codes: 99204, 99214, and 99284
- Unspecified DME codes: A9900, E1399, K0108, B9999, and B9998
- The character limit of the Credentials field in the provider web user settings has increased from 8 to 20 characters.
- For Clinical subscribers, System Administrators can now activate the monthly per provider AI Note Assist Subscription for AI Notes via the provider web user settings or the Solution Center depending on the customer account type. Review the AI Note Generation section of our Pricing Policy for the subscription rates.
Billing Resolved Issues
- Fixed an issue where some patients did not receive SMS messages sent by the practice.
Clinical
AI Note Assist Subscription
Tebra’s AI Note Assist revolutionizes clinical documentation by streamlining the note-taking process for in-person and Telehealth visits through advanced AI with ambient listening to automated scribe documentation with intelligent prompts.
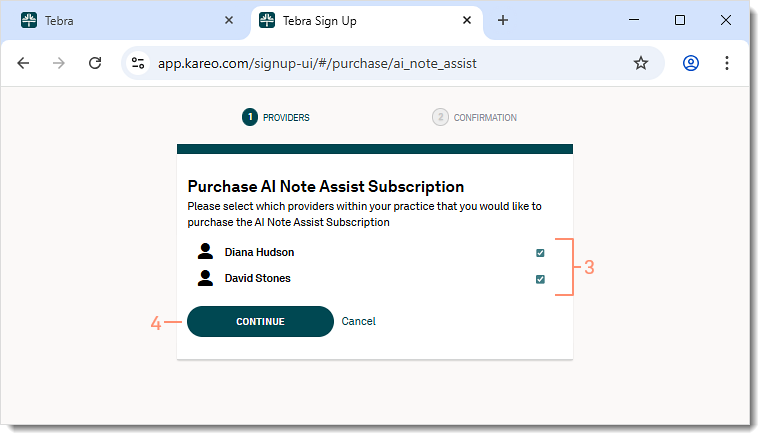
System Administrators can now subscribe providers for an AI Note Generation monthly subscription in-app via the Solution Center (if applicable) or User Settings. Review the AI Note Generation section of our Pricing Policy for the subscription rates.
| Solution Center: New Subscription If the Solution Center is not available for the account, purchase the subscription through User Settings.
|
 |
|
 |
|
 |
| User Settings: New Subscription Note: The provider must be subscribed to Clinical to enable the new subscription.
|
 |
|
 |
eRx: RxInform Medication Adherence
RxInform powered by DrFirst helps providers close the medication adherence gap with zero extra work. When a prescription is submitted, send patients a SMS via RxInform with a link to a HIPAA-compliant portal where they can view prescription details, set reminders, and access educational information about safe use and potential side effects.
Notes:
- eRx enrollment is required for provider to use RxInform.
- The SMS is sent through RxInform, not Application-to-Person (A2P) messaging.
| RxInform: Provider Workflow In addition to the new prescription workflow, RxInform can be sent from the renew medication, batch prescribing, and order delegation workflow.
|
 |
RxInform: Patient Experience
|
 |
Clinical General Improvements
- Tebra was updated with the new AMA 2026 CPT code set that goes into effect January 1, 2026. Visit the AMA website for more general information about the 2026 CPT Code Set.
- Updated the following Immunization VIS date to reflect current CDC guidelines:
- Ebola
- Pneumococcal Conjugate (PCV)
- Pneumococcal Polysaccharide (PPSV23)
- RSV Preventive Antibody (nirsevimab) Immunization Information Statement (IIS)
- Tick-borne Encephalitis
- After patients complete screening tools (PHQ-9, GAD-7, PCL-5, and AUDIT) via Patient Intake, providers can review their scores in the Mental Health flowsheet. This feature is available for Engage subscribers and accounts with access to Patient Intake by December 5, 2025.
Clinical Resolved Issues
- Fixed an issue where the No Known Medication checkbox was missing from the web platform and mobile app
- Fixed an issue where users were unable to set a template as default
- Fixed an issue where users received an error message when attempting to create a new note in the mobile app
- Fixed an issue where users receive an error message when attempting to process a Renewal Request
- Fixed an issue where the COVID, Zoster, and Diphtheria vaccines did not reflect the new 2025-2026 CDC Influenza Immunizations updates
Platform
Enhancement: Other Appointment
Tebra’s Calendar now offers other appointment booking. The practice can schedule internal timeblocks (e.g., staff meetings) without linking a patient and assign multiple providers, recurrence rules, and resources.
Feature will be deployed to customers in phases and completed by early December 2025.
Create Other Appointments
|
 |
|
 |
Platform General Improvements
- The character limit of the Credentials field in the provider user settings has increased from 8 to 20 characters.
Platform Resolved Issues
- Fixed an issue where some patients did not receive SMS messages sent by the practice
Practice Growth
Practice Growth Resolved Issues
- Fixed an issue where users experience a continuous loading icon attempting to access the location tab