Updated: 03/27/2026 | Views: 10687
Tebra Payments and Patient Collect (Stripe) activated practices with Patient Portal have the option to send Email Balance Reminders and/or Text Balance Reminders to accelerate patient collections and drive online payments. Text Balance Reminders can be sent to patients who have a valid mobile phone number on file. After balance reminders are sent, review the Patient Statements Delivery Report as part of the monthly closing activities.
Send Text Balance Reminder
Text Balance Reminders are sent to patients within an hour so it is important to only send them during normal business hours (ideally between 8:00 AM and 3:00 PM). In compliance with relevant consumer laws, the text method is not available before 8:00 AM and after 9:00 PM for all time zones.
Note: Text Balance Reminders are not sent to patients that have opted out.
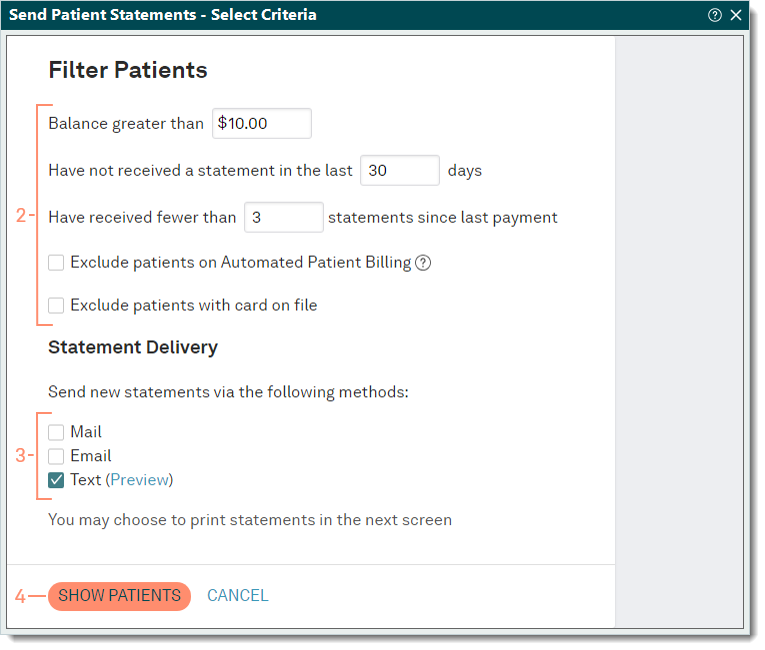
- After preparing patient statements, click Send Statements at the bottom of the Find Claim window. The Send Patient Statements - Select Criteria window opens.
- To navigate from the Practice Home window, click Encounters > Send Patient Statements.
|
 |
- Filter Patients: Enter the appropriate criteria to filter the patients.
Note: The criteria auto-populates with the default batch options set in the Patient Statement Options. The number of days from receiving a statement applies if no new balance has transferred to the patient's responsibility.
- Automated Patient Billing enabled customers: To exclude all patients scheduled to receive automated statements, click to select "Exclude patients on Automated Patient Billing".
- To exclude patients with payment cards on file, click to select "Exclude patients with card on file".
- Statement Delivery: Click to select the "Text" method.
Note: In compliance with relevant consumer laws and to also reduce patient opt-outs, this method is not available before 8:00 AM and after 9:00 PM for all time zones.
- To view a sample text message, click Preview.
Note: The text message includes the Practice Name unless a Custom Practice Name was entered in the Patient Statement Options. If a Custom Practice Name was entered, it cannot exceed 50 characters in order for the text to be sent. The recommended length is not to exceed 30 characters.
- Click SHOW PATIENTS. The Send Patient Statements - Confirm Patient List window opens.
|
 |
- Review the patient list and information.
- If applicable, click to clear the checkbox on the left of the patient ID number to exclude the patient from receiving a statement.
- To view the mobile phone number on file, click the patient name to open the Patient record then select the General tab. Close the window to return to the patient list.
- Click Send Patient Statements. A confirmation pop-up appears.
- Click Yes to confirm. The Text Balance Reminders are sent and the Patient Statements Sent window opens.
|
 |
- Select whether or not to mark the patient statements as sent.
- "Yes": Selected by default and updates the status of the claim(s) to Pending patient.
- "No": Click to select "No" if the status of the claim(s) should remain as Ready to send statements.
- Click Finish.
|

|
Patient Experience
Patients receive the text message on their mobile device within an hour of the Text Balance Reminders being sent so they can securely make a payment or access the Patient Portal (if activated) and view the details of their statement.
Note: Text Balance Reminders include the billing phone number configured in the Patient Statement Options as applicable.
Patients can reply to the text message:
- With STOP to opt out of receiving Text Balance Reminders and START or UNSTOP to the same message to opt into receiving them again. If the patient did not save the message, they can provide another mobile number or opt into receiving Email Balance Reminders.
- With other inquires but will receive the following system message: Sorry, we don’t recognize this response. Please reach out to your health services provider with any questions. This message is not customizable and these types of patient responses are not tracked.
Make a Payment
- The patient taps the link provided in the text message. The Make a Payment screen opens.
Note: For security purposes, the link expires after 30 days or after the fifth use (each time the Make a Payment screen is loaded or refreshed). Should the link expire, the patient will need to contact the practice and request a new text balance reminder be sent to them.
|
 |
Make a Payment (Tebra Payments)
- The patient chooses the payment amount to pay in Step 1 of the Make a Payment screen.
Note: Patients that have Patient Portal activated can tap I want to see my statement before I pay to access the Patient Portal and view their statement. Patients that do not have Patient Portal activated will not see this option and need to contact the practice to request their statement.
- "Pay full Amount": The patient taps to select and pays the total amount owed.
- "Pay other amount": The patient taps to select and then enters a different payment amount to pay.
- The patient taps Next. Step 2 of the Make a Payment screen opens.
- The patient enters the Card Number, Expiration Date, and CVV code.
Note: If any of the card information needs to be corrected after it was entered, all card information fields will automatically clear for security purposes.
- The patient taps Process Transaction to charge the card. The Payment Successful screen opens with Payment Receipt information.
Once processed, the payment shows as an unapplied payment under the Online tab of the Find Payment window in the Desktop Application (PM).
|
 |
Make a Payment (Stripe)
- The patient taps to select the payment amount to pay.
Note: Patients that have Patient Portal activated can tap I want to see my statement before I pay to access the Patient Portal and view their statement. Patients that do not have Patient Portal activated will not see this option and need to contact the practice to request their statement.
- "Pay full Amount": The patient taps to select and pays the total amount owed.
- "Pay other amount": The patient taps to select and then enters a different payment amount to pay.
- The patient enters the credit card information.
- If the patient has Apple Pay, Google Pay, or Microsoft Pay set up, the Choose payment method section displays an icon for selection to process the payment.
- If the patient has Patient Portal activated with a saved card on file and is currently signed in, they can choose to use the saved card or to Use a new credit card.
- If the patient chooses to Use a new credit card, the option to save the card on file becomes available and is selected by default.
- The patient taps Submit Payment. The Payment Successful screen opens with Payment Receipt information.
Once submitted, the payment shows as an unapplied payment under the Online tab of the Find Payment window in the Desktop Application (PM).
|
 |
View Statement
Patients that have Patient Portal activated can view their statement.
- The patient taps the link provided in the text message. The Make a Payment screen opens.
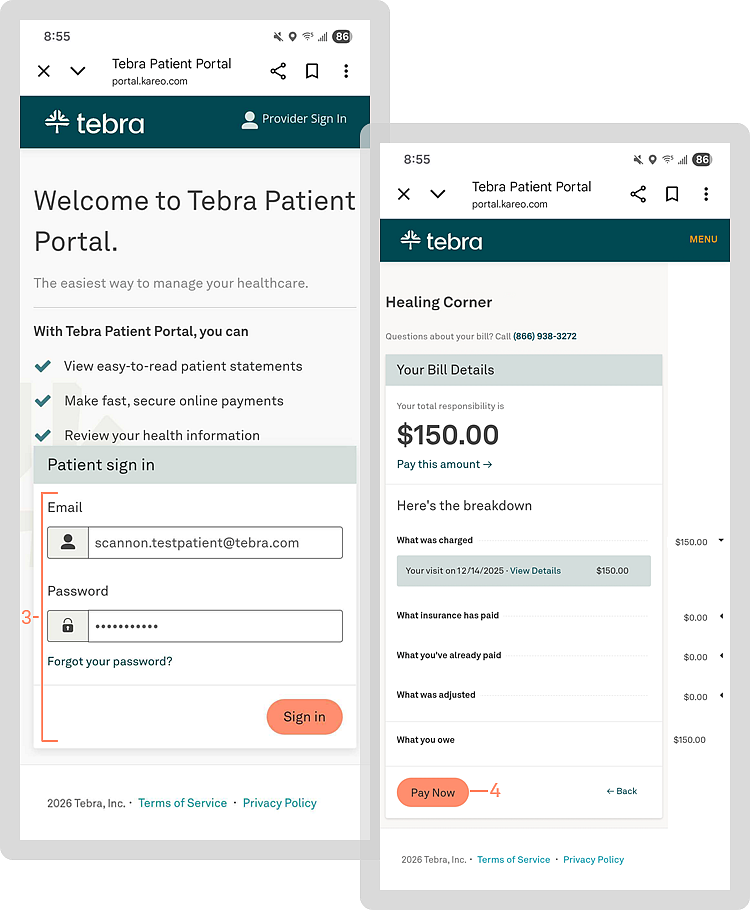
- The patient taps I want to see my statement before I pay. The Patient Portal sign in screen opens.
- The patient enters their credentials then taps Sign in. The Your Bill Details page opens for them to review the information.
- The patient taps Pay Now to make a payment. The Make a Payment screen opens.
|
 |