Release Notes August 2024
On August 22, 2024, your Tebra account will be upgraded to the latest version.
Billing |
Billing General Improvements
- The claim level adjustment code sets, Claims Adjustment Reason Code (CARC) and Remittance Advice Remark Code (RARC), were updated.
Billing Resolved Issues
- Fixed an issue where users received an error message when attempting to export the A/R Aging report as a PDF
Clinical
Enhancement: New Decision Support Interventions
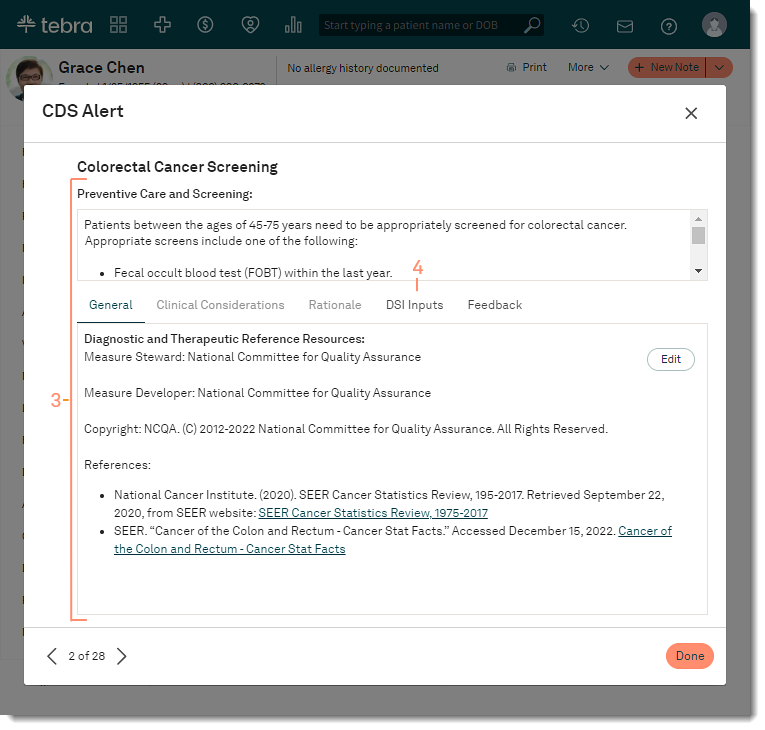
Tebra now offers two new evidence-based Decision Support Interventions (DSI). In addition to the new DSI, providers can review the DSI Input details on the intervention to see which attributes triggered the specific DSI and provide feedback on individual DSIs.
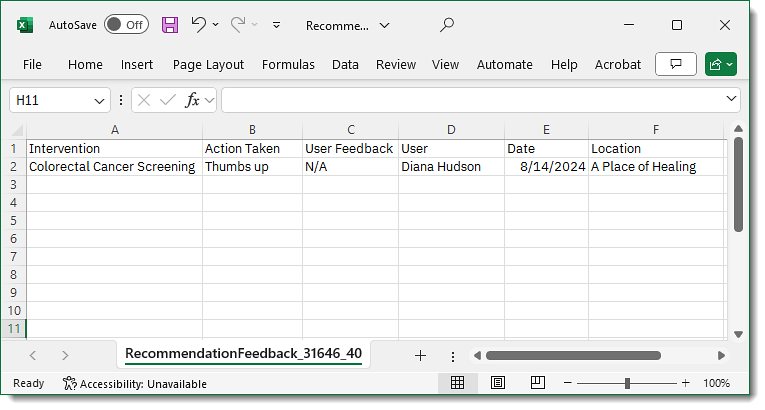
System Administrators can define which user roles has access to the new DSI and export the practice's CDS Feedback to review whether certain DSIs are helpful or not.
New DSI:
- Implantable Devices: Complications with Cardiac Implantable Electronic Device (CIED)
- Procedure: Preventive Care and Screening: Colorectal Cancer Screening
| Configure Clinical Decision Support System Administrators can define which user roles has access to the new DSI.
|
 |
| View DSI The DSI displays on the patient's facesheet when the patient meets the following criteria:
|
 |
|
 |
| Export CDS Feedback System Administrators can export the practice's CDS Feedback to review whether certain DSIs are helpful or not.
|
 |
|
 |
Clinical General Improvements
- The Notes AutoSave feature has been enhanced to increase the frequency of automatic saves, reducing the risk of documentation loss. The note will now automatically save after:
- 30 seconds of inactivity (if a change is made)
- A text shortcut is used
- A template is used (click menu items)
- Clicking anywhere outside of note section (e.g., CC, Subjective) being documented
Clinical Resolved Issues
- Fixed an issue where the diagnosis code for Binge-Eating Disorder (F50.81) in the DSM-5 Feeding and Eating Disorder template is incorrectly listed as F50.8
- Fixed an issue where users received an error message when attempting to print a clinical note with special characters in the body of the note or the addendum
- Fixed an issue where the lab order status did not update when marked as Mark Ready for Review
- Fixed an issue where users on some versions of Chrome was unable to access the Templates or Drug Favorites page from My Settings
- Fixed an issue where users intermittently received an error message when attempting to create a new lab order
- Fixed an issue where users were unable to add the Meningococcal (Penbraya) vaccine to the patient's immunizations
- Fixed an issue where a comma was incorrectly displayed before a lab test name on the Lab/Studies page
Engage
Engage Resolved Issues
- Fixed an issue where recall message sent by the practice was not delivered to patients
Platform
Multiple Time Zone
Tebra enhances multiple time zone and telehealth practice management by introducing time zone settings for clearer scheduling and appointment reminders, ensuring alignment of patient expectations and streamlining the scheduling flow for an improved patient experience. Enable multiple timezone support to set a specific timezone for a service location and send appointment reminders based on the service location's time zone.
Note: The calendar will continue to display appointments based on the default practice time zone in Calendar Settings. Appointment reminders sent to patients will display the time/date based on the appointment's service location time zone.
Enable Multiple Time Zone
|
 |
| Set Location Time Zone
Set a different location time zone for every applicable service location. If a Location Timezone is not set for the service location, the time zone will default to the practice time zone set in Calendar Settings.
|
 |
Message Center Enhancements
Tebra’s Message Center layout has been redesigned and expanded to streamline communication by enhancing usability and clarity. The feature updates allow healthcare providers and staff to quickly identify, read, and respond to messages, significantly improving their efficiency and patient interaction quality.
| Messages Preview Enhancements includes:
|
 |
| Message Center Enhancements includes:
|
 |
Platform Resolved Issues
- Fixed an issue where users with did not receive a 2FA code for authentication
- Fixed an issue where user accounts were locked due to 2FA codes expiring before the code can be validated
- Fixed an issue where users received and error message when attempting to upload a profile photo to the provider profile
- Fixed an issue where the patient's name displayed as NULL in the message center
- Fixed an issue where users were unable to access their Sent folder in the message center
Telehealth
Telehealth Visit Meeting Diagnostics
A meeting diagnostics is now available during the telehealth visit to detect video, audio, and network issues. This feature allows participants/providers to detect issues and displays actionable tips for a smoother visit.
Example Network Connection
|
 |
Breakout Group Settings
The new Breakout Group Settings allow providers more control to improve the experience for participants joining breakout sessions.
Note: Saved changes to the breakout settings only applies to the current telehealth visit.
Access Breakout Settings
|
 |
Telehealth Visit File Sharing
A HIPAA compliant file sharing feature is now available in the teleheath visit chat. With this enhancement, all participants in the visit can exchange media files (e.g., images, documents, audio, video) up to 15 MB. These files will be available for download throughout the visit, making it easier to collaborate and share resources in real-time.
All files are encrypted and securely stored for the duration of the visit. Once the visit ends, files are automatically deleted permanently from the system within 1 minute from the end of the session. For maximum privacy, files cannot be recovered once the visit has ended.
Max file size is 15mb and supports these file formats:
- Images: JPEG, PNG, GIF, WEBP
- Documents: PDF, DOCX, TXT, RTF, CSV, XLSX
- Audio: MP3, WAV
- Video: MP4, MOV, MKV, WEBM
![]() Important Notes:
Important Notes:
- All participants in the telehealth visit can view and download shared files.
- If a participant joins the telehealth visit after files are shared, they cannot view or download the files.
Share File
|
 |
