Updated: 01/28/2026 | Views: 13330
Schedule patient and/or non-patient appointments to manage and organize the practice’s daily agenda. To learn how to find, view, and edit an existing appointment, review Find, View, Edit Appointment.
For scheduling appointments in the web platform, review New Patient Appointment and Create Other Appointment.
New Appointment
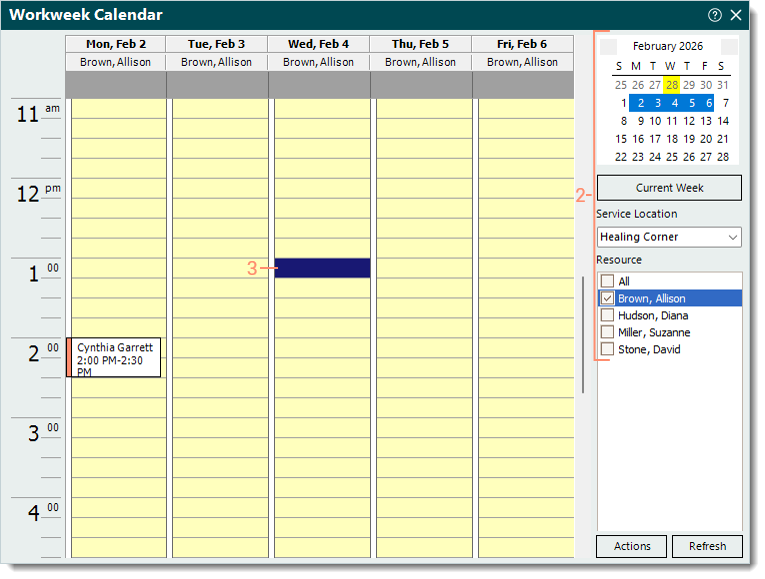
- Navigate to a calendar view (e.g., Daily, Workweek, or Weekly). The Calendar window opens.
- Make the appropriate selections for the new appointment.
- Date Picker Calendar: If necessary, use the date picker calendar to select the date for the appointment.
- Service Location: Click the drop-down arrow and select the service location for the appointment.
- Resource: Click to select the provider or other scheduling resource for the appointment.
- Double click on the time slot for the new appointment. The Appointment Details window opens.
|
 |
New Patient Appointment
- Select the type of appointment, patient, and service location.
- Type: Defaults to Patient Appointment as the type of appointment.
- Patient: Click Patient to search and select the patient.
- If the patient is not listed, click New at the bottom of the Find Patient window and create the new patient before continuing.
- Location: Auto-populates with the service location previously selected in the Calendar view. If necessary, click the drop-down arrow to select the service location for the appointment.
- Add the appointment reasons and resources.
- Reasons: Click the drop-down arrow to select the appointment reason then click Add. The reason is listed. Repeat as necessary to add more reasons.
- To set the primary reason if multiple reasons are added, right click on the primary reason and select Set as Primary.
- To remove a reason from the list, right click on the reason and select Delete.
- Resources: The provider (or other scheduling resource) previously selected in the Calendar view is automatically added. If necessary, click the drop-down arrow to select a the resource then click Add. The resource is listed. Repeat as necessary to add more resources.
- To remove a resource from the list, right click on the reason and select Delete.
|
 |
- Confirmation Status: Defaults to Scheduled. If applicable, click the drop-down arrow to select a different appointment status.
- Enter the insurance information.
- Case: Auto-populates if there is only one case associated with the Patient record. If there are multiple cases associated with the Patient record, click Case to select the case for the appointment.
- If the case is not listed, click New at the bottom of the Select Case window and create the new case.
- Authorization: If applicable, click Authorization to select the authorization for the appointment.
- If the authorization is not listed, click New at the bottom of the Select Authorization for Appointment window and create the new authorization.
- Enter the Date/Time information.
- Start and End times: Auto-populates based on the date/time slot previously selected in the Calendar view and the appointment reason(s). Verify the date/time is correct. Adjust or use the Recalculate button as necessary.
- For a recurring appointment, click Recurrence. The Recurrence tab opens then enter the Start and End times, Recurrence Pattern, and Range of Recurrence. When finished, select the General tab to return to the previous information.
- Notes: Enter any notes related to the appointment. Once saved, a note icon will display on the appointment in the Calendar view.
- When finished, click Save.
Note: Once the appointment is saved, the Documents tab and Tasks tab becomes available. Open the appointment to attach documents and/or add tasks related to the appointment.
|
 |
New Other Appointment
- Enter the General tab information of the Appointment Details.
- Type: Defaults to Patient Appointment. Click to select Other Appointment.
- Subject: The subject that will display on the appointment in the Calendar view.
- Location: Click the drop-down arrow to select the service location for the appointment.
- Under the Resources section, add the appointment resource(s). Click the drop-down arrow to select a provider or other scheduling resource then click Add. The resource is listed. Repeat as necessary to add more resources.
- To remove a resource from the list, right click on the reason and select Delete.
|
 |
- Confirmation Status: Defaults to Scheduled. If applicable, click the drop-down arrow to select a different appointment status.
- Enter the Date/Time information.
- Start and End times: Auto-populates based on the date/time slot previously selected in the Calendar view. Verify the date/time is correct and adjust if necessary.
- If the appointment is an all day event, click to select "All day event" and verify the correct date is selected.
- For a recurring appointment, click Recurrence. The Recurrence tab opens then enter the Start and End times, Recurrence Pattern, and Range of Recurrence. When finished, select the General tab to return to the previous information.
- Notes: Enter any notes related to the appointment. Once saved, a note icon will display on the appointment in the Calendar view.
- When finished, click Save.
Note: Once the appointment is saved, the Documents tab and Tasks tab becomes available. Open the appointment to attach documents and/or add tasks related to the appointment.
|
 |